Friday, December 31, 2010

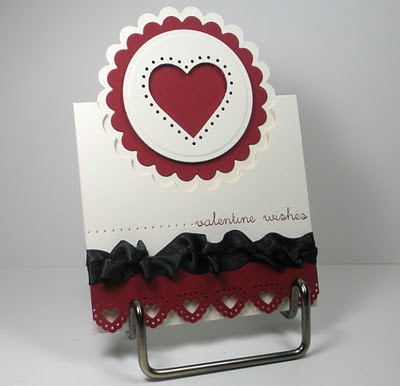
Pop Up Tent Card


Supplies: Stamps: Savvy Paper: Ivory, cherry cobbler Ink: cherry cobbler Accessories: Nestabilities: scalloped and plain circles, paper piercer, Martha studded heart and border punch, satin black ribbon, dimensionals.

I don't know if there is a name for this type of card. I was thinking it would be Pop Up Tent Card? I was looking for a tutorial because I know I have seen one somewhere! Well after searching and searching, I decided to make another card and make a picture tutorial for you. If you have any questions please feel free to email me!


Start out by cutting your cardstock to 3.75x6.5. You can make your base any size you want as long as it fits in your envelope. Next, lightly draw a line at 3.5 inches. This isn’t the center because I will be adding a border punch at the bottom to make up the difference. If you do not want to add a border at the bottom, make the base longer and draw a line in the middle.


Next select the nestabilities die that you would like to pop up. This will be the largest of the frame. So if you have a focal image selected already, make sure that your image and any desired layers will fit inside this shape.
Place the A plate, B plate, paper, die facing down *lining up the center of the die with the line you drew*, C plate *the C plate should only cover the half of the die that you want cut*. The placement of the C plate is essential for the success of this card. I placed it on the shorter side of my card, lining it up with the edge of the C plate with the line previously drawn. If your sides are equal you can choose either side. In either situation you are only covering half of your die cut with the C plate so it only cuts half of the die cut.
You’ll notice in my picture that my C plate is off to the right, this placement allowed me to have more control when running it through the cuttlebug. When I ran it through the other way I had a hard time getting it to catch to run through the cuttlebug. It also didn’t leave any unwanted marks on the paper that sometimes happens when using only part of the cutting plates.


You can see that only half of the die cut was cut, and now it is time to add some score lines so you can fold the card. With the longer side of the card base on the left, line up the card base on the edge of the score-pal. Score the card edges at the 3.5 inch mark on the score-pal. If you chose a different card size simply score it in the middle.
This is what your card will look like when it is folded. Time to embellish!


I added a scalloped circle in cherry cobbler. I punched out Martha’s studded heart punch and then cut out and embossed it using a circle nestabilities die. I popped it up on the red scalloped circle using dimensionals. I added a heart border at the bottom, added a scrunchy ribbon, stamped the sentiment, and added some piercing.


When I opened the card this is what it looked like. To make it look more polished and to hide my ribbon ends, I punched out another border lined it up with the front, and attached it.


Now it looks like this!


I hope you enjoyed this tutorial.

Have a great day!

Thursday, December 30, 2010

CAS Thank You


Supplies: Stamps: Just Believe, Ink: Black and Cherry Cobbler, Paper: kraft, very vanilla, and cherry cobbler Accessories: Ribbon Victoria, su border punch, dimensionals


So I received an email the other day regarding a contest for new demonstrators. The contest is to create a card using only supplies from your starter kit! I love challenges and contests so I created this card. I stamped the frame on kraft in black ink. Then I stamped the sentiment in cherry cobbler, cut it out, and popped it up over the frame. At the top I edged it with the border punch, added some score lines, and added some ribbon. Lastly, I rounded the corners at the base.
That’s all for now, we’ll see if I am selected there are quite a few entries….

Tuesday, December 28, 2010

Marvelous Mocha Mix

Paper: red and white cardstock, Accessories: su scallop circle and snowflake punch, circle punch, gem, grograin ribbon, twine

I gave these jars of Marvelous Mocha Mix to the coffee drinkers at work. I’m not sure where the recipe came from, probably a Taste of Home magazine or cookbook. I also found the cute lids for the mason jars at Walmart. Here is the recipe:

Marvelous Mocha Mix:
1 c. Nestle chocolate milk mix
1 c. powdered nondairy creamer
2/3 c. instant coffee granules
½ c. sugar
½ tsp. cinnamon
¼ teaspoon nutmeg
Combine all ingredients; mix well. Store in an airtight container. To make 1 serving: Add 4-6 tsp. mix to ¾ c. boiling water, and stir until dissolved.
Makes 3 c. mix.

Have a great day!


Monday, December 27, 2010

Ghirardelli Chocolate Holder

Supplies: Stamps: Papertrey mixed messages, Ink: versamagic red brick, Paper: Imaginisce, mauve, and white cardstock, Accessories: 1 1/4 inches scallop circle punch, 1 and 7/8 inch circle punches, su border punch, modern label punch, white grosgrain ribbon
These Ghirardelli holders hold one Ghirardelli chocolate square. The directions can be found here: Ghirardell Square Holder. I put the sentiment on the left on some and on the right on some, depending on the open space of the patterned paper. These are cute, quick, and easy! Give 'em a try!
Thanks for stopping by!

Sunday, December 26, 2010

Ghirardelli Box

Supplies: Stamps: Papertrey Mixed Messages, Paper: Deep Mostly Mauve colormates, imaginisce Snowy Jo, white, Ink: versamagic red brick, Accessories: Scallop circle punch 1 1/4, circle punches 1 inches and 7/8 inch, su border punch

I hope everyone had a wonderful Christmas, ours was nice. I have a few projects to share that I made for my coworkers. The first is a box of Ghirardelli chocolates. Here is a video tutorial that I followed from Splitcoast Stampers. The boxes fit 3 of the Ghirardelli chocolates. Stay tuned over the next few days I have two more projects to share.

Have a great day!

Friday, December 24, 2010

CAS Snowflake #4


Supplies: Stamps: Endless Creations, Ink: Pear Pizazz, Early Espresso, Cherry Cobbler, Paper: GKD white, Archiver's brown, Accessories: wrights ribbon, score buddy, cuttlebug winter embossing borders, ek success snowflake border punch

Well here it is the last of the series. I added the snowflake border punch in place of the embossed snowflakes. I like the extra touch of red it adds. It is already Christmas Eve, I hope everyone has a wonderful Christmas! I will be posting some small gifts that I made for my coworkers soon.
Thanks for stopping by!


Thursday, December 23, 2010

CAS Snowflake #3


Supplies: Stamps: Endless Creations, Ink: Pear Pizazz, Early Espresso, Cherry Cobbler, Paper: GKD white, Archiver's brown, Accessories: wrights ribbon, score buddy, cuttlebug winter embossing borders

Well here is number 3! It is not much different than number 2. I added my score lines around the ribbon instead of the embossing border. I'm exhausted, I took my 4K class sledding today!! It was a fun way to spend our last day of school before break, but wow, I'm ready for bed! Check back tomorrow for the last of the 4 cards. I dug out a super cute border punch to add to the last card!

Have a great day!