Showing posts with label sizzix. Show all posts

Sunday, August 9, 2026

Happy Birthday


Supplies:
Stamps: Market Street Stamps: Daily Grind, Stampin' Up Like It A Latte
Ink: Stampin' Up Poppy Parade
Paper: Gina K White and Kraft, Stampin' Up Poppy Parade
Accessories: Stampin' Up Baker's Twine Essentials Pack, Softly Woven Embossing Folder, Stitched Circle Dies, Sizzix Alterations by Tim Holtz, Spellbinders Layered Happy Birthday, Waffle Flower Nesting Circle Dies

Hello Stampers!  It is Featured Stamper Sunday over at Splitcoaststampers.  Here is the card that I CASED (the bottom right card):
For my card I used an embossing folder for the focal panel in place of the dsp.  I matted this panel with poppy parade.  For the card base I embossed it with the softly woven embossing folder.  I used a die cut sentiment in place of a stamped sentiment.  For the background of the sentiment I ran that through the same embossing folder as the card base, and then adhered the sentiment on top.  Behind the sentiment I twisted some white baker's twine.  I thought it needed just a little something so I stamped and fussy cut out the coffee and nestled it into the sentiment. I popped up both the sentiment and the coffee.  For the inside I duplicated the same layout.  I stamped, die cut, and matted the sentiment.  And then added the same coffee as the front.  

Thanks so much for stopping by!
Terri


Monday, January 11, 2021

Die Cut Heart Card

Supplies: Paper: Gina K white Accessories: Offray white ribbon, Simon Says Stamp: Detail Floral Heart and Detail Petal Plate, Sizzix card scallop circle insert

Hello Stampers!  The Clean and Simple challenge on Splitcoast Stampers was to CASE yourself!  I chose to CASE this card:

For the embossing I die cut the detail petal plate, I used the same ribbon and scalloped circle, and I changed the butterfly to a heart that I popped up.  It was really hard to get a good picture of the card with the detail at the bottom.  Well that's all for now, I better go make dinner!

Thanks for stopping by!

Terri


Sunday, September 20, 2020

Reindeer Greetings

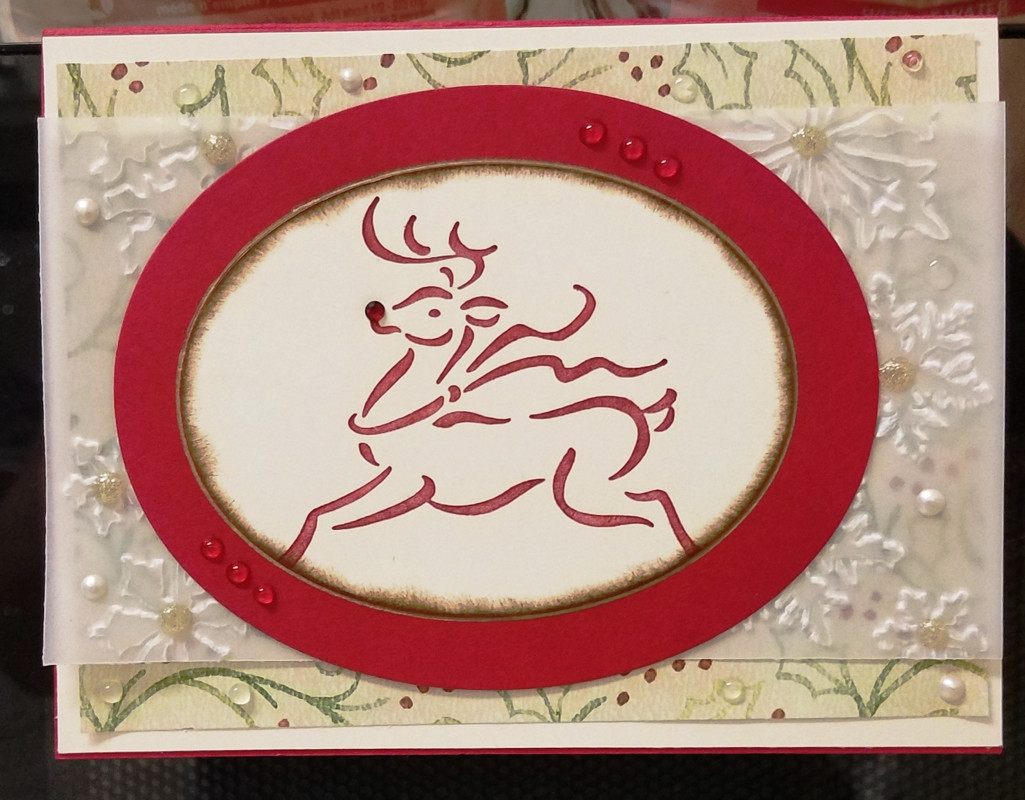
Supplies:  Stamps: SU Christmas Punch. Paper: SU early espresso, cherry cobbler, crumb cake, and very vanilla. Ink: SU early espresso. Accessories:  Hero Arts oval infinity dies, Sizzix reindeer embossing folder, SU wide oval punch, SU stampin write markers cherry cobbler and early espresso, red metallic gem, dimensionals, Sizzix snowflake embossing folder, sponge

Happy Sunday everyone!  It is the Featured Stamper Challenge on Splitcoast Stampers.  The featured stamper is Patti and this is the card I chose from her gallery to CASE.

For my card I die cut an oval and then embossed the reindeer.  I used a sponge to add some early espresso ink to define the reindeer, and added a metallic red gem for the nose.  Next I cut out a cherry cobbler oval to mat the reindeer. Then I embossed the card base with a snowflake embossing folder.  After this I adhered the reindeer to the card base.  Lastly I inked up the sentiment with markers and stamped it onto very vanilla paper, punched it out with the wide oval punch, and adhered it to the card with dimensionals.  

That's all for now!  Thanks for stopping by!!

Terri
 

Sunday, April 26, 2020

Rainbow Birthday

Supplies: Paper: Tim Holtz watercolor paper and Gina K heavy base weight white  Accessories: Sizzix Phrase Happy Birthday to You, SU rectangle stitched framelits dies, Kuretake watercolors

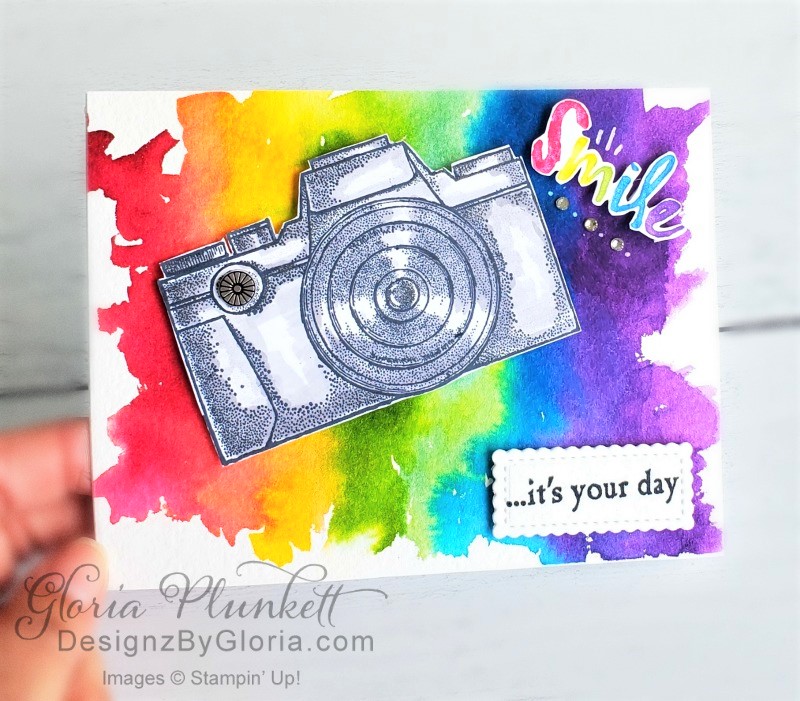
It's Sunday, time for the Featured Stamper challenge on Splitcoast Stampers.  The featured stamper this week is Gloria, she has a very fun gallery!  I selected this card as inspiration for my card:
I really liked the bright rainbow background that she created.  I definitely stepped out of my comfort zone with this one.  Watercolor is not my forte.  But I had fun with it.  I started by making the rainbow background, and adhering it to my card base.  Then I cut a smaller piece of watercolor paper as big as my die cut, and watercolored another rainbow background.   When this was dry I die cut the Happy Birthday phrase out of it.  Next I die cut the stitched rectangle and adhered my focal phrase to it.  I added some dimensionals to the back of the rectangle and adhered it to my card.  That's all for now!

Thanks so much for stopping by!

Terri

Wednesday, October 29, 2014

Happy "Whoo"llaween!

Supplies: Stamps: Warmest of Wishes  Ink: Memento Luxe tuxedo black, early espresso, Memento cantelope  Paper: grey, daffodil delight, white, early espresso  Accessories: Tim Holtz tree die cut, owl punch, 2 inch circle punch, sponges
 
I love punches and die cuts, and when I actually use them I love them even more!  I sponged the moon and tree with ink to add some texture to the die cuts.  I colored in the treat bag and beak on the owl.  Easy peesy for this card.  Thanks for looking!
 
Terri

Monday, April 7, 2014

Make a Wish

Supplies: Paper: white and strawberry  Accessories: scallop border punch, MFT pennant die cut, Sizzix birthday embossing folder, copic markers. ZIG wink of stella clear
 
Hello Stampers!  This weeks CAS challenge on SCS is to use dry embossing.  I die cut the pennant and then embossed the make a wish greeting.  I colored the embossed image with copic markers and added glitter to the star and candle of the focal image.  To complete the card I added a scalloped border trim to the top of the card.  Thanks for stopping by and have a great week!
Terri

Tuesday, August 13, 2013

Snowy Button Wishes

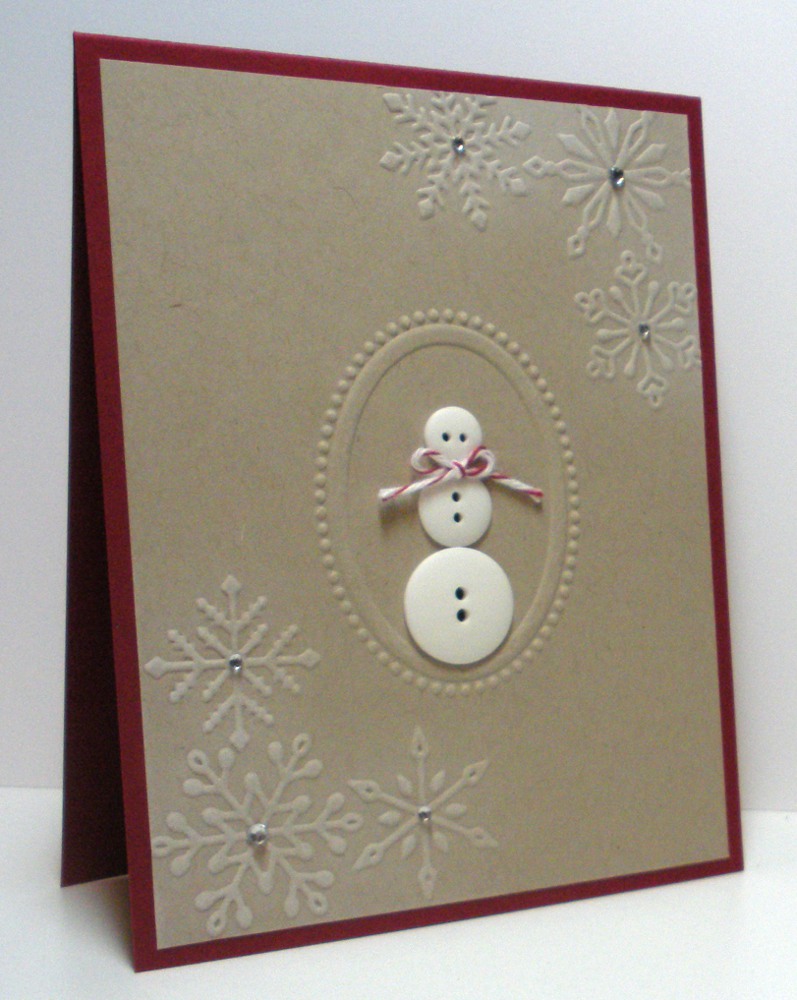
Supplies: Paper: crumb cake and cherry cobbler cardstock  Ink: craft white Accessories: Sizzix embossing folder, Stampin Up oval embossing folder, buttons, cherry cobbler twine, gems, sponge, black copic marker

The challenge on CAS-ual Fridays is to use buttons.  My Mom saw this pin on Pinterest and shared it with me.  That is where I got inspiration for this card.  For the embossing I created a cardboard shim with a large oval cut out in the middle.  This allowed me to emboss both with both folders successfully.  I sponged white ink on the snowflakes and added a gem to the center of them.  I colored behind my buttons with a black marker to make them look like the coal buttons and eyes of the snowman.

Thanks for stopping by!

Terri
Thursday, August 8, 2013

Day 3 Dare to Get Dirty

Supplies: Stamps: Hero Arts  Ink: white craft  Paper: black and white cardstock  Accessories: Spellbinders, sponge, twine

This is my first attempt at the chalkboard technique.  I had a hard time wanting to make a dusty chalkboard, so mine is pretty clean! :)

Supplies: Stamps: Gina K  Ink: Memento tuxedo black  Paper: 6x6 paper pad, Sizzix die cut, Tim Holtz tinsel twine, red gem

I think these trees are so cute, had to make one.  I trimmed the bottom so it was more even of a circle at the bottom.
Supplies: Stamps: Gina K, Autumn Leaves  Ink: VersaMark, Memento tuxedo black  Paper: black cardstock, glossy cardstock, white cardstock  Accessories: black fine detail embossing powder, scallop oval punch, oval punch, Tim Holtz alcohol inks

I remember the first time I did this polished stone technique it was at a scrapbook store I worked at.  We had so much fun creating various backgrounds.  Fun times!  I still had fun with it on this one, what I like about it is you never get the same look twice.

Supplies: Stamps: Stampin Up  Ink: Memento tuxedo black, Martha Stewart stack of pigment inks for the pumpkin  Paper: white and purple cardstock  Accessories: birch tree stencil, purple twine

I have never made a card with a stencil.  First I tried spritzing my color on...unsuccessful.  So I used a sponge dauber and that worked better for this particular stencil.  I think it looks really spooky.

Supplies: Silhouette cut file and cardstock
 
Isn't this cute?!  I used a crimper to finish off the edge at the top.
 
Supplies: Stamps: Hero Arts  Paper: Papercut whip cream and Chatterbox  Ink: Versamagic dew drops  Hero Arts die cut (came with the stamp set), American Crafts ribbon, corner rounder

I was so sure on this layout, but it is growing on me.  I like that it a way to incorporate patterned paper into a clean and simple card.  I have so much patterned paper to use, so I will use this layout again.

That's all for Day 3!

Thanks for stopping by!

Terri

Wednesday, April 3, 2013

Pierced Butterfly

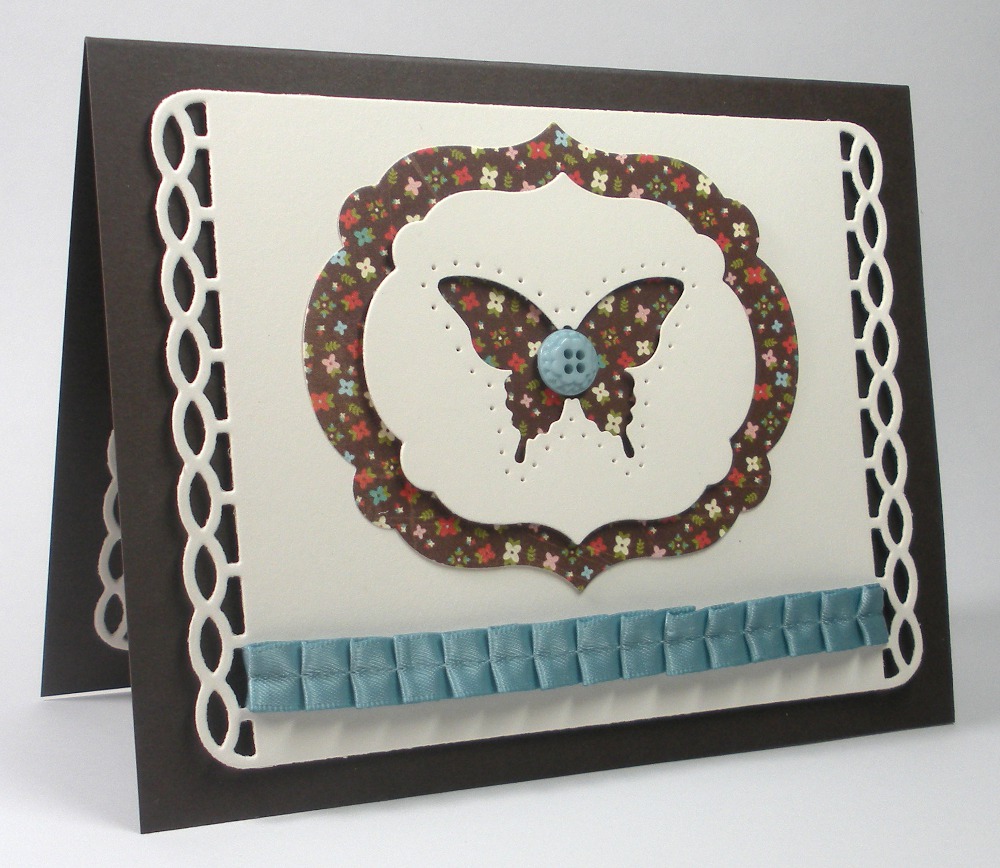
Supplies: Paper: early espresso, ivory, Basic Grey Hey Girl!, Accessories: Sizzix die cut, SU ribbon, button, framelits, piercing guide, dimensionals.
 
More butterflies!  I love the new piercing tool/template from Stampin Up!  It made piercing around the butterfly a breeze!  I popped up both ivory pieces for dimension.  Thanks for stopping by! 
 
Terri

Tuesday, July 5, 2011

Oh What Fun!


 Wow, what a fun day yesterday was with all of the CAS challenges for the Fourth of July.  I hope everyone had a fantastic holiday, it was a hot and sunny day here!  We enjoyed our new patio!  We were grillin' and chillin' yesterday!  We deserve it after all of that work! :) I lifted every single one of those 130 blocks...more than once!  It was a long day, but it is so wonderful!  We expanded quite a bit and now we can actually fit enough lawn chairs for visitors! :)  And soon we will be getting a gas grill which will sit next to the door to the garage. 
 On to the cards...

Supplies: Stamps: Lockhart and Stampendous  Paper: red white and blue cardstock  Ink: tuxedo black  Accessories: corner rounder, swiss dots cuttlebug folder, martha stewart ribbon, small gem, crystal effects, nestabilities, copic markers, dimensionals.

I will be sharing my cards that I made for the challenges throughout the week.  I ended up making 12 cards in one day?!  What a mess I had (I just finished cleaning up the mess today!)  This card was for an inspiration challenge, picture at the left.  Details that are hard to see in the picture are the tiny gem in the center of the star.  And I used crystal effects on the cherry.


Supplies: Stamps: Stampendous  Paper: not quite navy, real red, white  Ink: tuxedo black  Accessories: sizzix flag die cut, star gem, tiny red gems, white gel pen, smal star punch, twine, gingham ribbon.
This card was for the challenge flag fun.  You could chose any flag for inspiration.  I chose our flag as you can see, I think this is the first time I've used this die cut!  I knew I was saving it for a reason! :)  On the tag I colored in the stars with a white gel pen and then added tiny red gems in the center of each star.  I also colored my twine with a copic marker to get it to match my card. 

That's all for now!  You have a couple more days to play along with the challenges!  Remember you have the opportunity to become a CAS guest designer if you participate! :) 

Thanks for stopping by!


Monday, March 21, 2011

Birthday Wishes

Supplies: Stamps: Wings of Friendship and Sincere Salutations Ink: Pink Pirouette and Pear Pizzazz Paper: White Cardstock Accessories: Sizzix Birds and Wreath embossing folder, eclipse tape

We went to get our taxes done this weekend and there is a wonderful little scrapbook store close by. I had to stop. They always have tons of Cuttlebug, Sizzix, cool stamps, etc. I picked up the Birds and Wreath embossing folder set that I used on this card. I created a mask so I could stamp just on the inside of the embossed image. I used my stamp a ma jig for the placement and presto! The card was done. I love it when the embossing folder does all of the work! :) Thanks for stopping by!