Showing posts with label Gina K. Show all posts

Sunday, August 16, 2026

Happy Anniversary


 Supplies:
Stamps: Gina K Blooming Sunflower and Graceful Greetings, Stampin' Up Phrases and Frames
Ink: Memento Tuxedo Black
Paper: Gina K White, Simple Stories Vintage Autumn Breeze 6x8 Paper Pad, Stampin' Up Floral Delight 12x12 DSP
Accessories: Stampin' Up Greenery Die, Waffle Flower A2 Layers Dies, Gina K Graceful Greetings Dies and Blooming Sunflower Dies, Copic markers, Honey Bee Clear Gems

Hello Stampers!  It is Featured Stamper Sunday over at Splitcoaststampers.  Here is the card I CASED:

As soon as I saw this card I thought of the blooming sunflower image by Gina K.  I stamped, die cut, and colored in my image.  Then I picked out some patterned paper, and created the background like her card has.  After this I stamped and die cut the sentiment.  For the last component I decided to use the greenery background die on the front card base.  To finish it off I adhered it altogether, and added a couple of gems for some sparkle.  For the inside I stamped and die cut the sentiment and matted it with the same burlap dsp as the front.  I decided that it needed a bit more color so I added a strip of the patterned paper as well.
Thanks so much for stopping by!
Terri

Sunday, February 22, 2026

With Sympathy


Supplies:
Stamps: Stampin' Up Love & Sympathy and Flourishing Phrases, and Gina K Autumn Silhouettes
Ink: VersaFine Clair: Nocturne, Distress Inks: Spun Sugar, Spiced Marmalade, and Picked Raspberry, Gina K Dark Cranberry
Paper: Gina K White, Stampin' Up Basic Black
Accessories: Pickett Fence Blending Brushes, Honey Bee Gems

Hello Stampers!  I'm here to share a card I made for the Featured Stamper Challenge over at Splitcoaststampers.  Here is the card that I CASED:

For my card I started with the blended panel.  I used the same color scheme, but I ink blended my background instead of using patterned paper.  I also stamped a floral image instead of using a die cut.  I framed this panel in black like she did.  I adhered the panel to a white card base and stamped a sentiment in black.  For the inside I stamped an die cut a sentiment.

That's all for now!  Thanks for stopping by!
Terri

Sunday, February 1, 2026

Warm Winter Wishes


Supplies:
Stamps: Gina K Sweaters and Cocoa and Christmas Greenery
Paper: Gina K White and SU Secret Sea
Ink: SU Secret Sea
Accessories: SU Snowflake Kisses Dies, Honey Bee Gems

Hello Stampers!  It is Featured Stamper Sunday over at Splitcoaststampers.  Here is my inspiration card: 
For my card I started by cutting a panel 4x5.25 of secret sea cardstock.  Then I die cut the snowflakes from the snowflake kisses die on each corner.  Next I stamped the sentiment in secret sea ink and die cut it with the circle from snowflake kisses die.  I popped up the circle in the center of the card.  After this I adhered this layer to a white card base.  To finish the front I added some gems to the center of the snowflakes.  For the inside I stamped the sentiment in secret sea ink and die cut some snowflakes from secret sea cardstock and adhered them next to the sentiment.

Thanks so much for stopping by!!
Terri

Sunday, February 23, 2025

Snowflake Holiday Wishes


Supplies:
Stamps: Gina K: Snow Much Love, Stampin' Up Holly Berry Happiness
Ink: Distress Ink: Tumbled Glass and VersaMark
Paper: Gina K White, Simon Says Stamp Matte Silver Cardstock
Accessories: Gina K: Snow Much Love Dies, Graceful Snowflake Stencil, Honey Bee Gems, Silver Embossing Powder, Pickett Fence Blending Brush

Hello Stampers!  I'm back to share a card I made for the Freshly Made Sketches, Sketch of the Week.
For my card I ink blended the Graceful Snowflake Stencil with Tumbled Glass Distress Ink.  I tried to blend the snowflake darker in the center and lighter as I blended it out.  When I was done I added some sparkle.  For the sentiment I heat embossed it and die cut it out.  I adhered it to the focal panel and embellished it with a couple of gems as well.  I matted this layer with some matte silver cardstock, and adhered it to a white card base.  For the inside I cut a white panel and stenciled the top and heat embossed a sentiment.
That's all for now!  Thanks so much for stopping by!
Terri

Tuesday, January 21, 2025

Birthday Wishes


 Supplies:
Stamps: Gina K A Big Hello, Pretty Posy, and Julie Hickey Sweet Sentiments
Paper: Gina K White and Black Onyx
Ink: Memento Tuxedo Black, Distress Inks: Dusty Concord, Victorian Velvet, and Antique Linen
Accessories: Waffle Flowers A2 Layers and Additional Layers Dies, Honey Bee Gems, Pickett Fence Blending Brushes, Copic Markers

Hello Stampers!  School was canceled today due to the -35 degree wind chills!  So I made some chocolate chip cookies, and spent some time finishing a card I started yesterday.  I made my card for the Featured Stamper challenge over at Splitcoaststampers!  Here is my inspiration card:
For my card I started by ink blending the background with purpley colors.  Then I stamped my floral image in black, and my sentiment in black also.  After I adhered the layers together, I add a bit of bling to the floral image.  For the inside I stamped and die cut the sentiment, layered it in black, and fussy cut the butterfly and colored it with Copics.

That's all for now!  Thanks for stopping by!
Terri

Sunday, November 10, 2024

Quilted Sunflower Birthday


Supplies:
Stamps: Gina K: Enjoy the Sunshine
Gina K: Blooming Sunflower
Ink: Memento Tuxedo Black
Paper: Gina K White, SU Mossy Meadow, Bumblebee, Copper Clay, The Paper Company: Royal Purple
Accessories: 3/4 inch square punch, Copic markers, Honey Bee Gems, SU embossing folder


Hello Stampers!  I'm here to share a card that I made for the Featured Stamper challenge over at Splitcoaststampers.  Here is the card as inspiration:
I liked the quilted background on this card, so I created a quilted background using a 3/4 inch square punch.  I adhered the squares to a sheet of copy paper, and then ran in through my die cutting machine with an embossing folder.  Then I stamped, die cut, and colored in the sunflower image.  I popped it up in the center of the card.  For the sentiment I stamped, die cut, and adhered it to the card front.  To finish the card I added some gems and adhered the card front to the card base.  For the inside of the card I made a quilted strip and adhered it to the inside, then I stamped a sentiment.

That's all for now!  Thanks so much for stopping by!!
Terri

Sunday, November 3, 2024

Polka Dot Sunflower


 Supplies:
Stamps: Gina K Blooming Sunflower, Stampin' Up Sweetly Scripted
Paper: Gina K White, Stampin' Up Cajun Craze, Bumblebee, Pecan Pie, Iconic Celebrations 6x6 DSP
Ink: Memento Tuxedo Black
Accessories: Gina K Large and Small Oval Die Sets, Honey Bee Gems, Copic Markers, Dimensionals, SU Baker's Twine Essentials Pack, QuicKutz Sunflower Die

Hello stampers!  I'm here to share a card I made for the Featured Stamper Challenge over at Splitcoaststampers.  Here is my inspiration card:

For my card I stamped, colored, and die cut my sunflower for the focal image.  Then I die cut the ovals to mat the focal image.  For the background I cut a piece of DSP, and added some twine.  I then adhered this piece to the card base, and then adhered the oval piece to the card base as well.  For the inside I adhered a strip of DSP, added a sunflower die cut, and stamped my sentiment.  

That's all for now, thanks for stopping by!

Terri

Sunday, June 30, 2024

Geranium Birthday Wishes


 Supplies
Stamps: Gina K Enjoy the Sunshine and Spring Mix
Paper: Gina K White and SU Real Red
Ink: Memento Tuxedo Black
Accessories: SU Spotlight on Nature dies, Copic markers, Spellbinders Scalloped Circle Dies, Ribbon from Stash, Concord & 9th Basket Weave Card Front Die

Hello Stampers!  I'm late in posting today!!  It was so nice out and I spent the day cleaning up Bishop's Weed in my flower beds today.  Then I had to make dinner and do the dishes!  Then I was able to finish the card I started this morning.  This card is for the Featured Stamper Challenge over at Splitcoaststampers.  Here is the card that I CASED:


For my card I used a similar layout, but I changed the flowers to geraniums.  I colored and die cut the focal image, and then die cut a scalloped circle in red to mat the focal image.  Then I decided that I wanted to use a card front die instead of using patterned paper.  For the sentiment I stamped, die cut, and matted it in red to coordinate with the focal image.  I felt it was too big so I trimmed off the bottom of the sentiment.  I picked out some ribbon from my stash and adhered it to the white layer.  Then I adhered the sentiment and added a bow.  For the inside I kept it simple.  I stamped a sentiment and geraniums and colored them in.

That's all for now!  Thanks for stopping by!
Terri

Sunday, May 5, 2024

Happy Birthday


 Supplies:
Stamps: Gina K: Warm Spring Wishes and Vine and Butterfly, Simon Says Stamp: Happy Combos
Paper: Gina K white, Simon Says Stamp: Fog, and SU Basic Black
Ink: VersaFine Clair: Nocturne and Distress Ink: Seedless Preserves, Abandoned Coral, Wild Honey
Accessories: Honey Bee Gems, Gina K Masking Magic, Waffle Flower: A2 Layers Dies, Pickett Fence: Blending Brushes, Simon Says Stamp: Happy die

Hello Stampers!  I'm sharing a card I made for the Featured Stamper challenge over at Splitcoaststampers.  Today marks the 900th Featured Stamper challenge, and we were able to select a previous Featured Stamper for the challenge today.  I selected this card:

For my card I changed the orientation of the card.  I kept the same color cardstock, I liked how she used a grey card base with the white card panel.  I usually just to white on white, and this caught my eye.  I created a mask, and ink blended the background.  Then I spritzed on some water like she did.  Next I lined up the butterflies and sentiment in the Misti and stamped them.  For the happy I die cut it three times and adhered them together and then onto the card.  To finish I added some bling.  For the inside I lined up the butterflies and sentiment in the Misti and stamped it.  

That's all for now, thanks for stopping by!
Terri

Sunday, April 21, 2024

Birthday Wishes


Supplies:
Stamps: Gina K: Daisy Delight, Bitty Blossoms Mini, Wild Blossom
Paper: Gina K white and SU daffodil delight
Ink: Memento Tuxedo Black
Accessories: SU ribbon, Copic markers, Honey Bee Gems, A2 Waffle Flower Dies, SU Something Fancy Dies

Hello Stampers!  I am happy to report that updating Chrome and my computer fixed my Blogger problem from yesterday.  I was very relieved!  Today's card is for the Featured Stamper Challenge over at Splitcoaststampers.  Here is the card I chose to CASE:

For my card I started by masking off the bottom of the front panel with some post it tape.  Then I used my Misti to line up the daisies and sentiment on the front panel, and stamped them.  Next I colored in the daisies with Copic markers.  Then I adhered some gems around the daisies, and added a ribbon treatment at the bottom of the card.  To finish I adhered all of the layers together.  I kept the inside simple by stamping the sentiment and die cutting it with a layer of yellow.

That's all for now!  Thanks for stopping by!
Terri

Sunday, February 11, 2024

Silhouette Birthday


Supplies:
Stamps: SU Little Treats,  Gina K Autumn Silhouettes, Gina K Bitty Blossoms Mini
Ink: SU Pebbled Path, Distress Inks: Victorian Velvet, Antique Linen, and Lost Shadow
Paper: Paper Rose: Country Quilt 6x6, Gina K White, SU Pebbled Path
Accessories: Gina K large and small oval dies, SU wavy trim, brushed brass butterflies, Pickett Fences blending brushes

Hello Stampers!!  I am sharing a card that I made for the Featured Stamper challenge over at Splitcoaststampers.  Here is the card I CASED:
For my card I started by picking out some patterned paper.  Then I picked out some coordinating Distress Inks.  I ink blended a background, and die cut it into an oval.  Next I stamped the silhouette image.  I decided to use a dark brown instead of black.  I thought it would compliment the soft colors I chose.  I thought black would be too stark.  Next I cut the patterned paper, stamped a sentiment, and adhered it to the card base.  I used some wavy trim to polish up the edge of the patterned paper.  And to finish the front I added some butterflies to the focal image, matted it with pebbled path cardstock, and popped it up onto the card base.  For the inside I stamped and die cut the sentiment and added it to a strip of patterned paper.

That's all for now, thanks for stopping by!!
Terri

Sunday, December 17, 2023

Rainbow Birthday Wishes


Supplies: 
Stamps: Julie Hickey: Sweet Sentiments Stamp Set (inside)
Paper: Gina K white, Silver glitter cardstock, Bazzill Vellum, SU: real red, pumpkin pie, daffodil delight, gumball green, blueberry bushel
Ink: Memento Tuxedo Black, SU: real red, pumpkin pie, daffodil delight, gumball green, blueberry bushel
Accessories: Gina K: Large circle die and Birthday Trio Dies, Brads, Pickett Fence blending brushes, Newton's Nook: Confetti Stencil

Hello Stampers!  It is Sunday and you know what that means, it is Featured Stamper Challenge Time on Splitcoaststampers.  This week's Features Stamper is Karen is this is the card I chose from her gallery:


I really liked the confetti background and the rainbow colors in the patterned paper.  So I started by stenciling on the confetti background.  Then I blended inks on white card stock and die cut the Birthday Trio dies. I got that all assembled and put it on the background and it was all just too bright.  The birthday dies blended in with the background and it was hard to see what it said.  So I got out some vellum and layered that on top and that softened my background.  I dug out some brads to adhere the vellum to the stenciled background.  Then I adhered the Happy Birthday.  For the inside I wanted to incorporate the rainbow colors from the front so I cut strips of paper and adhered them to the inside of my card.  I stamped and die cut the sentiment and adhered that to the rainbow strips.  And that completed my card!  

Thanks so much for stopping by!
Terri

Sunday, November 12, 2023

Graceful Snowflake


Supplies:
Stamps: Gina K Blesses Is the Season, SU Cherish the Season (inside)
Paper: Gina K white and kraft
Ink: Gina K White Pigment Ink and Memento Tuxedo Black
Accessories: Gina K Graceful Snowflake Stencil, Honey Bee Clear Gems, Simon Says Stamp Sponge Applicators

Hello Stampers!  I'm back to share a card that I made for the Featured Stamper challenge.  This week's Featured Stamper is Laura, and this is my inspiration card:

For my card I kept the same cardstock, but I chose to stencil the snowflake instead of die cutting the snowflake.  After I stenciled the snowflakes for the inside and outside I let them dry for about an hour.  Then I used my stamp a ma jig to stamp the sentiment.  To finish the snowflake I added some gems, I just kept adding them and adding them LOL.  I may have gone a bit overboard.  Then I simply stamped the inside and that completed my card!  

Thanks so much for stopping by!!
Terri


Sunday, October 1, 2023

Christmas Mouse


Supplies:
Stamps: Gina K Noelle Mouse
Paper: Gina K white and kraft, Stampin' Up Cherry Cobbler
Ink: Memento Tuxedo Black
Accessories: Stampin' Up Layering Circles Framelits Dies, ribbon, and Copic markers

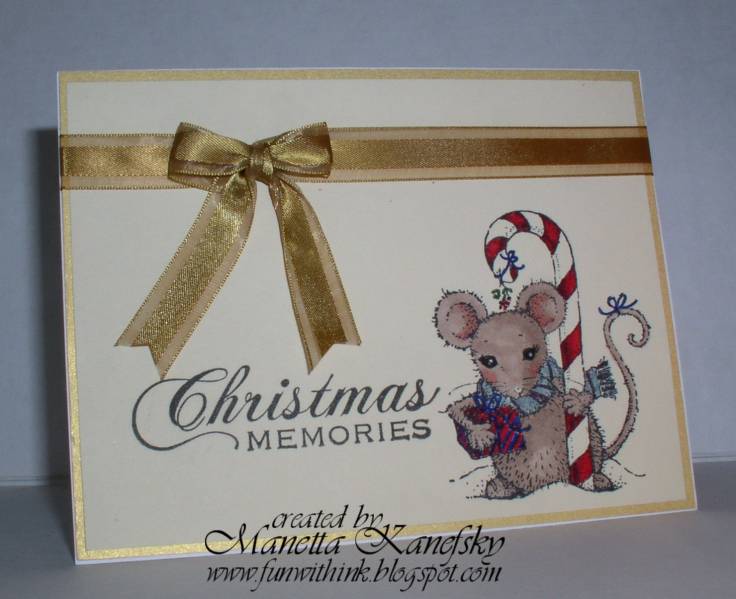
Hello Stampers!  I am sharing a card I made for the Featured Stamper challenge on Splitcoaststampers.  The Featured Stamper is Manetta, and this is the card I chose to CASE. When I saw the mouse holding the candy cane, I immediately thought of the Gina K mouse and candy cane.  

I changed the card size to a 4.25x4.25 square card, and the color scheme.  To start the card I cut out the card base and the two layers.  I stamped my mouse and colored it in with Copic markers.  Then I stamped, colored, and fussy cut out the candy cane, and popped it up with some mini dimensionals on the mouse.  I used the stay put bow ribbon treatment and added a sentiment.  For the inside I stamped the sentiment, die cut it, and die cut a red scalloped circle.  I adhered everything together and that finished this card.  

Now I better get something done around the house... dishes, laundry, making chili where do I start?!  

Thanks for stopping by!!
Terri

Wednesday, August 2, 2023

Graceful Snowflake


Supplies: 
Stamps: Simon Says Stamp Christmas Blessings
Ink: Stampin' Up Petal Pink
Paper: Gina K white and Stampin' Up Petal Pink
Accessories: Gina K Stencil Graceful Snowflake, Simon Says Stamp Christmas Blessings Dies, Honey Bee Clear Gem Stickers, Stampin' Up Bitty Banners Framelits, Pickett Fence Blending Brush

Hello Stampers!  Todays card is for the Sketch Challenge on Splitcoaststampers.  Here is a picture of the sketch:

For my card I started by deciding to make a pink card.  My sister has been requesting that I make her a pink Christmas card.  So here it is!  I love the color petal pink so I started by blending on the snowflake using the graceful snowflake stencil.  This stencil is so dainty I just love it!  Then it was on to the sentiment I stamped and die cut this sentiment, and die cut a few layers to pop the sentiment up a bit.  For the elements in the upper left hand corner I die cut some itty bitty banners and added a gem to them.  To complete the card I added some gem stickers and adhered my layers together.  For the inside I stenciled the graceful snowflake again and stamped a sentiment.

That's all for now, thanks for stopping by!!

Terri

Monday, July 10, 2023

Happy Birthday


Supplies:
Stamps: Stampin' Up Cottage Greetings (inside)
Paper: Gina K white and Stampin' Up Silver Glimmer Paper
Ink: Distress Ink: Saltwater Taffy, Scattered Straw, and Salvaged Patina, Memento Tuxedo Black
Accessories:  Gina K Birthday Trio Dies, Stampin' Up Stencil

Hello Stampers!!  I made this card using the sketch over at Freshly Made Sketches.  

To make my card I started with the Birthday die cut.  For the Happy, I used the Saltwater Taffy ink pad and swiped it on cardstock to color the paper pink.  Then I die cut the Happy letters out of it.  For the Birthday, I ink blended Scattered Straw and Salvaged Patina and die cut the Birthday word out of it.  To finish off the sentiment I adhered the Happy Birthday onto the silver glimmer paper background.  Next I used the stencil to create the background.  I added some strips of silver glimmer paper to frame it, and then popped up my greeting to finish the card.  

Thanks so much for stopping by!!
Terri
Sunday, April 23, 2023

Sending Smiles

Supplies:
Stamps: Gina K Spring Mix
Paper: Gina K white and black onyx, Making Memories Chloe's Closet 6x6 paper pad
Ink: Memento Tuxedo Black
Accessories: Waffle Flower A2 dies, Stampin' Up linen thread, Copic markers

Supplies: 
Stamps: Gina K Enjoy the Sunshine
Paper: Making Memories Chloe's Closet 6x6 paper pad
Ink: Memento Tuxedo Black

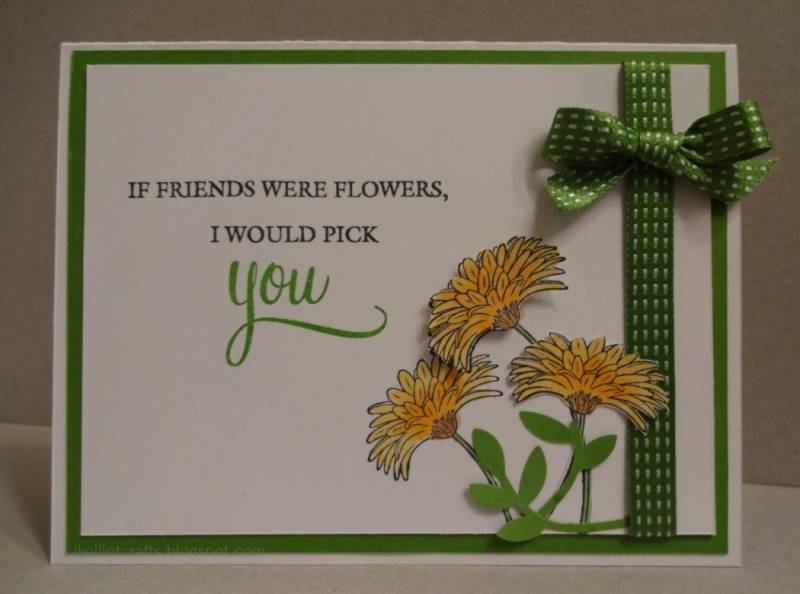
Hello Stampers!  It is time for the Featured Stamper's Challenge on Splitcoaststampers.   Congratulations Lynn on being the Featured Stamper.  This is the card I chose from her gallery.  For my card I started by die cutting my layers.  I chose a floral patterned paper to go with the florals on my focal image. Then I colored my focal image using Copic markers.  For the sentiment I used my Stamp-a-ma-Jig.  Then I added some linen thread with a bow.  To finish the card I adhered all of my layers together.  
That's all for now!  Thanks for stopping by!!

Terri