Showing posts with label 3D Project. Show all posts

Sunday, August 3, 2025

Jar of Joy Box


Supplies: 
Stamps: Stampin' Up Jar of Joy
Paper: Stampin' Up: Basic White, Crumb Cake, Real Red, Mossy Meadow
Ink: Memento Tuxedo Black, Stampin' Up: Crumb Cake, Real Red, Mossy Meadow
Accessories: Stampin' Up Holly Berry Happiness Punch, Sweet Jar Punch, Stylish Shape Dies, Everday Arches Dies, Snowflake Sky Embossing Folder, Dimensionals, Celebrate It Ribbon

Hello Stampers!!  I'm here to share this cute box I made for Christmas.  I followed the following tutorial:  Snowman Box 


I didn't quite have all of the supplies she had, so I improvised with what I had.  You could fill this little box with lots of different candies.  I send my niece and nephew money for Christmas, so I thought this would be a fun way to package it.  This was a fun project to do.  

Thanks so much for stopping by!!
Terri 

Wednesday, March 5, 2014

Have a Bee utiful Day


Supplies: Stamps: hexagon stamps, Amuse, bee is stampin up  Paper: Recollections and We R Memory Patterned papers, white, black, crumb cake, and strawberry cardstock  Ink: Memento tuxedo black Accessories: scallop tag topper punch, hexagon punch, envelope punch board, twine, scallop polka dot ribbon, gem, copic markers, wink of stella marker

I followed this tutorial to complete this box.  I had a lot of fun making this, and I geared it towards Spring hoping this winter will come to an end.  As we got more snow last night! UGH!  Have a great day and thanks for stopping by!

Terri

Monday, August 12, 2013

Back to School


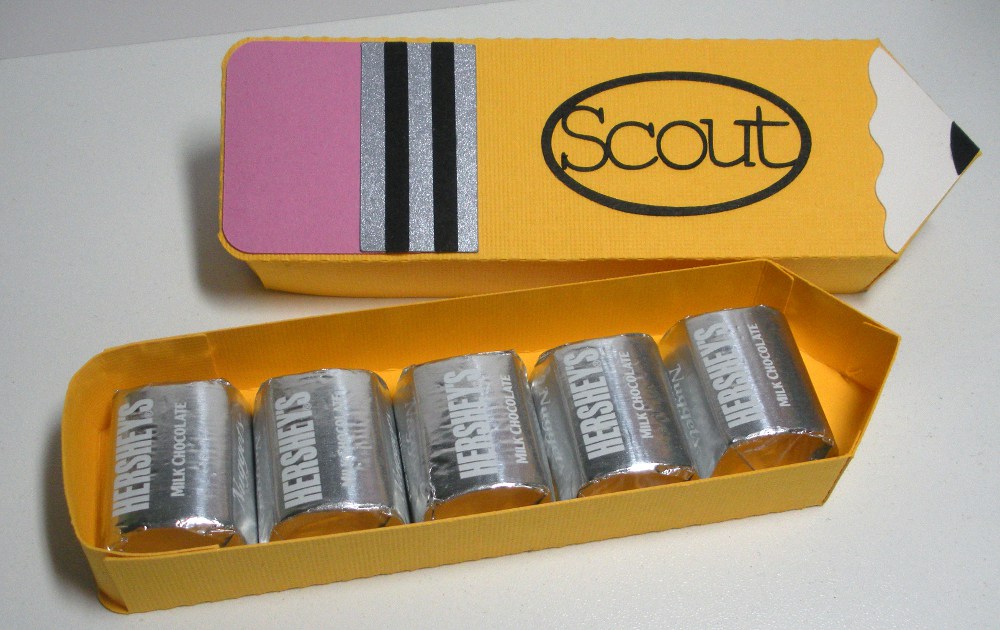
Supplies: Cardstock: yellow, cream, pink, black, metallic silver  Accessories: Silhouette cut file  Card Details Here

August is here...back to school time is upon us.  My niece and nephew started school this week, and my other niece starts in a couple of weeks.  I thought I would make them a little treat box to help them start out their school year.  I measured the size of a Hershey nugget and scaled the pencil box file down to fit the candies.  I also created and cut out their name labels on the Silhouette.  I tried a new to me spray adhesive, it was Aleene's Tacky Adhesive Spray.  It was super sticky!  I didn't have to apply a lot and it had a great bond, perfect for those very detailed die cuts.

That's all for now.  Thanks for stopping by!

Terri

Wednesday, January 2, 2013

Some Snowy Fun


 Supplies: Stamps: Snow Much Fun , Gina K sentiment  Paper: Paper Cut sno cone and wild cherry, glimmer paper, Neenah white  Ink: Memento tuxedo black  Accessories: copic markers, 2 3/8 scallop punch, 2 inch circle punch, 1 3/4 inch circle punch, ribbon, two tags die cut, score buddy
 
Thanks to Pinterest! Here is a link, thanks for the inspiration Julie! I copied them just the way they were because they were so cute. I made these for my co-workers, inside are some Andes candies. Thanks for stopping by!

Terri

Monday, September 5, 2011

A CAS Challenge turned into a Bookmark...


Supplies: Stamps: Studio G dollar stamps Paper: black, white, and crumb cake cardstock, Marjolaine Basic Grey, red glitter paper Ink: Memento tuxedo black, crumb cake Accessories: scallop oval punch, oval punch, scallop circle punch, 1 1/2 inch and 1 3/8 inch circle punch, font: Garamond, copic markers, sponge dauber, glitter glue, rhinestones, Tim Holtz gingerbread die cut (I used the bow for the shoes) and glossy accents
So the CAS challenge this week was to use shoes.  I thought it would be fun to make some bookmarks, can you do this for a challenge?  Not sure, but I did anyway.  I like how they turned out.  They are so cute with their little feet sticking out when they are in a book.  I think I'll give one to my niece, she loves to read.

Back to work for me tomorrow, wish me luck!  5:00 A.M. is going to come so fast I'm afraid..

Thanks for stopping by! 

Tuesday, June 7, 2011

More "Hoppiness"


Supplies: Punches: SU wide oval punch, large oval punch, boho blossoms, 3/4 inch circle, 1/2 inch circle  Cuttlebug embossing folder ek success small circle punch  Paper: old olive, pear pizzazz, early espresso, white  Ink: old olive

I was checking out my favorite blogs today and Laurie posted the most adorable frog!  She linked it up to a video tutorial and I just had to make one.  The little guy goes together really quickly, and now I just want to make more! 

Thanks for "hopping" by!

Wednesday, June 1, 2011

Welcome June

Supplies: Stamps: Stampendous  Paper: colormates light and medium awesome aqua, su yellow, white  Ink: memento tuxedo black  Accessories: queen and co white brads, baker's twine, sizzix sun die cut, 1 1/4 inch circle punch, copic markers

Summer is almost here...our weather here has been crazy!  Cool, then 90 degrees, cool, then 90 degrees.  So we'll see what Mother Nature's plan is as we get closer to summer. 
Can you tell I had some scraps left over and stamps to put away from a recent card?!  HA!  I have to admit it was convenient having all of the supplies at hand.  Although I did have to go digging for the sizzix die cut! 
Not much to explain on this, pretty simple project.  As I was making this calendar I was trying to think of what I am going to do with them as the month is complete.  I think I am going to start a little scrapbook using these calendars.  I thought I could journal the highlights of the month.  No pictures or anything just a small 6x6 or 8x8 album.  Now that I said it, I better do it! :)
Thanks for stopping by!   

Tuesday, December 28, 2010

Marvelous Mocha Mix

Paper: red and white cardstock, Accessories: su scallop circle and snowflake punch, circle punch, gem, grograin ribbon, twine

I gave these jars of Marvelous Mocha Mix to the coffee drinkers at work. I’m not sure where the recipe came from, probably a Taste of Home magazine or cookbook. I also found the cute lids for the mason jars at Walmart. Here is the recipe:

Marvelous Mocha Mix:
1 c. Nestle chocolate milk mix
1 c. powdered nondairy creamer
2/3 c. instant coffee granules
½ c. sugar
½ tsp. cinnamon
¼ teaspoon nutmeg
Combine all ingredients; mix well. Store in an airtight container. To make 1 serving: Add 4-6 tsp. mix to ¾ c. boiling water, and stir until dissolved.
Makes 3 c. mix.

Have a great day!


Monday, December 27, 2010

Ghirardelli Chocolate Holder

Supplies: Stamps: Papertrey mixed messages, Ink: versamagic red brick, Paper: Imaginisce, mauve, and white cardstock, Accessories: 1 1/4 inches scallop circle punch, 1 and 7/8 inch circle punches, su border punch, modern label punch, white grosgrain ribbon
These Ghirardelli holders hold one Ghirardelli chocolate square. The directions can be found here: Ghirardell Square Holder. I put the sentiment on the left on some and on the right on some, depending on the open space of the patterned paper. These are cute, quick, and easy! Give 'em a try!
Thanks for stopping by!

Sunday, December 26, 2010

Ghirardelli Box

Supplies: Stamps: Papertrey Mixed Messages, Paper: Deep Mostly Mauve colormates, imaginisce Snowy Jo, white, Ink: versamagic red brick, Accessories: Scallop circle punch 1 1/4, circle punches 1 inches and 7/8 inch, su border punch

I hope everyone had a wonderful Christmas, ours was nice. I have a few projects to share that I made for my coworkers. The first is a box of Ghirardelli chocolates. Here is a video tutorial that I followed from Splitcoast Stampers. The boxes fit 3 of the Ghirardelli chocolates. Stay tuned over the next few days I have two more projects to share.

Have a great day!

Tuesday, August 17, 2010

Stamp TV Kleenex Box

My mother in law saw my box that I had made using the tutorial on Stamp TV, and she thought she would like to have one. Her birthday is next week so I made this for her.

For the focal image I used the drop shadow technique using a stamp from the Spring Mix Stamp TV kit. I also colored the white stitching of the ribbon with a copic marker to match the patterned paper.


This is such a sturdy box when completed, with all of the extra cardstock layers.


Thanks for looking!

Sunday, July 4, 2010

Post It Note Organizer


Happy 4th of July everyone! I do not have a patriotic post today, but I do have a post it note organizer! I watched this tutorial on Chic n Scratch Live on how to make one. I love the little pocket on the side, it would be perfect for receipts or lists. I am a bit of a post it note freak so I'm sure I will be using this fairly often! Thanks for looking!


Thursday, February 4, 2010

Treat Bag Cover


When I saw this tutorial on Splitcoast I thought this would be a fun way to give fruit snacks as a gift for Valentine's Day. This was easy to make following the tutorial. The only change that I did was when I punched the holes I didn't punch through the bag, I used score tape to adhere the fruit snacks to the cover.
Thanks for looking!

Wednesday, January 20, 2010

Candy Box


Chic N Scratch Live is a wonderful blog that I follow, she has wonderful video tutorials and I love the projects that she posts. This is a box that she recently posted: Sweet Pea Candy Box. I had to try it out! The box is really easy to assemble, and it went together fast. Now I get to pick out some candy to put inside this box!
Thanks for stopping by!

Sunday, January 3, 2010

Valentine Box

This was such a fun and easy box to make for the CAS challlenge on SCS! The theme for this week's CAS challenge was Valentine's Day, so this box worked great for the theme. Beate Johns had a video tutorial on her blog Fresh and Fun. I used Bazzill cardstock for the base, added some Heidi Grace patterned paper, and for the heart closure I used a Martha heart punch (which was my mom's idea! thanks mom!) I attached a pink heart in the back of the scalloped one to provide some contrast, and rounded the edges of the flap. This box will hold Gharadelli Chocolates, or other small candies.

Thanks for Looking!!


Friday, July 17, 2009

Peek a Boo Box


This week on SCS the weekly tutorial was this cute Peek a Boo Box. I think these would be fun to make for co-workers at the holidays filled with little treats. For this sample I used the stamp set Great Friend, and a retired SU designer double-sided paper. To decorate the box I attached ribbon around the box and then added a bow with a glue dot. I also made a scallop circle frame around the opening of the box. For the top of the box I stamped and cut out the frame from Great Friend (ink: Aloe Vera chalk ink) and stamped the sentiment in the center (French Blue cat eye by colorbox). I added a scallop border on the bottom (ek success), and then colored some white pearls with copic marker G24 to match the project. Lastly, I used my largest corner rounder and took off the guide, and rounded the tab of the peek a boo box. And most importantly I filled the box with these yummy coffee flavored candies by Sweet n Low.

Thanks for stopping by!


Monday, May 11, 2009

Mother's Day Part 2


This is the other card I made for Mother's Day, for my Mom. I know, I know, the cabbage flower again?! I just love it!! This time I used peachy colors for the theme, because it went with the calendar that I made for her. Details include: pattern paper Martha Stewart, border punch: new ek success border punch, su oval punches, martha stewart tag punch, hero arts happy mom's day, and ribbon by offray. I used the sketch challenge from Splitcoast Stampers for the layout of this card.


And....here is the calendar that I made for my Mom! I got the idea from the blog Creative Stampin Spot.


That's all for now and probably until the weekend. This is my last week of school!!!!!!!!!!! :) :) :) So I just am trying to make it through the week! Then I will be doing a lot more posting while I am enjoying my summer vacation!!


Thanks for stopping by!

Saturday, February 7, 2009

My First Post!


Welcome to my first post on my new blog. I am excited to start this adventure, and hope that I am able to inspire you to create. I hope to include tutorials along the way in addition to my card creations.


I made this card for the Cupcake Challenge from
Taylored Expressions. This is the first time I am participating in one of Taylor's Sketches. It was a fun sketch to start with! I started by stamping the bees and cutting them out with the petite oval nestabilities. I colored them in with the copic markers, and matted it on the next size nesty. After the marker art was dry I went back and added glitter to the wings with a glitter pen, and outlined the image with Prismacolor Cold Stone. I then cut out the pattern paper and adhered it to the base of the card. I punched out the scallop border, and attached the cuttlebug border on top of it. I stamped the sentiment using my stampamajig (it was a two line stamp). Then I attached the sentiment to the bottom. Then added the pink and red strip, and attached the main image. I cut out the heart buttons from my sizzlit and attached a white circle to the back so you could see the button holes. Then I added pop dots to the hearts and adhered them to the card.

Recipe: Stamps: Stampendous, Inky Antics; Paper: Doodlebug; Tools: Cuttlebug embossing border, Fiskars Apron Lace Border Punch, Sizzix Sizzlit Buttons, Petite Oval Nestabilities, Stamp-a-Ma-Jig; Coloring Tools: Memento Tuxedo Black, Copic Markers: RV21, R14, R59, R27, Prismacolor: Cold Stone (for the outlining), Sakura Glitter Pen


Then I made this coordinating
Gable Box. I kept the design simple like the card. I used the Martha Stewart mini scallop heart border punch to trim the box. And I punched a 2-inch scallop circle and punched hearts out with the 1/8 inch heart hand punch by fiskars to coordinate with the scallop border. I can't wait to fill it with treats and give it to my niece. She will love it!

Recipe: Stamps: $ Stamp from Michaels; Paper: Doodlebug; Tools: Martha Mini Heart Scallop Border Punch, EK Success 2-inch scallop circle punch, Fiskars 1/8 inch heart hand held punch, SU oval punch, 1 1/2 inch circle punch, Sizzix Sizzlit Button die cut; Coloring Tools: Ancient Page Cardinal Ink; Accesories: 1/8 inch white grograin ribbon

Thanks for stopping by!