Wednesday, December 26, 2012

Merry Christmas to Me!

I hope everyone had a wonderful Christmas! It always amazes me how fast all of the festivities go!

I was able to get my hands on a copy of the magazine I was published in, Papercraft Inspirations December issue. What a cool feeling it was to see one of my cards in an actual magazine. So I had to share this moment here.  Here is a link to the other "Beautiful Blogs" highlighted in the magazine.Thank you for stopping by, and sharing my moment in the "spotlight." 
Terri


Sunday, December 9, 2012

Let It Snow, Let It Snow, Let It Snow

Supplies: Stamps: bold snowflake  Ink: Versamark  Paper: Bazzil walnut cream, LilyBeeDesign hot cocoa Accessories: blossom punch, dimensionals, cherry cobbler embossing powder, stamp a ma jig, ribbon, Making Memories glitter brad
Let it snow, let it snow, let it snow....  I woke up to a sky full of snowflakes today.  The first of the season for us.  I am making a pot of cinnamon hot cocoa and I am going to make cards and enjoy the the snow fall....inside.  :)  This card is a CASE of this card for the featured stamper challenge over at SCS.  I changed the center image to a snowflake and added a bow at the top instead of something in the center.  I also popped up the focal panel to add some dimension.  Thanks for stopping by!!
Terri

Tuesday, December 4, 2012

Snow Much Fun

Supplies: Stamps: Snow Much Fun  Paper: Papercut sno cone, wild cherry, and GKD pure luxury white  Ink: Memento tuxedo black  Accessories: modern label punch, snowflake gem, gems, brad, baker's twine, delicate designs embossing folder, scallop framelit, glitter ribbon, copic markers, dimensionals

A new stamp set + a fun Mojo sketch=1 card made!  I am really liking the look of light blue and red together for winter cards, the red really pops!  Looking at my card I think I should have stamped my snowman further to the left maybe even off of the panel, oh well.  It was a fun card to make!

Thanks for stopping by!

Terri


Sunday, December 2, 2012

Pennant Parade Christmas Style


Supplies: Stamps: Pennant Parade Paper: white and cherry cobbler  Ink: old olive, cherry cobbler, soft suede, early espresso  Accessories: pennant punch, bitty banner framelits, delicate designs embossing folder, gems, dimensionals


Hello!!!  I hope you all are well and are finding time to stay crafty during this busy time of year.  Our family celebrates Christmas on my side of the family over Thanksgiving....needless to say I have been shopping, wrapping, baking, and working (can't forget that!)  I found some time today to break out the ink and stamps though!  It felt great!  I checked out the featured stamper challenge on SCS and decided to case this card.  I created a CAS version of this card by using a lot of white space.  I added some embossing at the top and added gems instead of ribbon.  Thanks so much for stopping by, and I hope to get inky again soon!

Terri


Wednesday, October 31, 2012

Have a Fang-tastic Halloween!

Supplies: Stamps: Fang-tastic Paper: old olive, black, and white  Ink: Memento tuxedo black and london fog  Accessories: 1 3/4 in circle punch, spellbinders circle, SU oval punches, Martha Stewart grass punch, Halloween twine, copic markers, pop dots
 
Happy Halloween everyone!  I made this for my nephew too, Happy Halloween and Birthday Luke Matthew! 
 
Hope your day was spooktacular!
 
Terri

Monday, October 29, 2012

Holy Batman!

Supplies: Paper: Bazzill Accessories: Silhouette Batman cut file
 
My nephew's birthday is on Halloween, and this is the card I made him.  He loves Legos and combine that with a super hero like Batman and he is a happy camper!  So I thought since I wasn't going to be giving him Legos I would make him a Super Hero card.  The Silhouette made it easy, I found this cool cut file and turned it into a card. 
 
Thanks for stopping by!
 
Terri

Monday, October 15, 2012

Featured Stamper

Supplies: Stamps: clear set Inkadinkado?  Ink: crumb cake Paper: Neenah white and Basic Grey  Accessories: Lawn Fawn twine, Martha Stewart flourish border punch, Spellbinders leaf die cut.
 
I made this for the featured stamper over at SCS.  I just have a minute to post, so this is short and sweet.  Thanks for stopping by and have a great week!
 
Terri

Monday, October 8, 2012

Faux real..it is not a die cut

Supplies: Stamps: Blessed is the Season Paper: Base Weight Kraft  Ink: early espresso  Accessories: reindeer spellbinders, red nailhead, ribbon?, corner rounder, sponge
 
To celebrate World Cardmaking Day Gina K is having a challenge to use the faux layers technique.  The winner will get a prize package from Gina K Designs, how fun!  I used this cute reindeer from Spellbinders to create my faux layer, and added a red nailhead to make it Rudolph.  I rounded the corners, added a sentiment, and attached my plaid ribbon (for the CAS challenge on SCS) with a stay put bow.  Quick and easy! Love it! 
 
Thanks for stopping by!
 
Terri

Saturday, October 6, 2012

My Dad, Mr. Fix It

Supplies: Stamps: MFT Fix It Fred Ink: Memento tuxedo black, early espresso Paper: early espresso, SU orange dsp, X press It Accessories: copic markers, American Crafts ribbon, pop dots
 
Happy World Cardmaking Day!  I was determined to get to my craft room and actually make a card to celebrate the day.  It took me all day to get there, but I did!
 
So we have gradually been running out of hot water all week....we knew that the heating elements in our hot water heater needed to be replaced, and were hoping that it would make it until my Dad had some time to look at it.  He was planning on coming up on Friday and that morning my husband and I both had cold showers! brrrrr!  That was great timing!  He came and replaced the elements and the thermostat, and we have hot water again! Yay! 
 
So I made him this card, he is our Mr. Fix It.  This stamp set is called Fix It Fred, and my Dad's name is Fred.  It was meant to be. 
 
I used the color challenge from Hand Stamped Sentiments to make this card.  The colors were early espresso, island indigo, and tangerine tango. 
 
Thanks for stopping by!  And I hope you all enjoyed World Cardmaking Day!
 
 
Terri

Sunday, September 23, 2012

Sweet Christmas

Supplies: Stamps: Lawn Fawn Sweet Greetings  Paper: crumb cake and early espresso  Ink: Memento rich cocoa  Accessories: Tim Holtz picket fence marker, R17 copic marker, pop dots, SU scallop border punch, corner rounder
 
Hello!  So glad to be able to post today.  I have been missing my little stampin' world!  I haven't even been able to visit everyone's blogs, hopefully I will get myself into a routine again.  School starts and my life turns upside down!  :)  This year I decided all of my bulletin boards needed a face lift....so my Silhouette Cameo got a workout and so did I.  It's lookin' pretty nice in my classroom. 
 
I have some fun news, I recieved an email from Papercraft Inspirations and they will be including one of my Christmas cards in their December issue!  How fun is that??!!  I was so suprised and excited to get this news, this will be my first publication! 
 
I also went to Scrapfest 2012 for the first time.  It was neat to experience one time, but I don't think I would go back.  I was able to see Tim Holtz and Heidi Swapp from afar!  That was pretty exciting.  I was able to shop at the Mall of America, that was fun too.  There were a lot of make and takes and the lines were pretty long, so that made for a long day.  Then we cropped in the evenings and I was able to get a pretty good start on my Christmas cards! Yay!
 
Which brings me to today, I was scoping out the featured stamper challenge and saw this cutie.  I had picked up a fun gingerbread set by Lawn Fawn over the Scrap Fest weekend, and thought it would work for case-ing this card. 
 
I better get going, thank you for stopping by!
 
Terri

Tuesday, August 14, 2012

Getting Ready for Back to School

 Supplies: Stamps: Stampedous, dollar acrylic stamps, school lines from SU, Paper: October Afternoon, ivory, black, kraft  Ink: Memento tuxedo black and summer sky, riding hood red  Accessories: Papertrey die cut, circle punches, copic markers, twill tape
I picked up this Changito set at a rummage sale, he is too cute.  For the focal image I die cut the notebook paper, stamped it using the school lines background in summer sky ink, then I stamped the monkey right on top and colored him.  I thought with the light color of summer sky that I could color right over it.  
Supplies: Stamps: dollar acrylic stamps  Ink: Memento tuxedo black and lady bug  Paper: all from my scraps  Accessories: black brads, Silhouette Cameo, circle punches, dimensionals
Nothing says back to school like new pencils and school supplies!  I made this shape card with my Silhouette Cameo, it took a bit to glue all of the pieces but otherwise it was easy peasy!  I had to add a little stamping, it just didn't feel right not.  So I added the Back to School Label, I popped up the apple in the center of the label on this one. 

Thanks for looking!

Terri

Sunday, August 12, 2012

How About Some Christmas Cards?

 Supplies: Stamps: Whipper Snapper  Paper: crumb cake, Papercut whip cream, Basic Grey patterned paper  Ink: Memento tuxedo black, crumb cake for distressing  Accessories: Offray red ribbon, SU snowflake long sizzlit die, circle nestabilities, gems, foam distress tool
I'm having too much fun with this bird stamp, he is just too cute. 
 Supplies: Stamps: Bells and Boughs  Paper: crumb cake Ink: Memento rich cocoa  Accessories: copic markers, Stickles, corner rounder, cherry cobbler ribbon
I have always liked the look of images colored with copics on kraft paper.  I had to try it. 
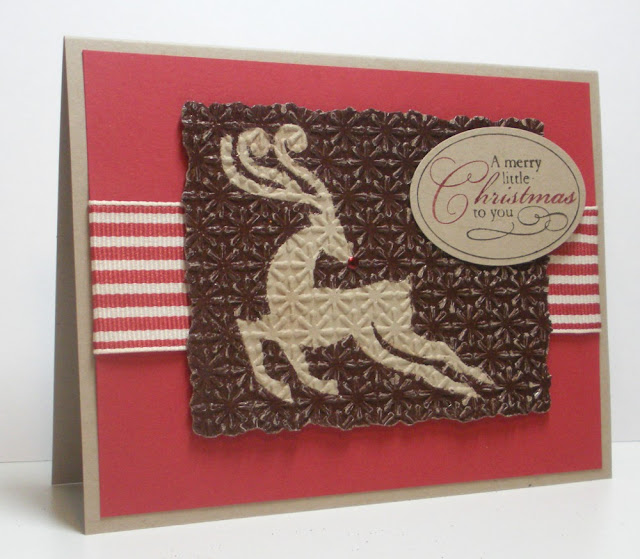
 Supplies: Stamps: Christmas Punch Paper: crumb cake, riding hood red  Ink: Versamark, cherry cobbler, early espresso  Accessories: riding hood red striped ribbon, brown embossing powder by Zing, extra wide oval punch, starburst embossing folder, Sizzix reindeer embossing folder, deckle edge rectangle nestabilities, dimensionals, red nail head

The fun part of challenges for me is it gets me to step out of my comfort zone.  I had seen this tutorial on Splitcoast: Double embossed enamel and always wanted to try it.  It worked out great for this challenge.
Supplies: Stamps: Winter Post Paper: Papercut sno cone and whip cream, SU early espresso, cherry cobbler Ink: crumb cake, early espresso  Accessories: northern flurry embossing folder, sponge for distressing, extra wide oval punch, designer frame embossing folder, classic oval nestabilities, twill ribbon, dimensionals
I saw this color combo in someone's gallery and loved it!  I had to try it out!
Supplies: Stamps: Gina K Blessed is the Season Paper: kraft, early espresso, Paper cut whip cream  Ink: Memento rich cocoa, Memento Markers  Accessories: brown twine
I made a card using this technique last year, and thought it was so fun I'd try it again. 

Supplies: Stamps: Technique Tuesday Paper: GKD white Ink: Versamark Accessories: Sizzix embossing folder, gem, silver embossing powder
This card was really hard to capture in a picture.  As much as I enjoy making white on white cards, I will have to practice.  I guess I should try putting a darker piece of paper behind it.  I'll try that next time.  Otherwise, this was a super quick CAS card.
I hope you have enjoyed some early Christmas Cheer.  I think I will have to choose one I can mass produce.
Thanks for stopping by!
Terri

Monday, August 6, 2012

Featured Stamper Winter Wishes

Supplies: Stamps: Verve  Paper: GKD white and Paper cut snowcone  Ink: Versamagic: aegean blue  Versamark  Accessories: Sizzix snowflake die cut, sewing machine, Iridecedent Ice embossing powder, dimensionals
Oh my goodness...I did it!  I completed all 38 Dare to Get Dirty challenges on SCS.  Whoa, I have never made so many cards in a short amount of time!  What a blast, I used stamps, die cuts, etc. that I have never used before.  I tried new techniques and with some of the sketch challenges I had to layer and step out of my CAS comfort zone.  But I did it!! :)  Will I do it next year??  I will have to think about that! 

This card I combined with the featured stamper challenge.  I cased this cardI made the following changes: I flip flopped the colors blue one the base and white on the snowflake, I added stitching, and I added another snowflake.  I had to emboss a piece of white cardstock with iridecent ice embossing powder for the glittery paper, I thought I had some and I didn't. 

Thanks for stopping by!

Terri


Sunday, August 5, 2012

Have a Bee-utiful Day!

Supplies: Stamps: Amuse, Whipper Snapper bee??, Studio G clouds  Paper: Papercut  Ink: Versamark, Memento tuxedo black and london fog, SU white craft  Accessories: Nesabilities, white detail embossing powder, copic markers, stickles, dimensionals

This card is for one of the Dare to Get Dirty challenges on SCS and CAS-ual Fridays CFC64.  The CAS-ual Fridays challenge was to use something found up in the sky.  I made this one layer card by embossing with a square nestabilities, and adding heat embossed clouds inside the frame.  Then I used a q-tip to add some white to the insides of the clouds.  I colored and cut out my bee, popped him up in the clouds and added some Stickles on his wings.  I used my trusty Stamp-a-ma-jig to stamp the sentiment.  That's all for now, thanks for stopping by!
Terri

Thursday, August 2, 2012

Lovin' the SU Snowflake

 Supplies: Stamps: Perfect Punches Paper: cherry cobbler, kraft, white  Ink: pear pizzazz and cherry cobbler  Accessories: SU snowflake die, scallop circle punch, circle punch, cherry cobbler baker's twine, red brad, dimensionals
Supplies: Stamps: Merry Christmas  Paper: white  Ink: Memento tuxedo black Accessories: SU snowflake die, white satin ribbon, SU embossing folder, pearl

I have been holding myself hostage in my craft room these days.  Splitcoast has a week of fun challenges for members of the fan club.  I am trying to complete them all...we shall see.  It takes me a long time to make a card, but I will do my best.  So stay tuned I have a lot more cards to post.  I am not able to share the details of the challenges, but I am able to share the cards.  I recently bought the new SU snowflake die, love it!  So fun, and a great size for making cards. I better get back to making some cards!

Thanks for stopping by!
Terri 

Monday, July 23, 2012

Pretty in Pink

Supplies: Stamps: Petite Pairs  Paper: Papertrey ivory, SU blushing bride Ink: soft suede, blushing bride Accesories: Basic Grey pink pearls, Memory Box wild blooms die cut, Nestabilities scallop oval die and classic oval die, sponge, Cuttlebug embossing folder, grosgrain ribbon from Michaels.


I have been busy, busy, busy.  Trying to get lots of projects done before my summer is complete.  So today is another one of those 100 degree days and I am staying inside!  I did pop out this morning to check out the garden, and I saw three zucchini, and lots of blossoms.  The ol' garden is not enjoying this summer of high heat and no rain.  But it looks like things may start growing now...we shall see.  We have hungry squirrels, gophers, and voles that have been eating well on some of the produce from the garden...

Anywho, my card is for the featured stamper challenge on SCS.  Here is the card I cased.  I made the following changes: the color tan to pink, I used a die cut instead of a stamp for the focal image,  I used a different embossing folder and I didn't apply ink to my embossed base.  Thanks for stopping by! 

Terri

Sunday, July 8, 2012

Mix It UP Monday Challenge


Supplies: Stamps: Gina K Enjoy the Sunshine Ink: Memento tuxedo black Paper: GKD white and black Accessories:  Spellbinders Tear Drop Circles, Doodlebug baker's twine, SU scallop border punch, black grograin ribbon, Cuttlebug embossing folder, copic markers

Supplies: Stamps: Gina K Enjoy the Sunshine, Spring Mix Ink: Memento tuxedo black Paper: GKD white Accessories: brown stitched grograin ribbon, Spellbinders Labels one, copic markers, Eclipse masking tape

This week on Stamp TV the Mix It Up Monday challenge was to use the colors red, orange, yellow, and lime green.  Very fun summery colors!  For the first card I was able to blend the red, orange, and yellow in the strawberries, and use the lime green for the stem.  The focal panel is popped up and the black scalloped border is on the base, it is hard to see that in the picture. 

For the second card, I thought it would be fun to have the colors blend from one color to the next...this took awhile to color but it was fun to match the colors and see which ones would blend in best to the next!  I love to color!  The cut the sentiment out using the labels one spellbinders die and tucked it under the stitched ribbon.  

I also want to thank Jen from the Paper Players for selecting my Chrismas in July card to be included in the Cut Above selections!  Yay, I'm so excited!!  Thank you Jen!!

Thanks for stopping by!

Terri

Thursday, July 5, 2012

Snowy Christmas Greetings

Supplies: Stamps:Best Yet  Paper: Paper cut red, GKD white  Accessories: Silhouette Cameo, Darice embossing folder, self adhesive gems

As I post this the current temperature is 101....at 6:30 pm...  I can't get used to this extreme heat!  It sounds like we might get some relief this weekend.  I'll have to keep making snowy cards to encourage our temperatures to cool down just a bit! :)  I used this week's Fall to Layout sketch to create this.  It was fun using my Silhouette Cameo, I'm always amazed when I cut something out.  I heat embossed the sentiment and popped up my embossed panel with dimensionals.  This was a quick and easy card!

I also want to thank the ladies over at Hand Stamped Sentiments for selecting my Quilted Chevron card as an artist pick!  I truly appreciate it!
Thanks for stopping by!
Terri

Tuesday, July 3, 2012

Christmas in July

Supplies: Stamps: Whipper Snapper, SU petite pairs  Paper: crumb cake, cherry cobbler, ivory  Ink: crumb cake, Memento rich cocoa  Accessories: Cuttlebug embossing folder, copic markers, sponge

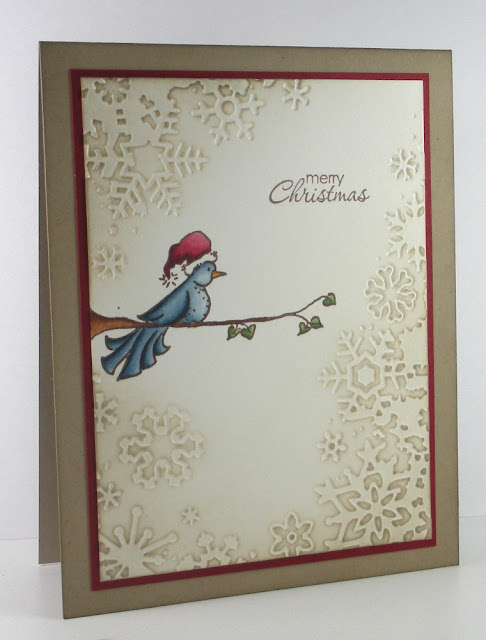
This week the Paper Players Challenge is Chrismas in July.  Hard to believe it is close to 100 degrees here and I am making a Christmas card, but maybe it will help me think cool thoughts! :)  For this card I embossed the main panel, and stamped the bird image.  I colored the bird with copic markers, and sponged crumb cake on the edge to emphasize the snowflakes.  Then I stamped the greeting, added a cherry cobbler layer, and sponged the edge of the card base with crumb cake as well. 

Thanks for stopping by!

Terri

Sunday, July 1, 2012

Quilted Chevron

Supplies: Stamps: Well Scripted, Summer Silhouettes Paper: crumb cake, Memory Box patterned paper Ink: Versamark and soft suede   Accessories: SU ribbon, bitty punch, self adhesive pearls

The challenge over at Hand Stamped Sentiments is quilting.  So with the trend of chevrons upon us, I thought I would create a quilted chevron.  Easier said than done, I should have used my Silhouette Cameo to create the pieces.  Silly me thought it would be snip, snip, and done.  There was a bit more measuring needed than I had anticipated.  But I made it!  I added the leafy image from Summer Silhouettes and adhered some of the bitty flowers for more color.  Then completed the card by adding the sentiment and ribbon.

Thank you to Nancy Riley who included my CAS Pleated card on her list of iPicks.  I truly appreciate being a part of this list!

Thanks for stopping by!
Terri

Have a Bee-utiful Day Loll!

Supplies: Stamps: Friends are like flowers, Amuse  Paper: GKD black, Bazzill yellow, GKD white  Ink: Memento tuxedo black  Accessories: Offray ribbon, stickles, copic markers, dimensionals

Loll is the featured stamper over at SCS, I love her cards!  She has such great CAS style, so I was delighted to case one of her cards.  I decided on this one.  I have to confess I chose this card because I wanted to use this ribbon.  My Mom found it and thought it would be perfect for a bumblebee card, she was right I love it. 

For the challenge I changed the orientation of the card, I added ribbon instead of twine, and I added a layer of yellow to the card base. 

I would also like to thank Tiffany for featuring my CAS Pleated card on her My Crafty Picks!  You made my day! :)

Thanks for stopping by!
Terri


Saturday, June 30, 2012

Start Each Day With "Whee!"

Supplies: Stamps: My Favorite Things: Start Each Day With "Whee" Paper: Lucky Limeade, ivory, Jillibean Soup  Ink: Memento tuxedo black  Accessories: early espresso ribbon, La Mode flower button, baker's twine, copic markers, Sizzix embossing folder, My Favorite Things die namics simply scalloped

Wouldn't it be great if that is how each day started, maybe after some much needed caffeine?!  I'm not what you call a morning person... 

I made this card for the guest designer challenge being held by My Favorite Things.  The challenge being a sketch!  I love sketch challenges and I have been wanting to use this stamp for awhile.  So I thought I would give it a go.  I kept it clean and simple as I always do, I love the ivory space!  I did jazz it up and added some texture using an embossing folder to compliment the girl's dress.

For my focal image I paper pieced her dress, and colored the rest of the image with copic markers.  I was going to add the sentiment in a banner below the focal image, but I thought how fun would it be to cut it up and put it on the pennants!  For the banner part of the sketch I found a super cute flower button and tied it onto my ribbon with more baker's twine.  Lastly I added the scalloped border using the simply scalloped die namics die cut.

That's all for now, thanks for stopping by!

Terri

Friday, June 29, 2012

Oh Pinterest, How I love thee...

Supplies: Stamps: Upsy Daisy  Paper: White  Ink: Memento tuxedo black, SU pool party, peach parfait, Versa Magic Thatched Straw  Accessories: Sizzix oval doily frame, beautiful butterflies die cut, gingham ribbon

I saw this card on Pinterest and I just had to try it!!!!  I created a mask with a post it note and sponged the butterfly with pool party, peach parfait, then thatched straw.  Then I stamped the upsy daisy stamp.  I stamped the greeting and thought the doily would frame it off nice, so I snipped off the bottom of the frame to fit the card.  And lastly I used my favorite stay put bow (link on the side panel) to add my ribbon.

I also want to thank the member of Hand Stamped Sentiments for making my card an artist's pick on their blog!!  I was tickled pink when I got the news!!

Thanks for stopping by!

Terri

Sunday, June 24, 2012

CAS Pleated Style

Supplies: Stamps: Summer Silhouettes, Friendly Phrases Paper: white, brights collection  Ink: PSX, Memento tuxedo black, pear pizzazz, and old olive  Accessories: fancy fan embossing folder, finishing touches edgelits, su ribbon, butterfly embosslit, gem, dimensionals

The challenge over at Hand Stamped Sentiments is to use pleating.  I'm not sure if this qualifies, I made a rosette by pleating the paper.  I have never made a rosette, so it was an adventure.  I wasn't sure how to attach it to the card, it just kept popping up when I wanted to lay it flat, LOL!  So I put a bunch of score tape on the back and hoped for the best.  Do you see all of my new SU goodies, it was fun to take them out and play! 

Thanks for stopping by!
Terri

Happy Birthday

Supplies: Stamps: Stampin Up  Paper: Kraft and white  Ink: early espresso, crumb cake  Accessories: Tim Holtz embossing folder, sponge for distressing, corner rounder, piercer


Well this is my first card since I have been back from the cabin.  It was HOT and stormy most of the time we were there, but we survived.  I made this for the featured stamper challenge on SCS.  This is the card that I cased: Get Well.  I made the following changes: embossed the catails, added piercing around the border, a different greeting, and I kept the colors monochromatic.  It was a fun one to make!  Thanks for looking!

Terri

Saturday, June 16, 2012

Happy Father's Day


Supplies: Stamps: Thinking of Father, Sanded Background   Paper: early espresso, ivory  Ink: crumb cake, soft suede, early espresso  Accessories: SU button, GKD ribbon, Crystal Effects, twine, distressing tool, sponge
My Mom was going to sell this set at a rummage sale and I snatched it up.  Love the vintage look to this set.  I started out with a piece of ivory cardstock, and stamped it with the Sanded background stamp in crumb cake.  Next I stamped the focal image in soft suede, and the sentiment in early espresso.  I inked up my twine ribbon with early espresso to make it more rustic looking.  Then I used my distressing tool to distress the edges.  I inked the edges with crumb cake first then added some soft suede for more dimension.  I attached the ribbon with one of the new SU buttons using twine.  I added crystal effects to the lenses of the glasses and clock face, here is a close up to see the shine.


It was fun to distress, once I start I just keep going...  So here's to a Happy Father's Day!

Terri

Tuesday, June 12, 2012

A Splash of Color

Supplies: Stamps: Friendly Phrases  Paper: GKD white, cherry cobbler, lucky limeade, scraps of "baja breeze" and "cajun craze" (I did my best to get a scrap to match these colors)  Ink: Memento Tuxedo black and cherry cobbler marker  Accessories: SU eyelet border punch, Silhouette '3 set' doily, dimensionals

The color challenge on SCS today is cherry cobbler, lucky limeade, baja breeze, and cajun craze.  That is a lot of color for this CAS gal...so I used a lot of white. :)  What do you think of those doilies??!!  I cut them out with my Silhouette, and made a background for them too (to add that splash of color.)  I thought the eyelet border coordinated well with the doiles, and then I popped up the main panel with dimensionals and popped up the doilies with dimensionals.  I added a gem to the center of the doilies, and stamped my sentiment using the stamp a ma jig.

Thanks for stopping by!

Terri

Monday, June 11, 2012

CAS White on White

Supplies: Stamps: Endless Creations  Paper: GKD white  Ink: Memento Tuxedo Black  Accessories: Silhouette scalloped background, SU framelits, SU embossing folder, SU wide oval punch, ribbon from Michaels, dimensionals

Oh Happy Day!  We were eating lunch today and the doorbell rang...a new Stampin Up order and my new Silhouette Cameo were sitting outside my door!!!!  Needless to say I had to make a card.  The SCS CAS challenge was to use white on white.  I cut out the scalloped background with my Silhouette and adhered it using a spray adhesive.  Then I embossed the oval frame, cut it out with the framelit, added the sentiment and popped all of them up on top of my fun paisley ribbon.

Thanks for stopping by! 

Terri

Friday, May 25, 2012

Happy Mother's Day!

Supplies: Stamps: Teeny Tiny Wishes, Memory Box  Paper: Kraft, white, My Mind's Eye Ink: riding hood red, white craft  Accessories: Blossom punch, early espresso bakers' twine, Bitty Banners Framelits, Naturals Designer Buttons, SU pleated ribbon, 1 1/8 inch punch

My Mom likes kraft paper just about as much as me, so I had to use it on her card.  I stamped a background stamp in white craft and punched out three squares.  I lined them up on the bottom, and added my sentiment that I cut out using one of the new framelits sets from Stampin' Up.  Love that pleated ribbon, wish it was in the new catalog!  I punched out the flower and added a new wooden button from the catalog and tied it with the early espresso baker's twine. 

Thanks for stopping by!
Terri

Wednesday, May 23, 2012

Have Loads of Fun

Supplies: Stamps: Stampin Up Happiest Birthday Wishes Paper: cardstock Accessories: dump truck tutorial, screw brads

Long time, No Stamp!  I know, I know, that is what I seem to say every time I post!  Well summer is here (I was starting to wonder if I was going to make it, what a school year?!)  and as I get caught up with the housework and garden work I will be able to give my stamps more attention.  I have gotten some fun things and can't wait to try them out...one of them a BIG SHOT!  My Mom got it for me for my birthday, my Cuttlebug was really worn out.  The Big Shot seems to be a stronger die cut machine, although I will miss my little bug! 

Anywho!  My Mother in Law asked me to make a card for a little guy that loves dump trucks....so I thought this seemed perfect!  Thanks to the tutorial!  She has a lot of great tutorials on her site.

Have a great day!

Terri


Saturday, April 21, 2012

First Communion

Supplies: Paper: Bazzill, copy paper, Martha Stewart patterned paper Accessories: scallop trim corner and border punch, petite ovals, Sizzix embossing folder, pop dots, SU button, white DMC floss

Today we are celebrating as my niece takes her first Holy Communion, she sure is growing up fast!  This is a card I made for the occasion.  I followed the following video tutorial, and put my own spin on the layout.  This was fun to make!

Thanks for stopping by!
Terri

Wednesday, April 11, 2012

I Can't Get Enough Of Double Embossing!

Supplies: Stamps: GKD Spring Mix Paper: Ivory Ink: Versamagic red brick, Memento sahara sand, Archival Ink cocoa  Accessories: nesatabilites, gems, ribbon, cuttlebug embossing folder

I remembered that the Gina K set had an oval frame, and I thought what are the chances that it would fit inside the double embossed frame?!  Guess what, it did!  How cool is that?!  I stamped the floral image using the drop shadow technique, added some chocolate colored gems, and a bow and I was done! 

Thanks for stopping by!
Terri

Monday, April 9, 2012

Double Embossing

I have had some requests to make a tutorial for the double embossed card I made.  If you have any questions, please let me know. 

To begin you will need to pick out your shapes, and make some shims.  To do this cut the shapes out of chipboard two times, and glue them together.  My rectangle is 4.25x5.5.  When you cut this out remember this is how it will appear on your card.  Be sure to place it where you want it to be on your card.
 
Next select an embossing folder, and get your card base ready.  Put your card front in your embossing folder, then put your chipboard shim down.  This is will be the part that you want embossed.

 
Mat Stack: A plate, embossing folder with card front, shim, C plate

Note: I do not put the C plate over the entire card.  I place it over the card front only to avoid any unexpected embossed lines from the cutting plate.  I line up the edge of the C plate to the scored line of my card.

 
This is what it will look like after running it through the cuttlebug.

 
Now the final embossing:  Mat Stack:
A plate, B plate, silicone mat, card front: embossing facing up, nestabilites facing down.

 
Next place the chipboard shims on top of the nestabilities.  (This takes some patience, those buggers like to move just when you have them where you want them! J)

 Last carefully (remember those mats like to move…you may want to use a little dotto adhesive if they keep moving) place the B plate on top, again lining up the edge of the plate with your score line on your card.  And run it through.
And presto! A double embossed frame using your nestabilities!  Time to embellish!  Have fun!!
Here is a link to the video where I recieved inspiration for this card:
Double Embossing Video

If you make a card using this technique I would love to see it, send me a link!

Terri