Sunday, January 31, 2021

Merry Christmas

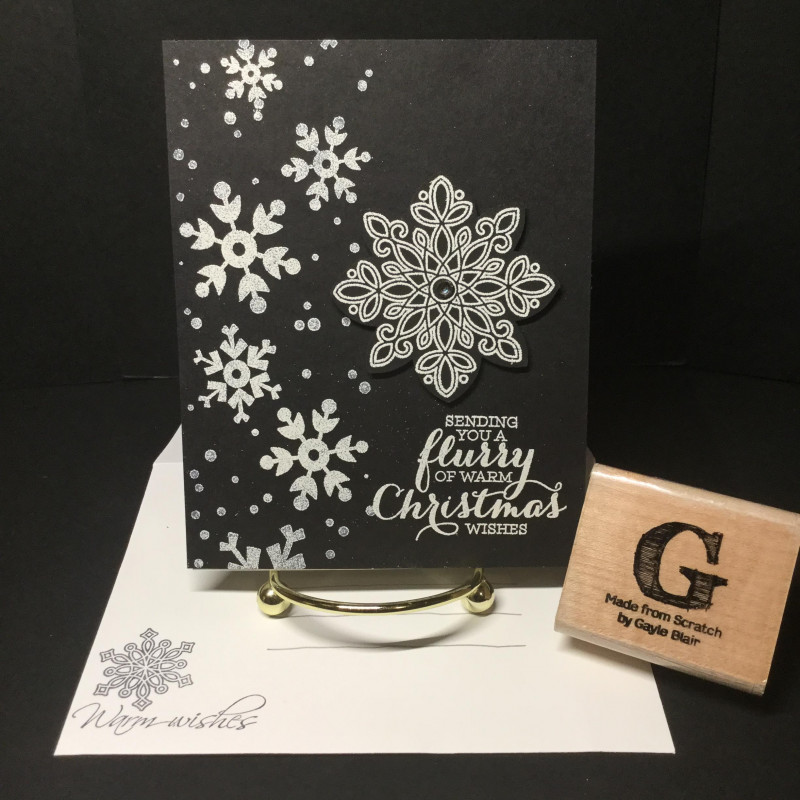
Supplies: Paper: black onyx and white Accessories: Gina K snowflake edger, Memory Box Merry Christmas, silver ribbon, gems

Hello Stampers!!  Welcome to my new follower!!  Today I made a card for the Featured Stamper challenge on SCS.  The featured stamper is Gayle.  Here is the card that I used as inspiration for mine:

To make my card I die cut the snowflake edger die and added some ribbon to the top.  I adhered this to a black card base, and added the Merry Christmas die cut sentiment.  To finish the card I added some gems to the centers of the snowflakes.  And that was it!  Quick, clean, and simple!!!  That is my kind of card.

Thanks for stopping by!

Terri


Saturday, January 30, 2021

Happy 70th Birthday!


Supplies: Stamps: SU Memorable Moments Paper: rococo rose, white, brushed gold, old olive  Ink: rococo rose  Accessories: SU framelits, SU little leaves, beautiful butterflies and floral fusion die cuts, stamp a ma jig, SU finial press embossing folder, rococo ribbon, pearls

Hello Stampers!  This week my Mom turned 70!!  I made this card for her.  I did get some inspiration from a card on Pinterest.  Here is the card:

To make my card I started with the focal image.  I never could have stamped this without my stamp a ma jig.  Then I matted it with a rococo rose mat.  I die cut the flowers, leaves, and butterfly and adhered them to the focal panel.  For the card base I added a brushed gold mat to the embossed layer, and added the rococo rose ribbon.  To finish the card I adhered focal panel with dimensionals.  That's all for now!

Thanks for stopping by!!

Terri

Monday, January 25, 2021

What's the Buzz?!

Supplies: Stamps: Whipper Snapper  Ink: Memento tuxedo black  Paper: white, melon mambo, and My Mind's Eye 6x6 paper pad: Happy Day  Accessories:  linen thread, Copic markers

Hello Stampers!  Today's Clean and Simple challenge on Splitcoast Stampers is It's a Bug's Life.  As I was looking through my images I came across this buzzy bee.  I stamped my image and colored it with Copic markers, matted it on some melon mambo paper, and set it aside.  Next I worked on the patterned paper.  I wrapped the linen thread around the patterned paper a few times, added a bow, and adhered the patterned paper to a layer of melon mambo.  Lastly I adhered all of my layers together.

Thanks for stopping by!!

Terri


Sunday, January 24, 2021

In this difficult time

Supplies: Stamps: Gina K Comfort and Peace Ink: Distress Ink tattered rose and victorian velvet, Memento tuxedo black, VersaMark. Paper: Rococo Rose, Gina K white and black onyx Accessories: Brutus Monroe alabaster white embossing powder, Offray ribbon, Gina K Master Layouts 1 and 2, blending brushes, gems

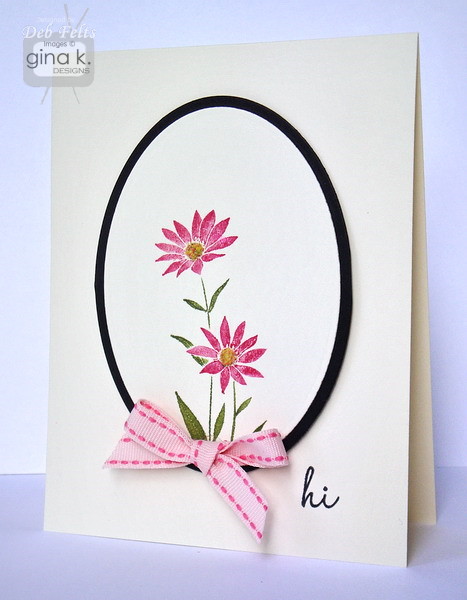
Hello Stampers!  Today the featured stamper on Splitcoast Stampers is Deb.  I chose the following card from her gallery to CASE.


To make my card I started with the focal image.  I stamped and embossed the flower image. Then I die cut it into an oval, and then I blended the victorian velvet at the top and blended into tattered rose on the bottom.  Next I die cut the frame of the oval, adhered the focal image to it, added gems to the center of the flowers, and a tiny bow on the flower.  For the sentiment I stamped it and then die cut it with a banner die cut.  Then I die cut the layers and adhered everything together.

That's all for now, going to go get ready to cheer on the Packers!!  

Thanks for stopping by!!

Terri


Wednesday, January 20, 2021

Pierced Hearts Valentine

Supplies:  Paper: white and real red Accessories: Many Hearts Dies, Layered Square Framelits, scoring tool, real red ribbon

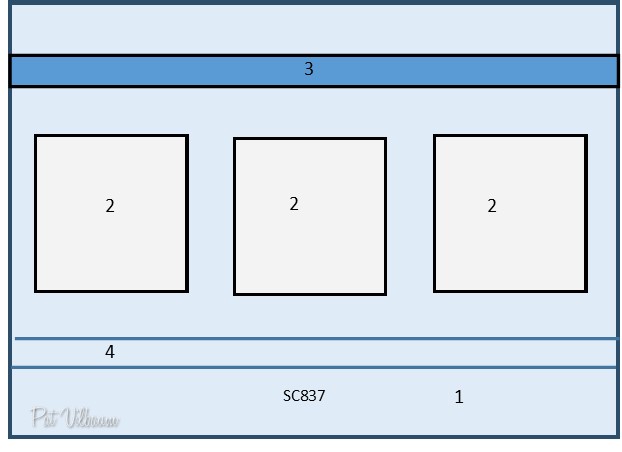
Hello Stampers!  I made today's card using the sketch challenge from Splitcoast Stampers.  Here is a picture of the sketch:


To make this card I had to go with a 5x7 card base so the hearts would fit across the card.  So after cutting a red card base, I cut a white layer.  Then it was onto the hearts.  I first cut out the pierced hearts, then used a solid heart to cut it out, and then I cut out another solid heart to go behind the pierced hearts and adhered them together.  After this I cut out the squares to go behind the hearts, and popped up the hearts onto the squares.  Before I adhered the hearts to the card I tied on some red ribbon at the top of the card.  Then I adhered the squares using a T-Ruler to help me line them up.  Next I added the score lines under the hearts.  Once this was done I adhered the whole panel to the red card base.

That's all for now, thanks for stopping by!!

Terri


Monday, January 18, 2021

Let's TACO 'bout your Birthday!

Supplies:  Stamps: Lawn Fawn Year Nine Birthday set  Paper: Gina K heavy base weight white Ink: Memento tuxedo black Accessories: Coordinating die set, Copic markers, My Favorite Things Peek a Boo Square die
Hello Stampers!  The Clean and Simple challenge on Splitcoast Stampers is to Stock your Stash.  To make cards that you need.  I always need birthday cards, so that is what I went for.  To make the card I started by die cutting the square.  Then I stamped the sentiment.  Next I lined up the die cut panel on the card base, and stamped the taco onto the card base.  After this I colored in the taco and party hat with Copic markers.  That is why I used Gina K's heavy base weight white paper, because the Copic markers do not bleed through to the back.  I popped up the focal panel and that completed my card.

Thanks so much for stopping by!!

Terri


Sunday, January 17, 2021

Masked Birthday Card

Supplies:  Stamps: Tim Holtz Simple Sayings, SU Lovely As A Tree Ink: Memento tuxedo black, Distress Ink: iced spruce, bundled sage, tea dye, and antique linen Paper: Gina K white and black onyx Accessories: blending brushes and Gina K Master Layout 2, Eclipse masking roll

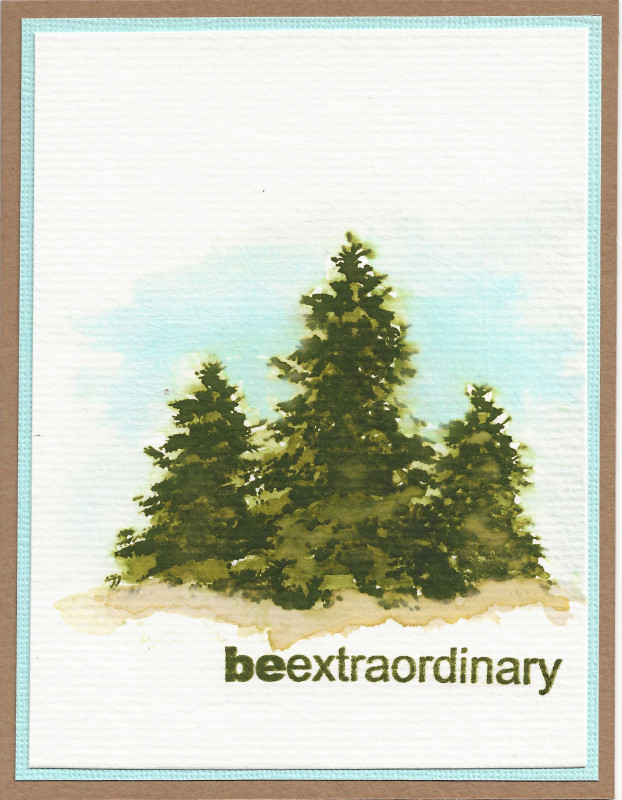
Hello Stampers!  Today is the Featured Stamper challenge on SCS.  Today's Featured Stamper is Debbie.  I chose this card from her gallery to CASE.


I used the Torn Paper Masking Technique that Gina K shared in one of her Stamp and Chat's.  Here is the link if you are interested.  I started by cutting a piece of my masking paper 4.25x5.5.  Then I tore the paper down the middle.  I placed the two pieces far enough apart so the tree images would fit within.  Then I blended on the Distress Inks.  After this I stamped on my trees.  Next I die cut it using the stitched rectangle in the Master Layouts 2 set, and cut out a black mat.  After adhering these two layers together I stamped and die cut the sentiment, and popped it up with dimensionals.  This worked out great because I need a masculine birthday card for my father-in-law.  His birthday is coming up in February.

Thanks so much for stopping by!

Terri


Saturday, January 16, 2021

In the Meadow We Can Build a Snowman

Supplies: Stamps: Tim Holtz Tattered Christmas  Ink: SU whisper white, Gina K kraft, VersaMark  Paper: SU real red, chocolate chip, pumpkin pie, old olive, Gina K. white, kraft, and black onyx  Accessories:  Tim Holtz Assembly Snowman, Brutus Monroe alabaster white embossing powder, SU banner punch, baker's twine, blending brushes, Tim Holtz paper distresser, Darice embossing folder

Hello Stampers!  Today on Splitcoast Stampers for the inspiration challenge, the Pinterest board was by Tim Holtz.  I found this pin to use as inspiration for my card.  I also made this for the Free For All challenge on Splitcoast Stampers: use your favorite color combo.  My favorite combo is red, kraft, and white.

To make this card I started with the embossed snowflake background.  Before embossing this panel I used the Tim Holtz distresser around the edge of the panel.  Then I sponged on some white ink to enhance the snowflakes.  Next I tore a piece of white paper for the snow and used the distresser around the edge of the paper.  After this I adhered the snow piece to the background, and I used my blender brush around the edge with kraft ink to distress it.  Next I assembled the snowman, I used my blender brush with kraft ink to distress the edges of the snowman, and adhered it to the card.  For the sentiment I embossed it, turned it into a banner, used my blender brush to distress it, and adhered it to the card.  To finish the card I tied on a baker's twine bow, and adhered the background to the card base.  That's all for now!

Thanks so much for stopping by!

Terri


Wednesday, January 13, 2021

Thanks a Bunch

Supplies: Stamps: SU Celebrate Sunflowers  Ink: SU daffodil delight and soft suede  Paper: SU bumblebee, white, and Flowers For Every Season 6x6 DSP  Accessories: dimensionals and linen thread

Hello Stampers!!  How about a bright sunflower card for this dreary day?!  I used the sketch from Freshly Made Sketches to make this card.  Here is the sketch:
To make the card I started with the bumblebee card base and added a white layer on top.  Then it was onto the focal image.  I inked up my sunflower with daffodil delight ink and then I took a larger sponge dauber and inked it up with soft suede ink.  Then I tapped the sponge onto the center of the sunflower to give it a darker color in the center.  I cut this into a rectangle, and matted it with some bumblebee cardstock.  Next I was able to cut out the DSP to go behind the focal image.  Once that was adhered I stamped the sentiment using my Stamp a Ma Jig.  Right before popping up the sunflower panel onto the card I decided to add a linen thread bow.  It was kind of a sticky mess because I already had on the dimensionals, LOL.  The joys of cardmaking! :)

Thanks for stopping by!!

Terri


Monday, January 11, 2021

Die Cut Heart Card

Supplies: Paper: Gina K white Accessories: Offray white ribbon, Simon Says Stamp: Detail Floral Heart and Detail Petal Plate, Sizzix card scallop circle insert

Hello Stampers!  The Clean and Simple challenge on Splitcoast Stampers was to CASE yourself!  I chose to CASE this card:

For the embossing I die cut the detail petal plate, I used the same ribbon and scalloped circle, and I changed the butterfly to a heart that I popped up.  It was really hard to get a good picture of the card with the detail at the bottom.  Well that's all for now, I better go make dinner!

Thanks for stopping by!

Terri


Sunday, January 10, 2021

Happy Valentine's Day

Supplies: Stamps: Unity/Gina K: You Had Me At Hello Ink: VersaMark Paper: white, black onyx, and red Accessories: Stamp a ma Jig, ribbon

Hello Stampers!  Happy Sunday!  I got all of my laundry and cleaning done before lunch today so I would have the afternoon to play in my craft room.  Today I made a card for the Gina K Monthly Mix Challenge, to use mostly red.  So I stamped and embossed the heart and greeting, using my Stamp A Ma Jigonto a piece of red cardstock.  I stamped toward the bottom so I could have a piece of ribbon at the top.  After I tied the ribbon on I adhered it to a black panel, and then onto a white card base.

That's all for now!

Terri


Saturday, January 9, 2021

Gingham Heart Valentine

Supplies: Stamps: SU Lots of Heart Ink: Memento tuxedo black Paper: white and real red Accessories: baker's twine and SU Many Hearts Dies, dimensionals, Wrapped in Texture. embossing folder

Hello Stampers!  I made it through a week on virtual learning with kindergarteners!  Thank goodness we go back to the blended format on Monday.  It was nice being home though.  Today's challenge on Splitcoast Stampers is the Inspiration Challenge.  Here is the picture that I got inspiration from:

The red gingham in the picture inspired me to use the gingham heart in the Lots of Heart stamp set.  To make the card I started with the hearts.  For the white heart I die cut a white heart and then embossed it.  I also cut out a red frame for the heart.  For the gingham heart I stamped and then die cut the heart, and added a die cut red frame to it.  Next I cut out the focal panel and matted it in red.  I adhered the white heart directly to the paper with its frame, and then I popped up the gingham heart so I could do a ribbon treatment with baker's twine.  After this I ran a piece of red paper through the Xyron, die cut the swirly heart border, and adhered it to the bottom of the card.  Lastly, I stamped the sentiment and adhered the focal panel to the card base.  

That's all for now!  Thanks for stopping by!!

Terri


Thursday, January 7, 2021

Happy Summer!

Supplies: Stamps: Lawn Fawn: Happy Summer Paper: Gina K heavy base weight white Ink: Memento tuxedo black Accessories: gingham ribbon from my stash, copic markers

Hello Stampers!  Welcome to my new follower!  So happy to have you!!  The Ways to Use It challenge on Splitcoast Stampers has a theme of fruit.  I chose to use a watermelon slice on my card.  I started by stamping the ants and watermelon.  I decided to pop up the watermelon after I colored it in with Copic markers.  Then I worked on the ribbon so I knew where to stamp the sentiment.  I used my Misti to help me line up the sentiment.  I love the Misti, it has been a game changer when it comes to making cards!  To complete the card I popped up the focal panel onto the card base to add some dimension.

Thanks so much for stopping by!

Terri
 

Wednesday, January 6, 2021

Valentine Sketch

Supplies: Stamps: SU Meant to Be Ink: SU real red Paper: real red, white, and Sending Love 6x6 DSP Ink: real red Accessories: Spellbinders scalloped circle, SU stitched circles, SU Be Mine stitched framelits dies
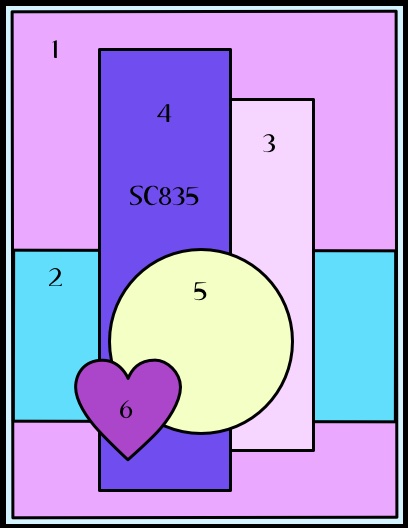
Hello Stampers!!  Today is the sketch challenge on SCS.  Here is the sketch:

This was a tough one for me.  I am not used to putting lots of layers on a card.  And it was tricky picking out patterned paper that goes together.  Using a 6x6 DSP paper stack helped.  So I picked out three patterns that I thought went well together.  Cut the different panels, and adhered them to the card.  For the sentiment I stamped and die cut it with the stitched circle die cut, and then matted it with a scalloped circle.  Then I added my heart that I had stamped and die cut.  Lastly,  I popped up the sentiment to help it stand out from the card.  

Thanks so much for stopping by!!

Terri


Tuesday, January 5, 2021

Be My Valentine

Supplies: Paper: white, and scraps from my stash Accessories: Lawn Fawn conversation hearts dies, Sizzix embossing folder

Hello Stampers!  I loved the theme of using something new for the New Year, so I made another card using some new supplies.  I have had them for awhile but I haven't used them until now!  Aren't those conversation heart dies the cutest??!!  The hardest part of the card was inlaying the letters in the hearts.  Otherwise this is a pretty quick and easy card.  After I die cut the hearts I found this Valentine embossing folder, and thought it would work well with the hearts below it.  I matted the sentiment with some pink cardstock and then adhered everything to the white card base.

Thanks so much for stopping by!

Terri


Monday, January 4, 2021

New Year New Stamps

Supplies: Stamps: SU Lots of Heart  Paper: SU real red and white  Ink: SU real red and Memento tuxedo black  Accessories:  SU Many Hearts dies

Hello Stampers!  I made this card for two challenges.  One is the Clean and Simple challenge on SCS and the other is the Paper Players Theme Challenge.  The theme for both of the challenges is to use something new for the New Year!  I am excited to share this card using the new Stampin' Up bundle Lots of Heart and Many Hearts dies.  To make the card I stamped the heart in real red, framed it with the white heart frame die cut, and matted it with the scalloped heart die cut.  Next I die cut the swirly heart border and adhered it to some white cardstock and matted it with red cardstock.  To complete the card I stamped a sentiment, adhered the heart and border to the focal panel, and then adhered it to the card base.

Thanks so much for stopping by!

Terri


Sunday, January 3, 2021

Celebrate The Season

Supplies: Stamps: Itty Bitty Christmas Ink: Memento tuxedo black, Distress Inks: tumbled glass and chipped sapphire Paper: white and real red Accessories: Simon Says Stamp: birch circle and Impression Obsession DIE079-U (the birds), blending brushes

Hello Stampers!  Well it is my last day of break...  it was really nice to have some time off.  And although we were stuck at home I had a lot of fun in my craft room.  Hopefully I will be able to continue stamping while I am back at school.  Probably not everyday, but hopefully get a couple challenges in a week.  

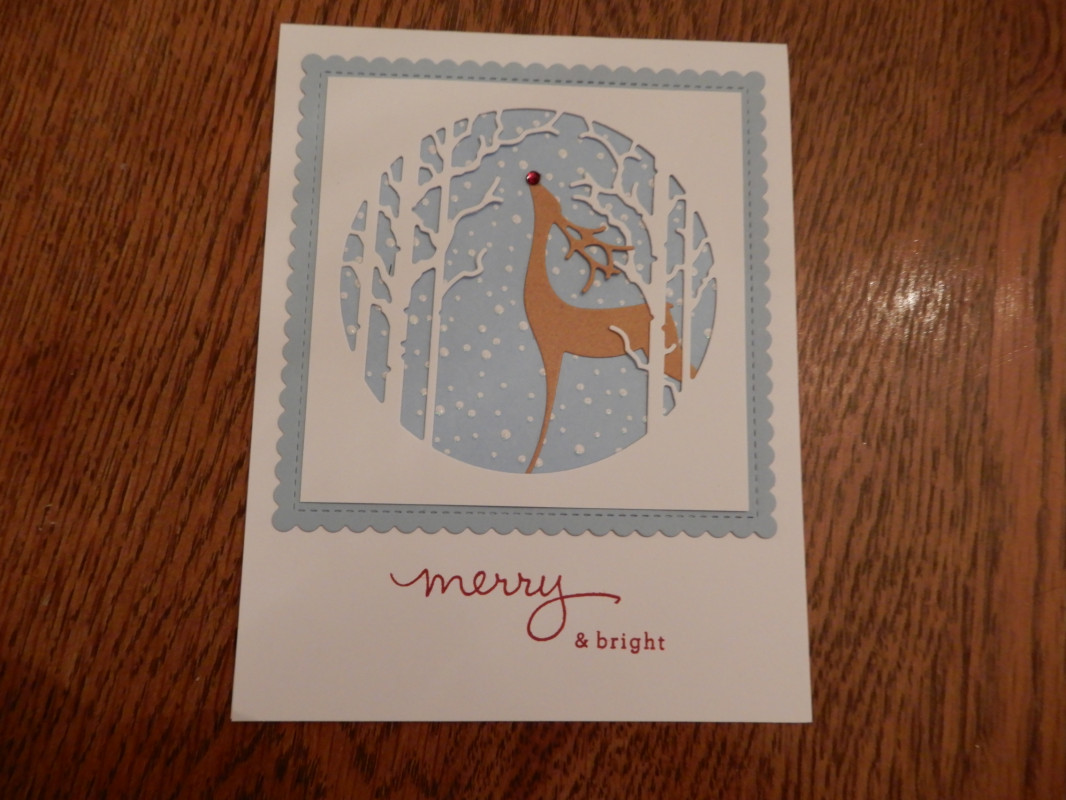
Today I am participating in the Featured Stamper challenge on SCS.  The featured stamper is Denise and this is the card I chose to CASE:
I had a similar die cut, but I didn't have a deer die cut so I used cardinals.  To make the card I cut out a card base and a red mat.  Then I cut out a square to go behind the die cut portion of the card.  On this paper I used my blending brushes to make the sky.  As I am posting this I remembered I was going to add some water spritzes to add snow to the sky.  Whoops!  After I blended the sky I cut out a white layer and die cut the Birch Circle die.  Before I adhered this to the red layer I stamped my sentiment, and added some ribbon.  Then to complete the card I adhered it to the red layer.  That's all for now!

Thanks for stopping by!!

Terri


Saturday, January 2, 2021

Sent With Lots of Heart

Supplies: Stamps: SU Lots of Heart Paper: cherry cobbler and white Ink: Memento tuxedo black Accessories: SU Many Hearts Dies, Offray ribbon, scoring board

Hello Stampers!  I made this for the inspiration challenge on Splitcoast Stampers.  Here is the inspiration image I chose:

I cut a piece of white cardstock 4x5.25 and die cut the three hearts at the bottom.  Then I added two score lines to frame the ribbon.  Next I used my Misti to stamp the sentiment.  To finish the card I added some ribbon, and adhered the focal panel to a cherry cobbler card base.  That's all for now!

Thanks for stopping by!!

Terri


Friday, January 1, 2021

Sparkly Believe Christmas Greetings


Supplies: Paper: silver glitter paper and white Accessories: Simon Says Stamp: believe, detail ringlet plate, and corbel tree collage, silver glitter ribbon

Happy New Year Stampers!  I made this for the Simon Says Stamp challenge: Sparkle and Shine.  I used silver glitter paper for my sparkle and shine.  I die cut the ringlet plate for the focal panel, and then die cut the tree and sentiment.  Next I added some silver glitter ribbon.  Lastly, I added the focal panel to the card base.  That's all for now!

Thanks for stopping by,
Terri