Sunday, January 28, 2024

How Ya Bean?


Supplies:
Stamps: Amuse: how ya bean?
Paper: Gina K ivory, SU pebbled path, LilyBeeDesign: Persnickety 6x6 paper pad
Ink: SU pear pizzazz
Accessories: SU punches, linen thread, and dimensionals, Concord & 9th Cup of Kindness dies

Hello Stampers!  Well I had good intentions to make a couple of cards today, but as I was cutting out the heart for the coffee cup I dropped my heart die cut!!  I spent over an hour searching and moving things around to try to find it.  It was the first time using this die set, so I was very determined to find the missing heart.  I was about to give up when I used a ruler to go under part of my desk, and out came the die cut!  I was so relieved.  So I was only able to make one card, because I have to make dinner.  Maybe if it's not too late I'll make another one after dinner.  Anywho, this card is for the Featured Stamper Challenge over at Splitcoaststampers.  This is my inspiration card:
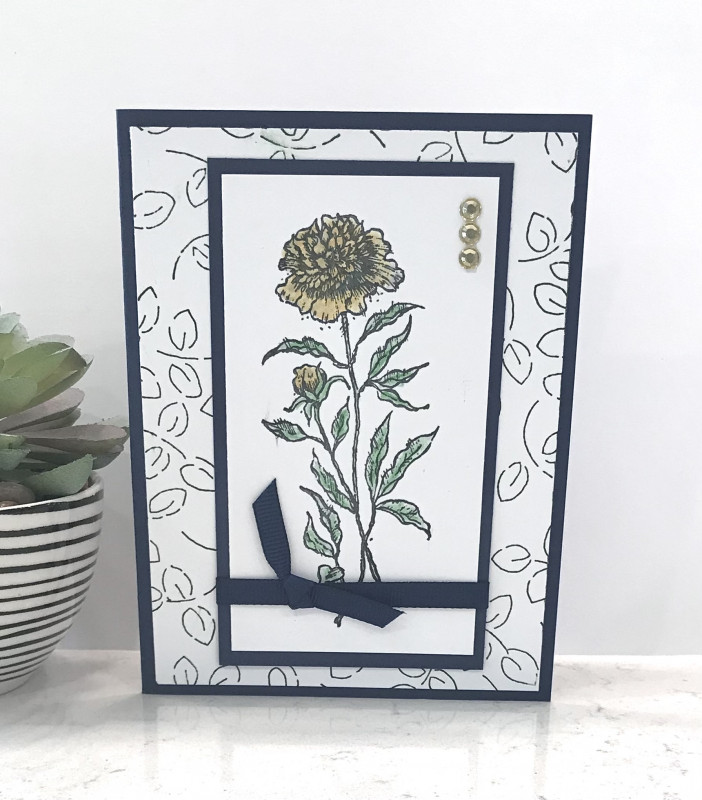
For my card I started by picking out some patterned paper and matching cardstock.  I cut my ivory card base, and assembled the coffee cup.  Then I cut a strip of patterned paper and matted it with pebbled path.  Before adhering it to my patterned paper layer I added a linen thread treatment.  Next I stamped and punched the sentiment and punched the background to the sentiment and adhered it to the card.  To finish the card I popped up the coffee.  I kept the inside simple so there would be room to write a note.

That's all for now!  Off to make some white chicken chili!
Terri

Sunday, January 21, 2024

Sunflower Birthday


Supplies:
Stamps: Clearly Besotted Sweet Little Sentiments and Verses Happy Memories (inside)
Paper: Gina K kraft, SU night of navy, early espresso, old olive, daffodil delight, and SSS matte gold card stock
Ink: VersaMark, SU crushed curry and old olive, Memento tuxedo black
Accessories: SU Stylish Shapes Dies, My Favorite Things: stitched fishtail flags, Spellbinders sunflower serenade, Taylored Expressions Dots of Diamonds embossing folder, SU dimensionals, SSS gold embossing powder

Hello Stampers!  I'm back with a card that I made for the Featured Stamper challenge on Splitcoaststampers.  Here is the card that inspired my card:


For my card I started with the die cut sunflower.  I sponged on some color to the petals and the leaves.  Then I worked on the fishtail.  Once I got it to the correct length I laid the sunflower on the fishtail, and worked on the sentiment.  I heat embossed the sentiment in gold to go with the gold center of the sunflower.  I die cut it and laid it onto the fishtail with the sunflower.  Once everything was where it was going to be I adhered the sunflower and then popped up the sentiment.  For the background I embossed it with the dots of diamonds embossing folder.  And adhered all of my layers together.  For the inside I did the same layout as the front, stamping a sentiment instead of having a sunflower.  

That's all for now!  Thanks for stopping by!!
Terri

Friday, January 19, 2024

Valentine Gnome Card


Supplies:
Stamps: SU XOXO, Hero Arts: Valentine's Day (inside)
Ink: SU real red
Paper: Gina K white, SU real red, and peach from stash
Accessories: SU be mine stitched framelits dies (inside), 1 1/4 inch circle punch, baker's twine, Honey Bee Fluttering Hearts Pierced Cover Plate, Waffle Flowers A2 and Additional A2 Dies, Jaded Blossom: Gnome dies and Valentine Add-ons, and SU dimensionals

Hello Stampers!!  I'm sharing a card that I made for the Free 4 All Challenge: Hearts over at Splitcoaststampers.  I started this card by assembling the Valentine gnome.  I picked up this Valentine add-on set at a rummage!!  It is soo cute!  After I completed the gnome, I decided to use the pierced hearts cover plate as the background to the gnome.  Then I grounded the gnome with some baker's twine.  I wanted some sort of greeting on the front, as I felt it needed a little somethin' somethin'.  I found the stitched love image and that was just the ticket.  I stamped it and punched it out with the circle punch.  Then I trimmed off the top edge so it was in line with the white layer.  From here I added a red mat and adhered it to the card.  For the inside, I used a stitched heart die to make the heart, and then I used my stamp a ma jig to stamp the greeting inside the heart.

That's all for now!! Thanks for stopping by!!

Terri 

Monday, January 15, 2024

Burgundy Sunflower Wishes


 Supplies:
Stamps: SU Darling Details and Colorado Craft Company Birthday Wishes (inside)
Paper: GKD white and SU burgundy
Ink: SU Early Espresso, Distress Inks: Walnut Stain, Aged Mahogany, Vintage Photo, Mustard Seed, Peeled Paint, and Bundled Sage
Accessories: SU Abundant Beauty Decorative Masks, Impression Obsession: Fancy Label (inside), Waffle Flower A2 Layers Dies, Pickett Fences blending brushes, SU linen thread

Hello Stampers!  We are off of school today, and it is waaay too cold out to do anything.  So I made a pot of chili, did some laundry, and squeezed in some cardmaking time.  My inspiration came from the Clean and Simple Challenge on Splitcoaststampers.  This week it is a color challenge: bravo burgundy, old olive, and more mustard.  I love sunflowers and burgundy sunflowers are one of my favorites.  So I stenciled the sunflowers with Distress Inks.  Then I used my Waffle Flower A2 Layers Dies to frame out my focal point and add a layer of burgundy behind my focal panel.  Before I adhered the burgundy layer I used my stamp a ma jig to stamp the sentiment, and added some linen thread with a bow.  For the inside I kept it simple.  I die cut the fancy label and stamped my sentiment on it.  

That's all for now!  It is back to work tomorrow, so I will see you this weekend!
Terri

Sunday, January 14, 2024

Snowflake Wishes


 Supplies:
Stamps: SU Brightest Glow SU Snowflake Wishes (inside)
Ink: VersaMark and SU Evening Evergreen (inside)
Paper: SU Evening Evergreen and Gina K white
Accessories: Gina K Master Layouts 3, Lawn Fawn Stitched Snowflake Backdrop, Stitched Snowflakes and Mini Snowflakes (inside), Brutus Monroe Alabaster White embossing powder, Waffle Flower Nesting Circles and Additional Circles dies, SU mini dimensionals

Hello Stampers!  Well we survived the Arctic Blast and now we are experiencing frigid temperatures.  What next?!  Needless to say we are staying warm inside!!  So I might as well make cards right?!  I made this card for the Featured Stamper challenge on Splitcoaststampers.  The featured stamper had scrapbook layouts in her gallery. That is always a challenge for me to take a scrapbook layout and turn it into a card.  But I stumbled upon this scrapbook layout and the wheels started turning! :).

I stuck with the same color pallette.  For the white layer I added some texture by running it through the Big Shot with the snowflake backdrop die.  Then for the focal image I die cut the Lawn Fawn stitched snowflake three times and adhered them together for some dimension.  Then I adhered this snowflake to a circle matted in evening evergreen.  Instead of the pictures in the scrapbook layout I added a sentiment, and popped it up.  For the inside of my card I stamped the sentiment and added some mini snowflakes.

That's all for now!  Thanks so much for stopping by!!
Terri

Friday, January 12, 2024

Stitched Flourish Card


Supplies:
Stamps: Pretty Pink Posh Simple Sentiments Strips
Ink: VersaMark
Paper: Gina K white and kraft and SU basic black and old olive
Accessories: Pretty Pink Posh Sentiment Strips Dies, Sewing machine, Cherry Lynn Designs Mini Fanciful Flourish die, Lawn Fawn stitched rectangle dies, Waffle Flower Additional A2 Layers Die, Brutus Monroe alabaster white embossing powder

Hello Stampers!  We are having our second snow day this week today!  I am grateful for the time off, because I haven't been feeling well.  So I slept most of the day, and then decided I was going to make a card!  I checked out the sketch over at Freshly Made Sketches, and decided to play along! 
For the background I chose to stitch the lines using my sewing machine!  I'm not what you would call a sewer, but I thought I'd give it a try.  First I had to change out the thread from black to white.  I'm not gonna lie, I had to get out the manual to figure out how to do this! LOL!  So I got it figured out and sewed my lines.  Then I had three different choices for the flourish.  I decided on the Cherry Lynn Flourish because you could see more of the stitched lines.  So I had my panel ready and I matted it with white, and thought it needed a little somethin' somethin'.  I thought a stitched edge would coordinate with the white stitching.  So I dug through and found my Lawn Fawn stitched rectangle dies, and that was the ticket!  Then I used my Waffle Flower Additional A2 Layers dies to mat the panel in white.  I was going to leave it as it was, but then I decided I wanted to add a sentiment.  I heat embossed my sentiment, die cut it, and then adhered it to my card.  For the inside I left it plain with just a flourish die cut so a message could be written inside. 

That's all for now!  Thank you for stopping by!!
Terri

Sunday, January 7, 2024

Quilted Halloween


 Supplies:
Stamps: Clearly Besotted Sweet Little Sentiments (inside)
Paper: Gina K white and kraft, Chatterbox Tangerine Pinwheels, and SU old olive and peach parfait
Ink: VersaMark
Accessories: May Arts Twine, SU dimensionals, SU square lattice embossing folder, SU Stylish Shapes Dies, Pink and Main large sentiment strips dies, 1/2 inch square punch

Hello Stampers!  I made this card for the Featured Stamper challenge on Splitcoaststampers.  I love the quilted look of this card and wanted to give it a try.  I started by picking out some patterned paper and matching cardstock.  Then I punched out all of my squares and started to make my pumpkin.  I used a 1/2 inch square punch to make my squares smaller so I could make a 4.25x4.25 inch square card.  I adhered my squares to some grid paper and decided to make a round pumpkin instead of a tall pumpkin.  Then I cut around the pumpkin, ran it through the embossing folder and adhered it to the white square die cut.  I added a kraft mat behind this.  To finish the pumpkin I added a twine bow.  For the background I used the floral orange paper that I used in my pumpkin, and matted it with white paper and adhered it to the card front.  For the inside I made a strip of patterned paper, and I heat embossed the sentiment, die cut it, and adhered it to the inside of the card. That's all for now!  Thanks so much for stopping by!
Terri

Monday, January 1, 2024

Believe


Supplies: 

Stamps: SU Itty Bitty Christmas
Paper: Gina K white, Simon Says Stamp Matte Silver Cardstock, light blue cardstock from stash. SU basic black cardstock
Ink: Distress Ink: stormy sky, faded jeans, and chipped sapphire, VersaMark
Accessories: silver embossing powder, Sizzix Dash Away All die, Pickett Fences blending brushes, Pink and Main Large Sentiment Strip Dies, Stampin Up winter snow embossing folder


Hello Stampers!  I hope you all had a wonderful Holiday Season!!  It went by pretty quickly!!  Here is a card I made for the Freshly Made Sketches sketch of the week.


For my card I die cut the stars and moon, and then I embossed and ink blended the background.  I used a matte silver cardstock behind the focal panel to make the moon and stars sparkle.  I die cut Santa's sleigh and adhered it to the focal panel.  For the sentiment I stamped and heat embossed it on to a black piece of cardstock and die cut it with a sentiment strip die cut.  And then I adhered it to the focal panel.  For the inside I embossed a piece of light blue cardstock and ink blended it.  Then I heat embossed the sentiment, die cut it, and adhered it to the embossed panel.

Happy New Year everyone!!  Thanks for stopping by!
Terri