Sunday, March 29, 2009

Taylored Expression Challenge

Well this weekend here is Wisconsin, we were expected to get 6-8 inches of snow. Needless to say I reached for this bright Springy paper to help brighten my mood. We just got rid of all of our snow and the thought of more snow coming....was not what I wanted to hear. Thankfully when I woke up this morning there was merely a covering of snow, and it has all melted by now. Phew! Let's bring on Spring!! So here is the sketch this weekend from Taylored Expressions:

Here is what I did with the sketch:


I started by picking out paper from the 6x6 Gypsy Basic Grey paper pad. I love these paper pads, the patterns are smaller and you get just the right amount of paper for cardmaking! I cut the pieces according to the sketch, and decided to mat the two strips to make them stand out more from the background. Then I added three orange brads to the top of the striped strip. The focal image is from an acrylic set by Hero Arts. The cupcakes are all just too cute. Since the paper I chose had flowers, I chose the cupcake with flowers. I tried coloring this in with my copic markers, and failed miserably...so I reached for my watercolor pencils and had success. You can't tell from the picture, but I added some sparkle to the sprinkles using a glitter pen. I outlined and shadowed the cupcake using my prismacolor cold stone marker. I also added piercing in the corner, and then matted it onto the pink paper. Then I die cut the leafy stuff using the Sizzix Bigz Hello Kitty Flower Bouquet. I attached it them to the card, and then using pop dots added the focal image. Next I added the flowers. These are bazzill flowers, and the center is a brad from Amanda Bleu that I got on clearance. I didn't notice it when I bought them, but there were two holes in the brad...hmmm. I decided that maybe they were there to add some twine, dmc floss, etc. So I gave it a try and I thought it looked pretty good, so I went with it. Maybe that's why they were on clearance?! Last, but not least, I added the sentiment. This is a Lockhart stamp, that I just love, and yes I used my stamp-a-ma-jig. :)


That's all for now! Thanks for stopping by..I get to go frost some chocolate cupcakes! mmm...I tried a new recipe! (Is your mouth watering??? mine is just smelling them)


Monday, March 23, 2009

Mojo Monday 79

It is that time again for Mojo Monday. As always the sketch was fantastic. Here is my take on the sketch:


I started by choosing my patterned paper. This is from a 12x12 paper pad by My Mind's Eye, that I purchased at Hobby Lobby. I thought the scallops in the paper would compliment the scalloped edges throughout the card. I can't seem to complete a card without adding scallops?! I just love 'em! I matted the patterned paper with cardstock and added a scallop border using one of my new ek success border punches. Then I stamped my focal image using ancient page chocolate, and cut it out using a long nestability. I colored in the flower using twinkling h20's. I had a hard time finding a coloring medium that matched the papers that I chose. This was the closest I could find, and it adds a little sparkle as well when using these and who doesn't love sparkles! After coloring I matted this with a scallop long rectangle nestability. After attaching the layers to the yellow paper, I attached the ribbon to the back of the yellow layer. This is a ribbon I purchased at Joann's, it is one of the little spools that they sell for $1. Now it was time to stamp the sentiment, I chose a thank you stamp from Amuse. I definately used my stamp-a-ma-jig to align this sentiment. Then I added a striped making memories flower brad that I picked up this weekend at Target. They recently stocked up their scrapbooking supplies with some fun new stuff! Lastly, I added a scallop corner. This is a punch by ek success. Speaking of punches....after I completed this card and was watching tv I heard a crash in my scrapbooking space. My husband and I looked at each other and immediately went into the other room, only to find that my curtain rod had fallen down and my beloved punches were everywhere. I had my curtain rod attached to some rails that were already up that hold up shelving that I have in my room, so it wasn't as sturdy as it would have been attached directly to the wall. So...lesson learned?! oh yeah. I piled up my punches and I will be fixing my curtain rod tomorrow night. :(


Thanks for stopping by!


Sunday, March 22, 2009

Featured Stamper

When I saw that Beate was the Featured Stamper this week, I was thrilled. I was suprised she hadn't been the Featured Stamper yet! Her gallery is OUTSTANDING! I love all of the details she adds to her cards, and love her tutorials! I have used quite a few of them, and they are awesome! As I was gazing through her gallery to choose a card, I finally decided on this one: Here is the card I made:


I changed the following card elements: color scheme, stamps, the shape of the focal image, and I didn't add all of the glorious piercing that Beate adds to her cards. I sometimes just don't have the patience to add the piercing, even though I love the way it looks.
While I was gathering supplies for this card, I discovered something very cool. I had purchased the Quickutz Label Revolution die last month. And I just received the wonderful top note die from Stampin Up. I thought what are the chances that these would work together...well guess what?! they did and I love that I can add all of those fun layers (without trying to cut them out by hand)!
So after being all excited over this I decided I wanted to use this patterned paper by My Mind's Eye, I love the colors in it. I cut it out and punched the corners using the su ticket corner punch. Then I was having a hard time choosing a stamp set, and as I was going through my stamp sets I noticed this flower stamp from the SU Older and Wiser Stamp Set coordinated really well with this paper. So I used my stamp-a-ma-jig (love this tool!) to stamp this image after I had die cut it and added a brad to center of the flower. After I attached all of the layers to the top note die cut I attached my ribbon. This is a ribbon I purchased at Michaels. Next, I stamped just the flower from the focal image, and then stamped it again to have a lighter shade of the orange. I again used my stamp-a-ma-jig to center the sentiment over the stamped flower. I punched it out using my 1 3/8" circle punch and layered it with the 1 1/2" circle punch, and then the su scallop circle. I adhered this to the card using pop dots.
That's all for now! Thanks for stopping by!


Taylored Expressions Cupcake Challenge #60

It has been awhile since I have made a card. I saw Taylor's cupcake challenge, and thought it was a great place to start. Here is the sketch: This is my take on the sketch:

I didn't have any cupcake images that would work for this card, so I decided to use this cute chick to make an Easter card. I started by choosing my patterned paper. This is paper from Chatterbox called Rosey Cottage and Rosey Bias Plaid. I cut the first plaid layer, and used my ticket corner punch on the corners. Then I made the center layer, and used the apron lace fiskars border punch to make the scallop edge. I added a pink cardstock strip and then tied on the white ribbon. I am not sure where I got this ribbon, but it is almost sheer and I love the texure that it has. For the focal image I decided that I was going to paper piece the chick rather than color it in. After placing the chick onto the white oval, I decided that I would like to mat the oval with the pink scallop to make it stand out more from the patterned paper.

That's all for now, I am working on a post for the Featured Stamper Challenge from Splitcoast. So be sure to check back tomorrow!

Monday, March 16, 2009

Filed With Flair

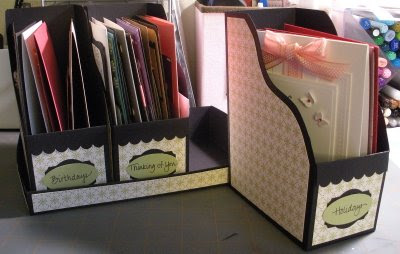
I was super excited when I saw this Filed with Flair template designed by Lauren Meader, released Sunday from Papertrey Ink. This was just what I needed to coordinate with my newly decorated, magazine holders. I just love all of the inspiration provided by such talented papercrafters here online! I used the same Amuse decorative paper to match the magazine holders. I added a scallop border above the title of the file boxes and titled them, Birthdays, Thinking of You, and Holidays. I wrote these titles out by hand and punched them out using the large SU oval punch. I then matted it with the designer label punch. For the base I made the front shorter so you could see the titles without taking out the file boxes, and added decorative paper to add some color. Be sure to check out the other templates that Lauren has created for Papertrey Ink, and while you're there check out the new stamp releases!!


How fun are these?! Thanks for stopping by. Now I'll have to make some cards to add to these snazzy files with flair!

Monday, March 9, 2009

Stamp TV Sketch Challenge

Have you checked out Gina K's Stamp TV? If not, you need to check it out!! Every week she has a new TV tutorial on various stamping techniques. She explains and demonstrates these techniques very well!! I look forward to this every Wednesday. In addition to the tutorials, there are a variety of challenges to participate. This week's sketch challenge was presented by Jessica Fick. I really liked the large panel, so many options for this space!!


I just received this Thoughts and Prayers set from SU last week, so of course I had to break it out and ink it up. I decided to stamp on a soft patterned paper for something different. I matted it on black cardstock cut out and embossed from the curved rectangle nestabilities. I attached the main image with pop dots, and then I added Martha Stewart's butterfly punch. I just have to say that I absolutely love her punches. I am always looking for a way to incorporate them into a card! Then I added three teeny tiny adhesive pearls to the body of the butterfly. Lastly I attached the ribbon at the bottom.
Recipe:
Stamps: Thoughts and Prayers

Ink: Memento Tuxedo Black

Paper: PTI ivory cardstock, paper pizzazz ivory swirls and twirls (almost certain I purchased this at Joann), black bazzill

Tools and Accessories: Curved rectangle nestabilities, martha butterfly punch, adhesive pearls, Offray black chiffon ribbon

Thanks for stopping by!


Sunday, March 8, 2009

Mojo76

It's time to get your Mojo on again. It is Mojo Monday Sketch #76 this week, and with it being the first sketch of the month it is contest time as well. The lucky winner will receive a Verve set!! And with a new release tomorrow from Verve stamps, who would not want to enter this contest?! Here is the sketch for Mojo76:

And here is what I did with the sketch!


I have found myself gearing toward the plain and simple cards lately. I like that the card focuses on the main image, and it looks crisp. I started out by coloring the stamped image and cutting it out and embossing it with the nestabilities. Then, I cut out the largest square nestability and embossed that as well. I added piercing around the edge and adhered it to the base. For the center panel, I decided to leave it plain because I chose I decorative ribbon. I decided on this ribbon because the swiss dots complimented the piercing throughout the card. After attaching the main image with pop dots, I punched out the tiny butterflies and added a gemstone to make them pop a little. Lastly, I added piercing at the bottom with my sentiment. I definitely used my stamp-a-ma-jig for alignment of the sentiment.

Recipe:
Stamps: Inkadinkado, Hero Arts


Paper: Gina K Luxury White Cardstock


Coloring Tools: Memento Tuxedo Black Ink, Copic Markers: BG10 Cool Shadow, BG23 Coral Sea, B00 Frost Blue, B02 Robin's Egg Blue, Y11 Pale Yellow, Y15 Cadmium Yellow, RV34 Dark Pink, RV11 Pink, V01 Heath, V15 Mallow, Y38 Honey, YG03 Yellow Green, Colorless Blender;


Accessories & Tools: Hero Arts Gemstones, Martha Stewart Butterfly Punch, RibbonFX, Square Nestabilities, Paper Piercer, Stamp-a-ma-jig


Thanks for stopping by!


Saturday, March 7, 2009

Organizing Makes Me Happy!

I am soooo excited about this. I have been in organization mode for a few weeks, trying to spruce up my scrapbooking space. When I opened up my email this morning from Papertrey Ink and saw this organization idea, I almost fell off my chair! This was exactly what I needed to do! Becky Oehlers, you made my day!! After using the Amuse paper on my card today, I thought how perfect would that paper be for this idea. I have lime green and black accents in most of my storage stuff! So I got to work and this is what I came up with. I love how clean this looks!! Now I wish I would have bought more of that patterned paper so I could make some more.


Thanks for stopping by!

Verve Release Sketch Challenge

Tomorrow there will be a new release from Verve Stamps. The sneak peeks have really made me anxious to see the new sets! I know I already want to purchase the butterfly set, that butterfly is so pretty!!!

Verve is having a Verve Release Sketch Challenge using the following sketch:


This is the card that I came up with:


I just received my Stampin' Up order, and I know Baroque Motifs is not a new stamp set, but it is one have wanted since it came out. So I was soo excited to ink this set up. This is a pretty self explanatory card so I will list the recipe of supplies below:


Stamps: SU Baroque Motifs; Paper: PTI Ivory Cardstock, Bazzill Brown CS, Amuse patterned paper; Ink: Chalk Ink: Chestnut Roan and Olive Pastel; Accesories and Tools: Hero Arts Flowers, American Crafts brown brads, square nestabilities, Martha Stewart border punch, scissors

That's all for now, thanks for stopping by!


Sunday, March 1, 2009

It's Challenge Time

This weekend I decided to try some new challenges. The first one that I tried was a sketch challenge from Our Creative Corner. Here is the sketch:


And here is what I did with the sketch.


Details: I started by choosing my DP from SU 6x6 paper pad. I then decided I wanted to use brown as a complimentary color for the base and accents. For the scalloped edge I was very excited to try out my new scalloped scallop edge border punch from ek success. (These punches are fantastic! And the storage of these babies is wonderful and compact!) Next I chose my main image, this monkey stamp is too cute. I colored it is with copic markers and then cut it out with petite oval nestabilities. After I cut it out I took the next size down and lined it up and ran it through the cuttlebug again to emboss it. This gave it a double embossed edge. I chose to do this instead of adding an extra layer. Then I matted it with the dark brown paper. After this was put together I added small creative candy from Amuse to the center of the flowers. Next, I rounded the top corners of the DP and card base, and attached the DP and scalloped edge strip. Before attaching my main image I punched a slot and ran the sheer brown ribbon through it, then I adhered it to the base, and tied the ribbon on. I then attached the flower with a yellow dew drop as my accent, in place of the butterfly. And I added the stamped sentiment in place of the button on the sketch.


The second challenge that I completed was the clean and simple challenge over at SCS. I am very excited about these challenges. It looks like a new CAS challenge will be posted on Mondays. I will definately be checking these out. I tried to post a picture of the sketch, but I was not able to figure it out. Here is the SCS link: CAS #3.


Details: For this one layer card I used Gina K's luxury 120 lb. white cardstock as a base. LOVE, this cardstock! I stamped my image on a stamp-a-ma-jig image sheet and centered it on the card. (I left off a butterfly that was on this stamp, it would have been in the embossed area if I would have kept it on, I decided to add the Martha butterfly punch instead) After I stamped the image, I used the largest plain rectangle nestability to emboss the card front. I did use removable tape to keep the nestability in line. I added the punched butterfly and pink gem stones and I was done! Gotta love a quick and easy card!


That's all for now!