Showing posts with label fall to layout sketch. Show all posts

Saturday, September 2, 2023

Jack O Lantern


Supplies:
Stamps: Stampin' Up (inside)
Ink: Memento Tuxedo Black and Distress Inks: Speckled Egg, Walnut Stain, and Shabby Shutters
Paper: Gina K White, SSS Fog, Stampin' Up: Basic Black, Old Olive, Soft Suede, Early Espresso, Pumpkin Pie, and Mango Melody
Accessories: Sizzix Tim Holtz Edison, Colorize, Impression Obsession DIE178-C, Waffle Flower A2 and Additional A2 Layers Dies, Pickett Fence Blending Brushes, May Arts Twine, Inside: Martha Stewart Punch and Impression Obsession DIE060-1

Hello Stampers!!  I made it through the first three days of school.  Needless to say I am beat, and was grateful for some time this afternoon to get back into my craft room.  I made this card for two challenges:  Free 4 All: Fiber Friendly on Splitcoaststampers and Freshly Made Sketches.
To start my card I die cut and assembled the Jack O Lantern.  Isn't that Jack O Lantern the best?!  I knew I had to have it when I saw it released.  It is kinda big, but I think it worked out well with this sketch.  Then I had to decide what background I wanted.  I was just going to use Speckled Egg, but when I blended it out I didn't like it.  So I went over to Pinterest and found the blend Walnut Stain, Shabby Shutters, and Speckled Egg and gave that a try.  I liked it much better.  So next I matted the blended piece in black and adhered the Jack O lantern.  It needed a little somethin' somethin'.  I found a grass die and added to the focal panel.  The Edison die comes with such cool clouds and I wanted to incorporate them into my card also.  So I die cut a gray and a white one and adhered them to the focal panel.  Before I adhered the focal panel to the card base I wrapped some twine around the bottom portion to add that layer for the sketch.  For the inside I stamped the sentiment and added some clouds and another Jack O lantern with some smaller grass.  

I am almost done with my Halloween cards!! Yay!


Thanks so much for stopping by!!
Terri

Thursday, May 30, 2013

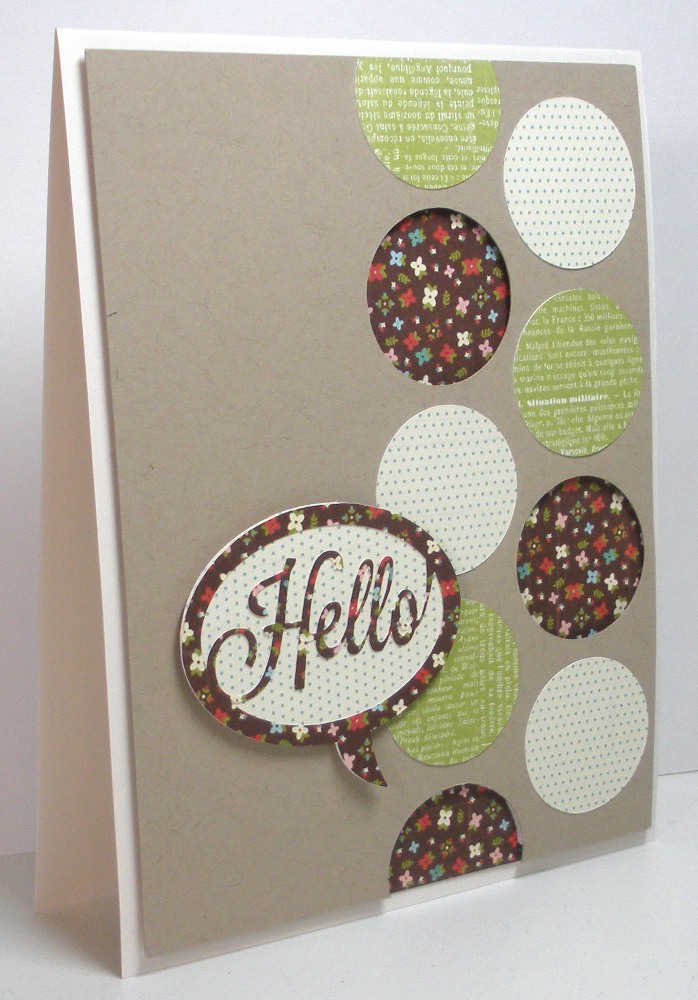
Hello!

Supplies: Paper: Papercut: cream, Crumb Cake, Basic Grey 6x6 Hey Girl!  Accessories: Silhouette Image: Lori Whitlock Quote Bubble, dimensionals
 
I have been wanting to make a card, and yesterday I organized my space so I have a table top again.  This made it a lot easier to make a card!  I saw this card sketch, and went from there.  I hopped onto the Silhouette Design Studio and created the card front.  I only cut out three of the circles from the card front, and then popped that piece up for dimension.  I cut out some circles from coordinating papers, then I was trying to decide what to do for the sentiment.  I have been seeing conversation bubbles on a lot of cards lately so off to the online Silhouette store I went.  I found this cut file.  I popped this up on the card too. 
 
I never would have come up with this on my own, thank goodness for card sketches! 


Thanks for stopping by!
 
Terri

Tuesday, April 9, 2013

Anniversary Wishes

Supplies: Stamps: Teeny Tiny Wishes  Paper: Pear Pizzazz, Basic Grey Hey Girl!, Ivory cardstock  Ink: Pear Pizzazz  Accessories: word window punch, SU flower garden textured impression folder, EK Success Scallop dotted ribbon 2 in 1 punch, pearls
Here is another card inspired by the Clean and Simple Sketch 235.  I rotated the orientation of the sketch so I could use the full embossed flower image.  I inked up my embossing folder before running it through the Big Shot.  Then I sponged the edges with pear pizzazz.  I have to say I am pretty excited that SU is bringing this color back.  I love it!  Thanks for stopping by!
 
Terri


Sunday, April 7, 2013

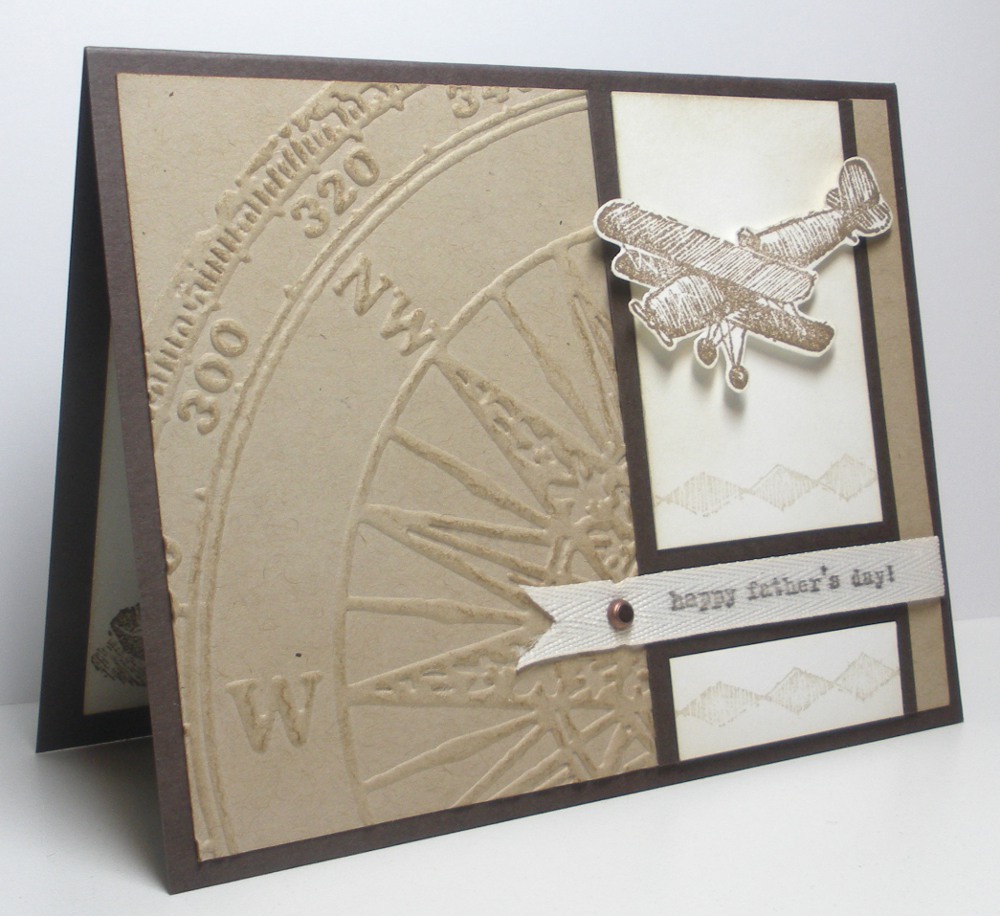
Plane and Simple

Supplies: Stamps: SU Teeny Tiny Wishes, Plane and Simple  Ink: SU Soft Suede, Crumb Cake, Early Espresso  Paper: Early Espresso, Crumb Cake, Whip Cream by Paper Cut  Accessories: Tim Holtz embossing folder, twill tape, dimensionals, brad, sponges for distresses
 
I wanted to try the Clean and Simple sketch this week.  I picked up this embossing folder today and thought it would work out great with the sketch.  Then I pulled out my Plane and Simple set and everything fell into place.  Thanks for stopping by!
 
Terri

Thursday, July 21, 2011

Still Lovin' This Designer Frame

Supplies: Stamps: perfect punches Paper: white, pear pizzazz, light yellow bazzill, jillibean patterned paper  Ink: early espresso  Accessories: early espresso taffeta ribbon, classic scallop and plain oval nestabilities, extra large oval punch, textured impressions designer frames
I just had to try this embossed frame with the oval nestabilities, and I have to say I am pleased with the results.  I cut out the frame with the plain oval and then matted it with the scallop oval.  Then I remembered that I had the perfect punches set and it had the happy birthday sentiment that works with the extra large oval punch.  So I had my focal point done.  I had the fall to layout sketch on my desk and decided to work with it.  I used 3 strands of ribbon in place of the panel behind the focal image, and I used scallops as a mat rather than a border.  What a fun sketch!
Thanks for stopping by!


Saturday, May 21, 2011

Wahoo, It's Summer Vacation!


Supplies: Stamps: Stampendous Ink: memento tuxedo black, versamark Paper: light and medium aqua and white Accessories: ek success border punch, 1/4 inch white grosgrain ribbon, detail white embossing powder, su scallop circle punch, 1 3/8 inch circle punch, dimensionals

It is my official first day of summer vacation!  Let the cardmaking, gardening, and lounging (thanks to my husband for buying me a couple anti-gravity lounge chairs for my birthday) begin!  So for my first card of the season I made a card for the CAS design team for the summer session.  I missed the challenges last time, but was able to receive a guest designer spot for the week of May 30th.  The theme of the challenges is beach and we also had to pop up an image or part of an image.  I popped up the scalloped circle to add dimension to this card.  I also used the Fall to Layout sketch of the week for the layout of this card.    Thanks for stopping by!

Tuesday, April 26, 2011

A Sketch, A Challenge, A Mother's Day Card

Supplies: Stamps: Well Scripted Paper: crumb cake, chocolate chip, white, pear pizzazz, riding hood red, daffodil delight, pink pirouette Ink: soft suede Accessories: little leaves die cut, floral fusion die cut, itty bitty shapes punch pack, dotted scallop ribbon border punch, rhinestones, twine, buttons latte


I've been working on this card a few days. I had everything punched out and was having fun moving around the die cuts until I found the arrangement that I liked. I used the sketch from the Clean and Simple Blog, FTL137, for this card. I also combined the "Rules of Three" CAS challenge on SCS. I used the three flowers, and before I added the itty bitty flower in the center of the flowers there were three layers to each flower. But I couldn't resist adding the fourth! Thanks for stopping by!


Monday, March 7, 2011

Happy Easter

Supplies: Stamps: egg I think it is technique tuesday??, sentiment stampendous Ink: Versamagic pink Paper: SU pink, bazzill coconut white, green patterned paper my mind's eye, SU crumb cake for the bunny Accessories: SU punch, martha border and bunny punch, puff ball, twine, sizzix embossing folder

I made this card for two challenges. The first challenge was the current fall to layout sketch from the Clean and Simple Blog. I also stumbled upon a guest designer challenge for the clean and simple challenges on SCS. I totally missed the designer challenges, so I thought I'd try out for the guest designer. The challenge was to use a silhouette stamp. So I stamped my egg silhouette to make a background. For the ribbon panel I used Martha's grass border punch and added some thin twine in place of ribbon. I also added a bunny punched out of crumb cake and added a nice puffy white cottontail to him. I stamped the sentiment punched it out with the SU punch and adhered it behind my "grass." Lastly, I embossed the card front using a sizzix embossing folder and adhered all of my pieces onto the card front.


Thanks for stopping by!


Thursday, January 27, 2011

Fall to Layout


Supplies: Stamps: SU Paper: Basic Grey, ivory, and brown Ink: memento rich cocoa
Accessories: ek success border punch


I made this card awhile ago and forgot to post it. I used a sketch from the Clean and Simple blog. I like the layout a lot. I wasn't sure how the stamped images would look on the patterned paper, but I think they stand their own fairly well. Thanks so much for looking! Have a great day!


Monday, December 20, 2010

CAS Gingerbread Fall to Layout

Supplies: Stamps: SU and Amuse, Paper: Imaginence, bazzill, archiver's cs, Ink: Versamagic Jumbo Java, Accessories: su border punch, nestabilities, grosgrain ribbon, red gems


Here is a card using the latest fall to layout sketch. I added some patterned paper on the bottom... I thought it needed some more color. This is kind of an odd angle for the picture, my battery was dying when I was taking pics and I had to send them in the mail today so I couldn't take too many pics. Speaking of sending Christmas cards, my husband picked up our mail today and all of our Christmas cards that we sent were bundled in our mailbox. He had to add postage to all of our cards! I didn't think they seemed that heavy, but some of the ribbons were too thick to pass through the machine... The post office suggested we purchase the 64 cent stamps next year... oops!!! Well at least the recipients didn't have to pay extra postage this way. I'm always afraid that is going to happen, or that they will get sent back. This is such an expensive hobby!!


I'll be posting the rest of my Christmas cards this week. I needed just a couple more and made a series of cards that are all just a little bit different.


Have a great night, see you tomorrow!


Monday, December 13, 2010

Is it just me or are gingerbread just too cute?!

Stamps: Amuse and Stampin up? Ink: Versamagic Jumbo Java Paper: Bazzill, archivers brown, imaginece, Accessories: brown grosgrain ribbon, su scallop circle punch, 1 3/8 inch circle punch, 1 1/2 inch circle punch, small red gems


Gingerbread are my favorite Christmas decoration, I have them all over my house right now and I love it!! So of course I have a few gingerbread stamps! I used the fall to layout sketch for this. The details are pretty basic, nothing fancy on this one!

Have a great day stay warm!!


Monday, December 6, 2010

I'm a Demonstrator!

Stamps: Winter Post, Cardinal Christmas Ink: Early Espresso, versamark Accessories: Top Note, stamp a ma jig, grosgrain ribbon.


So I recieved my Stampin Up Hobby Demonstrator kit today!! I wanted to call in sick today just so I could stalk the UPS man and play with all of my new goodies! I didn't call in sick, but I did rush home a bit sooner than usual. I couldn't wait to ink up Winter Post! I used the Fall to Layout sketch of the week for this card.


Thanks for stopping by. Have a great week!

Wednesday, November 17, 2010

Givin' It Another Go

It is time for the CAS design team search for winter over at SCS. I decided to go for it again and see what happens. The challenge for the first round is the theme: celebration/holiday or birthday, with ribbon and bling. But as always, also keep it clean and simple! I used the current fall to layout sketch as a starting point for this card. I had my Basic Grey 6x6 Waissal paper pad out so I picked out some papers from that. I die cut the SU top note and ornaments from sizzix. I added some Martha ribbon to cover up the seam, and added a touch of bling to the sentiment. And presto, I was done. Now I wait.... that's the hardest part! :)

Thanks for stopping by!


Thursday, November 11, 2010

Fall to Layout Sketch

I found some time to participate in the fall to layout sketch this week. I chose to use a stamp from Perfect Presentation from Stampin Up. My Mom picked this up for me at a rummage sale this summer. I stamped using Martha Stewart inks, and punched out the snowflakes with a 7/8 inch circle punch and added a gem to the center of each. Then I stamped the whole image inking up with a green edge, popped it up on a scallop square, and added a gem. Next I broke out the stamp a ma jig and stamped my sentiment in black. The red mat is embossed with a snowflake embossing folder, and I popped up the white panel on top of this for more dimension.

That's all for now, thank goodness tomorrow is Friday! :)


Monday, November 1, 2010

More Kraft??

I am going krazy with kraft these days!! I can't seem to make a card without it. This is a clean and simple card using the fall to layout sketch from the clean and simple blog. I used last year's stampin up set christmas punch. I stamped the snowflakes in memento rhubarb stalk and punched them out using the su punch. I added a ruby gem to the center of the snowflakes, and stamped the sentiment in memento tuxedo black. I can't remember the name of the su stamp set... That's all for now, have a great week. I have more conferences tomorrow night, and my anniversary is Wednesday. Can't believe it's been nine years!

Wednesday, October 27, 2010

Sweet Holiday Wishes

Wow, did life get busy all of a sudden! I've been preparing for parent teacher conferences, so I have been doing report cards on top of all of the rest of my busy work! Which means I have less time to stamp. But I snuck in a few minutes today! That's what I love about CAS cards, they don't take very long to make! Granted I had been planning it out in my head throughout the day, and when I got home it all came together.


I just love gingerbread, and these die cuts are cookie cutter die cuts from quickutz. They are just too cute! The peppermints are a stamp by whipper snapper that I colored and cut out. I popped one of them up with pop dots. The striped paper and sentiment are by Amuse. And I made the scalloped edge using su's scallop border punch. The layout for the card is from the clean and simple blog.


Thanks for stopping by!

Thursday, October 21, 2010

Oh Martha!

Just when I think I've got it all Martha does it again! I was at Michaels this weekend and they had some new Martha border punches! Why oh why am I so addicted??!! I think I need therapy! I just couldn't leave this on the shelf! I love it!! I added a bunch of black pearls to the centers of the flowers. The ribbon is from hobby lobby and the flower is by Bazzill. I added a button in the center and tied some red and white twisted floss to the button. My sentiment is by Amuse and I fancied it up by punching it out using SU oval and scallop oval punches. I am just loving this week's fall to layout!


Thanks for stopping by!

Monday, October 18, 2010

Girlie Christmas Card

I have two nieces (will have another very soon!) that are such girlie girls! I love it! So I thought for their Christmas card I would go with some girlie colors rather than the traditional green and red. I used the layout from the clean and simple blog. My images are both by Amuse, patterned papers are from a 6x6 paper pad by Cosmo Cricket. I cuttlebuged the ivory background, you can't really see the snowflakes unfortunatley, but I still like the texture it adds.


Thanks so much for looking!

Sunday, September 12, 2010

CAS Thinking of You

I used a couple of challenges for this card. The first was the color challenge over at Stamp TV. The colors of the week were kraft, yellow, brown, and red. The other challenge was the Fall to Layout sketch from the Clean and Simple Blog. I just love fall and sunflowers, and these colors were perfect for a fall card. I tried to grow sunflowers in my garden this summer and the birds (I'm assuming the birds) kept eating all of the seeds before they could grow. So out of all of the seeds I planted 1 sunflower plant came up and bloomed. HA, it looks pretty funny in the garden!! :) Anywho, I used Gina K's sets Happy Harvest and Summer Harvest for this card. I colored the focal image with copic markers, edged it with a Martha Stewart border punch, and added some SU brown paper to the sides. The sentiment was made by punching out SU designer label punch in red, 1 1/8 inch circle in brown, SU oval punch for the phrase, and after these were all adhered together I added some bronze brads.

Thanks so much for stopping by! Have a super week!

Sunday, September 5, 2010

A Sketch and A Color Challenge

Well before I get to the details I thought I would share that I am going to be one of the guest designers for the Clean and Simple Challenge over at Splitcoaststampers! Pretty exciting news for me, this will be my first designer experience and I am looking forward to it! Yeah!

Now onto the details of this clean and simple creation! The layout of this card is the sketch of the week from the Clean and Simple blog. You can see it here. I also used the color challenge from Stamp TV: brown, ivory, and yellow. These colors are so pretty together! The stamp sets that I used are Spring Mix and Enjoy the Sunshine Stamp TV Sets from Gina K. The brown and ivory are pure luxury cardstocks from Gina K, and the yellow was from my pile of scraps! The embossing was all done with my cuttlebug using the swiss dots folder and the just my type embossing borders.

Now that I had some crafty fun, it is time for some plum fun! We picked our plum tree yesterday and I have a huge bag waiting for me! If you have any plum recipes let me know!! :) I'll give em' a try!

Thanks for stopping by!