Showing posts with label Thinking of You. Show all posts

Monday, August 11, 2025

Sunny Beachy Thoughts


Supplies:
Stamps: SU Trucking Along
Ink: Distress Ink: Spiced Marmalade, Scattered Straw, Tumbled Glass, Memento Tuxedo Black, SU Pear Pizzazz, Cajun Craze
Paper: Gina K White, SU Pool Party, Pecan Pie, Granny Apple Green, and Sandpaper
Accessories: Pickett Fence Blending Brushes, SU Stylish Shapes Dies, Lawn Fawn Everyday Sentiment Banners, Dimensionals, Sizzix Palm Tree Die, SU Soft Waves Embossing Folder

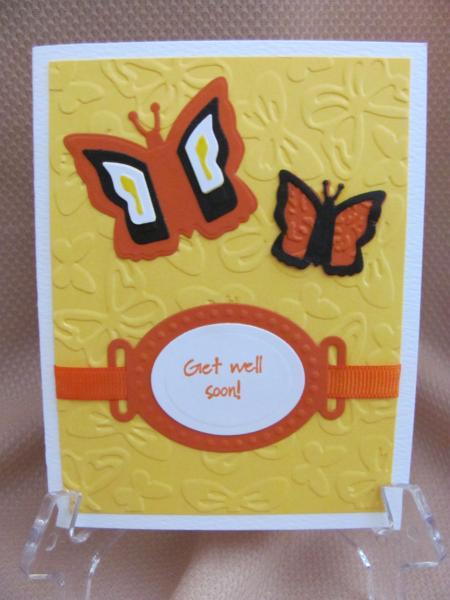
Hello Stampers!!!  I'm here to share a card I made for the Clean and Simple Challenge over at Splitcoaststampers.   The theme of the week is "Summer Fun."  To make my card I started with the truck.  I inked up the solid truck with pear pizzazz ink, and then I lightly sponged on some cajun craze ink at the bottom to give the truck a rusty look.  Then I stamped the outline of the truck on top of this.  To give it that beachy, summery feel I stamped the palm trees, surf board, and beach ball in the back and colored them with copic markers.  Then I fussy cut this out.  For the background I die cut a circled and ink blended a summery sky, and added some sandpaper at the bottom of the circle to ground the truck.  To finish up the focal image I stamped, die cut, and popped up the sentiment on the circle.  Now for the card front I decided to emboss it with the soft waves embossing folder, and adhere it to a pool party card base.  I adhered my focal image to the background to finish up the front of this card.  For the inside I die cut a palm tree and added a bit of sandpaper at the bottom, leaving room to add a note.  And that completes my card.  

Thanks so much for stopping by!!
Terri

Monday, June 16, 2025

Buzzy With Flower


Supplies:
Stamps: Stamping Bella: Buzzy Bee Holding a Flower, Pretty Pink Posh: Bee Friends
Ink: Memento Tuxedo Black
Paper: Gina K White, Stampin' Up: Sweet Sorbet and Bee Mine 12x12 DSP
Accessories: EK Success: Flourish Punch, Waffle Flower Nesting Circle Dies, Copic Markers

Hello Stampers!  I'm back from our week up north!  It was a chilly week but we still had a nice time.  I'm a bit late posting this featured stamper challenge card.  I started it last night, but was not able to finish it.  So this morning I finished it.  Here is the card that I CASED:


For my card I started with the focal image.  I stamped, die cut, and then colored in the image with Copic markers.  Then I matted it with some sweet sorbet cardstock.  For the background I chose to just have one diagonal cut.  I taped the two pieces together on the back, and matted it with some sweet sorbet cardstock.  For the flourishes, I used an oldie but goodie flourish punch from EK Success.  I adhered these to the back of the focal image, and then adhered it to the patterned paper layer.  Once that was in place I adhered the layers together.  For the inside I stamped the sentiment and bees.  And colored in the bees to finish this card.

That's all for now!  Thanks so much for stopping by!
Terri

Monday, March 3, 2025

Have a Bee-utiful Day!


 Supplies
Stamps: SU Honey Bee, Sentiment from Stash
Paper: Gina K White, SU Basic Black, Simon Says Stamp Matte Gold Cardstock
Ink: VersaMark
Accessories: SU Detailed Bee Dies, Simon Says Stamp Ultra Fine Gold Embossing Powder, Spellbinders Bee-Cause Embossing Folder, Dimensionals

Hello Stampers!  I'm here to share a card I made for the Clean and Simple Challenge: Squares, over at Splitcoaststampers.  I decided to make a square card for this challenge.  To start I cut a white card base.  Then I cut a square panel and embossed it with the bee-cause embossing folder.  I matted this with some gold cardstock.  Then I decided to add some bees.  I stamped, heat embossed, die cut, and popped them up with some dimensionals.  To finish the front I stamped, die cut, and popped up the sentiment.  For the inside I left room for a message, and added a couple of heat embossed bees.
Thanks so much for stopping by!!
Terri

Monday, July 15, 2024

Bee Thinking of You


Supplies:
Stamps: Pretty Pink Posh Bee Friends
Ink: Memento Tuxedo Black
Paper: Gina K White and Kraft
Accessories: Copic Markers, SU Perennial Postage Dies and Dimensionals

Hello Stampers!  I'm here to share a card that I made for the Clean and Simple Challenge over at Splitcoaststampers.  The theme for the challenge is summer bugs.  As I went looking through my supplies I found this set by Pretty Pink Posh that I hadn't used yet.  So I stamped the sentiment and flower using my Misti and cut it out with the postage die.  Then I stamped, fussy cut, and colored the bee.  I layed out the bee and focal image so I could stamp the trail of the bee.  Then I adhered the focal image and popped up the bee using dimensionals.  When I was done I thought about adding some texture to the kraft background.  I went through my supplies and couldn't find anything that would work, so I left the background plain.  So this is a super CAS card!  
Thanks so much for stopping by!
Terri

Monday, May 27, 2024

You are my Sunshine


Supplies:
Stamps: Stampabilities
Paper: Gina K white, Yellows from stash
Ink: Brutus Monroe Detail Ink: Raven
Accessories: SU Stylish Shapes Dies, Patchwork Pieces Dies, and Hey Chuck Dies, Copic Markers

Hello Stampers!  I'm here to share a card I made for the Clean and Simple challenge over at Splitcoaststampers.  The theme was: Let the Sun Shine in.  I thought of my You are my Sunshine stamp when I saw the theme for this challenge.  I wasn't quite sure what I was going to do with it being it was so small.  Then I stumbled upon the Patchwork Pieces Dies, and chose to use the rays die as the background.  After I had it glued onto some white paper I trimmed it so there was a slight border.  Then I stamped and die cut the sentiment, and colored in the sun with some Copic markers. I kept the inside simple so a message could be written.

That's all for now!!  3 1/2 days of school left!!  Woo Hoo!!  

Terri

Sunday, April 14, 2024

Tulip Note


 Supplies:
Stamps: Clearly Besotted Sweet Little Sentiments
Ink: SU Sweet Sorbet
Paper: Gina K white and SU Sweet Sorbet
Accessories: Park Lane Tulip embossing folder, SU Edgelits: Finishing Touches, Ribbon: SU Sweet Sorbet

Hello Stampers!  It is Featured Stamper Sunday!  Congrats to Beth on being the Featured Stamper!  Here is the card that I CASED.

For my card I embossed the tulips.  I added a decorative edge to the bottom of the sweet sorbet mat.  Before I adhered the tulip to the mat, I added some ribbon with a bow.  I used my Misti to stamp the sentiment, and that completes my card.  For the inside I embossed the bottom and left it blank so there would be room to write a note.

Thanks for stopping by!
Terri

Sunday, January 28, 2024

How Ya Bean?


Supplies:
Stamps: Amuse: how ya bean?
Paper: Gina K ivory, SU pebbled path, LilyBeeDesign: Persnickety 6x6 paper pad
Ink: SU pear pizzazz
Accessories: SU punches, linen thread, and dimensionals, Concord & 9th Cup of Kindness dies

Hello Stampers!  Well I had good intentions to make a couple of cards today, but as I was cutting out the heart for the coffee cup I dropped my heart die cut!!  I spent over an hour searching and moving things around to try to find it.  It was the first time using this die set, so I was very determined to find the missing heart.  I was about to give up when I used a ruler to go under part of my desk, and out came the die cut!  I was so relieved.  So I was only able to make one card, because I have to make dinner.  Maybe if it's not too late I'll make another one after dinner.  Anywho, this card is for the Featured Stamper Challenge over at Splitcoaststampers.  This is my inspiration card:
For my card I started by picking out some patterned paper and matching cardstock.  I cut my ivory card base, and assembled the coffee cup.  Then I cut a strip of patterned paper and matted it with pebbled path.  Before adhering it to my patterned paper layer I added a linen thread treatment.  Next I stamped and punched the sentiment and punched the background to the sentiment and adhered it to the card.  To finish the card I popped up the coffee.  I kept the inside simple so there would be room to write a note.

That's all for now!  Off to make some white chicken chili!
Terri

Friday, January 12, 2024

Stitched Flourish Card


Supplies:
Stamps: Pretty Pink Posh Simple Sentiments Strips
Ink: VersaMark
Paper: Gina K white and kraft and SU basic black and old olive
Accessories: Pretty Pink Posh Sentiment Strips Dies, Sewing machine, Cherry Lynn Designs Mini Fanciful Flourish die, Lawn Fawn stitched rectangle dies, Waffle Flower Additional A2 Layers Die, Brutus Monroe alabaster white embossing powder

Hello Stampers!  We are having our second snow day this week today!  I am grateful for the time off, because I haven't been feeling well.  So I slept most of the day, and then decided I was going to make a card!  I checked out the sketch over at Freshly Made Sketches, and decided to play along! 
For the background I chose to stitch the lines using my sewing machine!  I'm not what you would call a sewer, but I thought I'd give it a try.  First I had to change out the thread from black to white.  I'm not gonna lie, I had to get out the manual to figure out how to do this! LOL!  So I got it figured out and sewed my lines.  Then I had three different choices for the flourish.  I decided on the Cherry Lynn Flourish because you could see more of the stitched lines.  So I had my panel ready and I matted it with white, and thought it needed a little somethin' somethin'.  I thought a stitched edge would coordinate with the white stitching.  So I dug through and found my Lawn Fawn stitched rectangle dies, and that was the ticket!  Then I used my Waffle Flower Additional A2 Layers dies to mat the panel in white.  I was going to leave it as it was, but then I decided I wanted to add a sentiment.  I heat embossed my sentiment, die cut it, and then adhered it to my card.  For the inside I left it plain with just a flourish die cut so a message could be written inside. 

That's all for now!  Thank you for stopping by!!
Terri

Monday, October 30, 2023

Pumpkin Hello!


Supplies:
Stamps: SU Rustic Crate, Thinking of You (inside, unknown)
Ink: Memento Tuxedo Black
Paper: Gina K white and SU Crumb Cake
Accessories: Spellbinders Square Nestabilities, SU Rustic Crate Dies, SU Linen Thread, Cuttlebug embossing folder (inside), Copic Markers

Hello Stampers!  I'm back with a card that I made for the Clean and Simple Challenge on Splitcoaststampers.  The theme of the challenge is: Pumpkin Everything!  I've had this Rustic Crate stamp set on my desk for awhile and I was going to put it away, and then I saw this challenge.  I love this fall arrangement, and was happy I could use it again.  To make my card I started with a square card base, and then embossed the square nestabilities die.  Next I used my Misti to stamp the focal image.  I colored in the image with Copic markers, and then die cut the hello three times and stacked them together before adhering it to my card.  To finish off the front I added some linen thread at the top with a bow.  For the inside I kept it simple, so a note could be written.  I embossed the border and stamped the sentiment, and I was done.

That's all for now!!  Thanks for stopping by!!
Terri

Friday, August 11, 2023

Farm Fresh


Supplies: 
Stamps: Stampin' Up Trucking Along
Ink: Memento Tuxedo Black and Seaside Spray
Paper: Gina K white, Stampin' Up Pumpkin Pie, and Pebbles Spring Fling 6x6 paper pad
Accessories: Copic markers, Silhouette Studio pumpkins, May Arts Twine, Pickett Fence Blending Brush

Hello Stampers!  I'm back with a card I made for the Free 4 All challenge on Splitcoaststampers:  On the Farm.  I went with the theme of a pumpkin farm.  I started with the truck.  I stamped, colored, and cut it out.  Then I decided I needed some pumpkins for the back of the truck, so I went on Silhouette Studio and I had some pumpkins that I could use.  I added some detail to the pumpkins with a Copic marker.  Then I cut out my focal panel and stamped the sentiment, and did some ink blending for the sky.  On top of the sky I stamped and fussy cut the clouds.  Next I added some May Arts twine, and adhered the truck.  To finish the card I added some layers and adhered them to the card base 4.25 x 4.25.  For the inside I die cut some larger pumpkins an added a strip of the gingham brown paper.

Thanks so much for stopping by!
Terri

Thursday, July 13, 2023

Just Bee-Cause


Supplies:
Stamps: Stampin' Up Honey Bee and Sunny Studio Just Bee-Cause
Ink: Memento Tuxedo Black and Stampin' Up Daffodil Delight
Paper: Gina K white and black onyx
Accessories: Stampin' Up Detailed Bee Dies, Gina K Master Layouts 3, Taylored Expressions Honeycomb Embossing Folder, Ribbon (Stampin' Up?)

Hello Stampers!  I made this card for two challenges today: Freshly Made Sketches and Ways to Use It: Bee Creative on Splitcoaststampers.  
To make my card I started by stamping and die cutting the honeycomb, bees, and sentiment.  Then I cut out the focal panel, embossed it, and attached my ribbon.  Next I adhered this to a black mat.  Then I arranged the honeycomb, bees, and sentiment and adhered them to the embossed panel.  I popped up the honeycomb with dimensionals so I could tuck my bees in underneath just a smidge.  For the inside I die cut some honeycomb and added some bees.  

Thanks so much for stopping by!!

Terri

Sunday, April 30, 2023

Snail Mail


Supplies:
Stamps: Great Impressions and A Muse artstamps: Just a Note
Ink: Memento Tuxedo Black
Paper: Gina K Kraft and White and Stampin' Up Sweet Sorbet and Country Gingham 6x6 DSP

Accessories: Copic markers, Stampin' Up Linen Thread (Inside: Lawn Fawn Stitched Scalloped Borders).

Hello Stampers!  Today I am bringing you another card for the Featured Stamper Challenge on Splitcoaststampers.  This is the card I used as inspiration:         


For my card I started with a square card base.  Then created my layers.  For the focal image I stamped and colored it in with my Copic markers.  Then I stamped the sentiment and added some linen thread. 
 This was a pretty quick and easy card!  Thanks so much for stopping by!!

Terri


Sunday, April 16, 2023

Thinking of You

Supplies:
Stamps: Gina K Scripty Sayings 2
Ink: Memento Tuxedo Black
Paper: Park Lane Silver Foil, Gina K heavy and layering weight white
Accessories: Waffle Flower A2 Layers, Memory Box Leafy Ring, Stampin' Up Simply Elegant Trim

Supplies:
Stamps: Stampin' Up Positive Thoughts
Ink: Memento Tuxedo Black
Paper: Gina K Layering Weight and Park Lane Silver Foil
Accessories: Stampin' Up Nature's Thoughts Dies

Hello Stampers!  It is Featured Stamper Sunday on Splitcoaststampers!  This week's Featured Stamper is Susan and this is the card I chose from her gallery as inspiration for my card.  The silver ring of stars caught my eye, and it reminded me of the Leafy Ring die cut.  For my card I die cut the Leafy Ring and then stamped the sentiment.  From there I die cut an A2 layer to be my focal panel, and added silver trim with a bow  I matted this with silver foil paper (even though in the picture it looks holographic!) to get that same metallic look as Susan's card.  To finish the front I adhered this to a card base.  

That's all for now!  Thanks for stopping by!
Terri

Sunday, March 19, 2023

Gnome Thinking of You

Supplies: 
Stamps: Gina K A Big Hello
Ink: Memento Tuxedo Black
Paper: Gina K white and kraft, peach and blue from stash, Simple Stories: Bloom and Grow 6x6 paper pad
Accessories: Stampin' Up Gnome Dies, May Arts twine, mini dimensionals, Stampin' Up Stylish Shapes Dies, white gel pen

Supplies:
Stamps: Stampin' Up Happy Thoughts
Ink: Memento tuxedo black
Paper: Gina K kraft and white, Simple Stories: Bloom and Grow 6x6

Hello Stampers!  This week's card is for the Paper Players theme challenge of Spring has Sprung, and the featured stamper challenge at Splitcoaststampers. Erin is the featured stamper, and here is the card I selected from her gallery.  I started by making the gnome.  I followed a tutorial on how to make a dancing gnome, and adhered it to the patterned paper.  I cut out the panels and mats and adhered these together.  I added some twine and a bow before I adhered the focal panel.  To finish the card I stamped and die cut the sentiment.  Thanks so much for stopping by!!

Terri

Saturday, March 18, 2023

Thinking of You


Supplies:
Stamps: Hampton Art Kelly's Thinking of You
Ink: VersaMark
Paper: Gina K white, blue and cream from stash, Stampin' Up: Granny Apple Green, Daffodil Delight, Gingham Gala 6x6 DSP
Accessories: Jaded Blossom Gnome Dies, Stampin' Up cloud embossing folder, Martha Stewart grass border punch, Doodlebug twine, Brutus Monroe alabaster white embossing powder

Supplies: 
Stamps: My Sentiments Exactly: Happy Thoughts
Ink: Stampin' Up Daffodil Delight
Paper: Stampin' Up Daffodil Delight and Gingham Gala 6x6 DSP
Accessories: Lawn Fawn: stitched scalloped border die

Hello Stampers!  I made this card for the Inspiration Challenge on Splitcoaststampers.  This photo was my inspiration:
I just love gnomes, and when I saw this image I thought of my new gnome die that I got this week.  To make my card I started by assembling the gnome die cut.  I gave him a flower in hopes that we stop getting snow storms!  I am ready for spring!!  Then I thought he should be sitting in some grass, so I punched out a grassy border.  I left enough room below the border to include a sentiment and some twine.  From here I had a white background for the gnome, but I felt like it needed a little somethin' somethin' so I added the embossed cloud background.  Then I matted it with some gingham paper, and to finish the card I adhered it to my card base.

That's all for now!  Thanks for stopping by!!

Terri

Sunday, December 11, 2022

Autumn Silhouette


Supplies: Stamps: Gina K Autumn Silhouettes Paper: Gina K: Heavy Base Weight White and Black Ink: Distress Ink: Wild Honey, Seedless Preserves, Mustard Seed, Spiced Marmalade, VersaFine Clair Nocturne Accessories: Stampin' Up: Wonderful Gems, Simply Elegent Trim, Needlepoint Elements Framelits Dies, Pickett Fences Blending Brushes

Hello Stampers!  I made this card using Freshly Made Sketches sketch of the week.
I decided to take a break from Christmas cards and go with a fall theme for this card.  I started by blending my background.  Then I used my Misti to stamp the silhouette image.  I matted this blended piece with black cardstock.  For the sentiment I stamped and die cut it, and attached it to the card.  To separate the focal image from the sentiment I added some gold twine.  And then I added some sparkle to my focal image by adding some gold sparkly gems to finish the card.

Thanks so much for stopping by!!

Terri

Sunday, May 1, 2022

You've Been In My Thoughts


Supplies: Stamps: Gina K Autumn Silhouettes Ink: VersaFine CLAIR nocturne, Distress Inks: Scattered Straw, Spiced Marmalade, and Seedless Preserves Paper: Gina K heavy base weight white and black onyx  Accessories: Gina K Master Layouts 1, gems, Martha Stewart butterfly punch, Pickett Fence blending brushes

Hello Stampers!  Happy May 1st!  So excited to be that much closer to summer break.  I made this card for the Featured Stamper Challenge on Splitcoaststampers.  Here is the card I CASED.


To make my card I cut my card base, and I used the Master Layouts 1 to cut the layers of my card.  Next I chose some Distress Inks to blend the background.  Then I stamped the silhouette and sentiment using the Misti.  Lastly, I added some butterflies with gems to give the card a little sparkle.


That's all for now, thanks for stopping by!

Terri

Tuesday, April 12, 2022

Hello!

Supplies: Paper: GKD black onyx and heavy base weight white Ink: Distress Inks: crackling campfire, carved pumpkin, and mustard seed Accessories: SU rectangle stitched framelits, SU scalloped contours dies, Impression Obsession butterflies, Create a Smile hello twice cool cuts die, Taylored Expressions gold drip drops, Picket Fences blender brushes

Hello Stampers!  I was stuck on the heating pad on Sunday, and wasn't able to participate in the Featured Stamper challenge on Splitcoaststampers.  So I thought I would make one today.  Congratulations to Gayle on being the Featured Stamper this week.  Here is the card that I got inspiration from:

To make my card I started with a white card base, and then die cut the scalloped rectangle out of black onyx cardstock.  Then I die cut a stitched rectangle and ink blended the background with Distress Inks.  I die cut the butterflies and adhered them to the background, and added some gold drip drops to the body of the butterflies.  For the sentiment I die cut it out of black cardstock and adhered it to the ink blended background.  

That's all for now, thanks for stopping by!!
Terri

Monday, September 6, 2021

How Ya Bean?


 Supplies: Stamps: Amuse: To Go Cup and How Ya Bean? Ink: Memento tuxedo black and VersaMark Paper: Gina K heavy base weight white, SU melon mambo, and Pink Paislee patterned paper Accessories: SU stitched circle die cut, Spellbinders scalloped circle nestabilities, Brutus Monroe alabaster white embossing powder, SU word window punch, dimensionals
Hello Stampers!  Well I survived my first three days of school.  I have 22 kindergarteners this year, needless to say I was pretty tired out after three days of school!!  It is great to have a three day weekend after that!!  I didn't get to participate in the featured stamper challenge yesterday, we were celebrating my niece's 18th birthday!  Today I have to clean the house and do laundry so I thought this morning I would have some fun time in my craft room first!  

I made this card for the Clean and Simple challenge on Splitcoaststampers.  The theme this week is coffee.  I love these images from Amuse, and decided to use them in this challenge.  To start I stamped the coffee and die cut it with the stitched circle die cut.  Then I cut the scalloped circle frame.  I stamped the coffee again onto the patterned paper and cut out the cup of the coffee and adhered it to the stamped image.  I love how dainty the hearts are on this patterned paper.  Next I cut the card base, added a strip of the patterned paper, and a sliver of melon mambo to frame the patterned paper.  I adhered the coffee piece to the card base, and then worked on the sentiment.  I stamped and embossed the sentiment and cut it out with the word window punch.  I popped it up with some dimensionals on the card, and this card is complete.

Thanks so much for stopping by!

Terri

Wednesday, March 3, 2021

Buzzing By To Say Hi

Supplies: Stamps: Whipper Snapper garden buzz, Great Impressions sentiment Paper: SU Melon Mambo and Gina K layering weight white Ink: Memento tuxedo black Accessories: Offray ribbon, Copic markers, Spellbinders rectangle nestabilities, Stampin Up layering circle framelits, Simon Says Stamp detail petal plate, 1 3/4 inch circle punch, sequins
Hello Stampers!  Today on Splitcoaststampers it is the sketch challenge. Here is a picture of the sketch.

To make this card I started with a melon mambo card base.  The next layer I used the detail petal plate to add some texture to the background.  For the focal image I stamped, colored, and die cut the image, and matted it in melon mambo.  I stamped another bee from the image, colored it, cut it out, and popped it up with a mini dimensional on the focal image.  Next I added some ribbon, and then it was onto the sentiment.  I stamped it on white cardstock, punched it out with the 1 3/4 inch circle punch, and matted it with one of the circles from the Stampin' Up layering circle framelits.  To finish the card I adhered all of the layers together.

Thanks for stopping by!

Terri