Showing posts with label Amuse. Show all posts

Monday, July 21, 2025

Here's the Scoop!


Supplies:
Stamps: Amuse: Sundaes, Here's the Scoop, Dessert First

Paper: Gina K White and Stampin' Up Basic Black
Ink: Memento Tuxedo Black
Accessories: Stampin' Up: Baker's Twine Essentials Pack, Word Window Punch, Rounded Word Window Punch, Wide Oval Punch, Dimensionals, Amuse Ribbon, Lawn Fawn Quilted Backdrop, Copic Markers, Simon Says Stamp: Large Rounded Tag

Hello Stampers!  I'm here to share a card I made for the Clean and Simple Challenge over at Splitcoaststampers.  The theme for this challenge is Ice Cream!  For my card I started by stamping, punching, and coloring the focal image and sentiment.  I die cut the tag, and popped up the focal image and the sentiment.  And to finish the tag I added some Amuse ribbon.  For the background I die cut the Quilted Backdrop die, matted it with black cardstock, and adhered it to the card base.  For the inside I stamped the sentiment and partially stamped the ice cream image and colored it in.
That's all for now!  Thanks so much for stopping by!!
Terri

Sunday, July 6, 2025

Congratulations


Supplies:
Stamps: Amuse Bride and Groom, Savvy Stamps: Congratulations Script and Just Married, Stampin' Up Falling for You
Paper: Gina K White and Stampin' Up Basic Black
Ink: VersaFine CLAIR: Nocturne
Accessories: Ribbon from stash, Alex Syberia Designs: Charming Flora Cover Die, Stampin' Up Tasteful Labels Dies, Doodlebug Glitter

Hello Stampers!  It's Sunday and it is time for the Featured Stamper Challenge over at Splitcoaststampers.  Here is my inspiration card:

For my card I started by adding texture to the focal panel using a cover plate die.  Then I stamped, die cut, and added glitter to the focal image.  For the ribbon I wrapped it around the focal panel and adhered it to the back.  And then I made a bow using the Bow Easy, because I couldn't get my bow to look right!!  I adhered the focal image with dimensionals, adhered the bow to the bottom of the focal image with a glue dot, and then I adhered the sentiment using mini dimensionals.  To finish the front I matted the focal panel with black and adhered it to the A2 card base.  For the inside, I stamped the Just Married image, and a sentiment underneath.

And that completed my card!  Thanks so much for stopping by!!
Terri

Saturday, March 22, 2025

Happy Birthday


Supplies:
Stamps: Amuse: Happy Birthday MA, Honey Bee: Birthday Wishes
Paper: Gina K Kraft, SU Very Vanilla
Ink: VersaMark
Accessories: Simon Says Stamp: Ultra Fine Cream Embossing Powder, SU: Needlepoint Elements Framelits Dies, Pretty Label Punch, Enamel Dot Essentials, Cream Ribbon, and Small Flower Punch, May Arts Twine


Hello Stampers!  I made a card using the sketch from Freshly Made Sketches, sketch of the week.  For my card I started by die cutting the floral image.  Then I heat embossed the sentiment, die cut the pierced edge, and then punched it out with the pretty label punch.  I embellished the sentiment with a punched out flower and an enamel dot.  Before I popped up my sentiment onto the focal panel I added a ribbon treatment with cream ribbon and tied on some twine.  To finish the front I added some cream enamel dots to the focal image.  For the inside I die cut the pierced border, and then heat embossed the sentiment.  And that completes my card!

Thanks so much for stopping by!!
Terri


Sunday, March 9, 2025

Ready, Set Recline


Supplies:
Stamps: Amuse: Recliner and Ready Set
Ink: Memento Tuxedo Black
Paper: Gina K White, SU gray (not sure which one)
Accessories: Ribbon from Stash, SU Baker's Twine Essentials Pack, Copic Markers: N4, N2, N0

Hello Stampers!  The Clean and Simple challenge over at Splitcoaststampers is: National Napping Day.  I thought of this stamp combo as soon as I saw the theme.  Some of my best naps are when I am in my recliner! LOL!  This is a very clean and simple card.  I stamped my recliner and colored it in.  I placed the ribbon where I wanted it and stamped the sentiment.  I tied on some baker's twine to the ribbon to finish the card.  For the inside I kept it open.  This could be a Father's Day card or a masculine birthday card.  

That's all for now!  Thanks so much for stopping by!
Terri

Monday, August 26, 2024

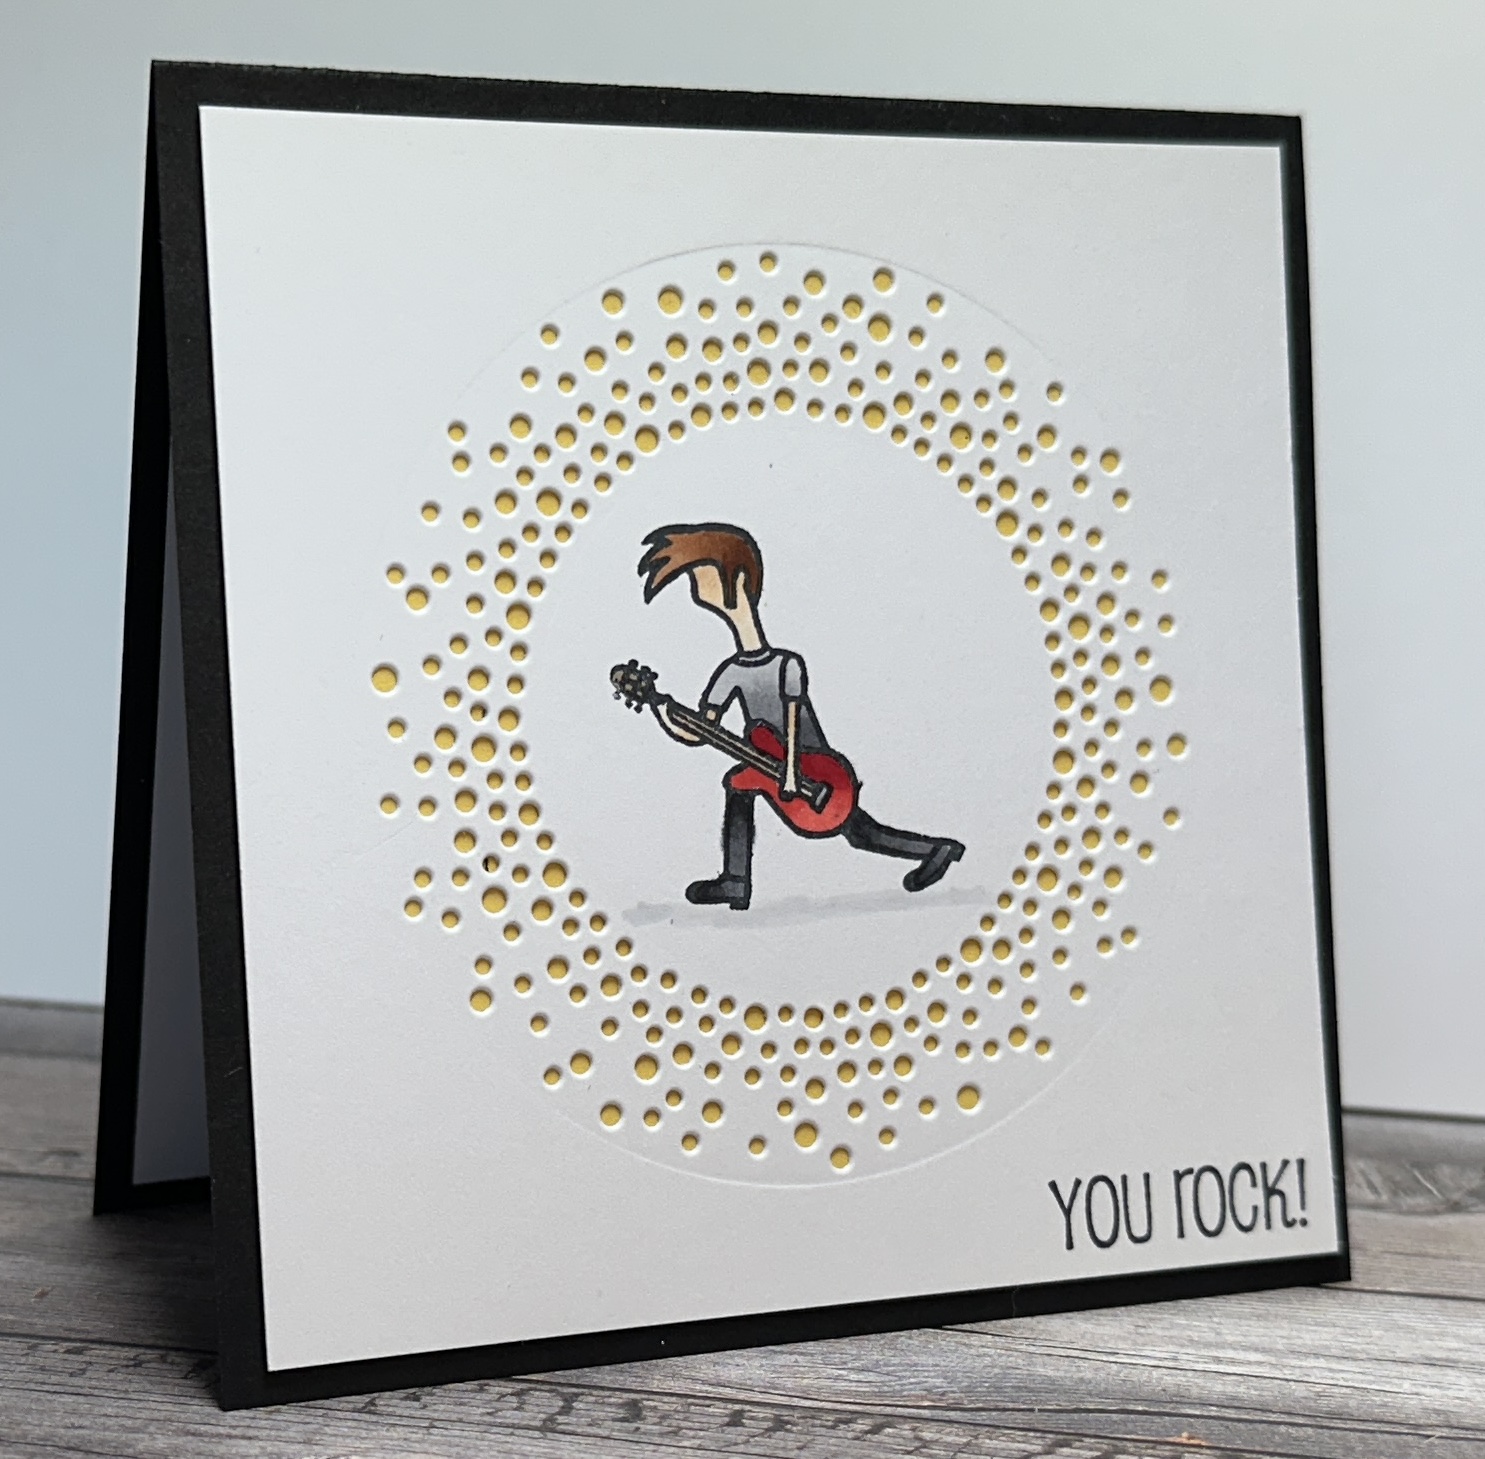
You Rock


Supplies:
Stamps: Amuse: You Rock and Rock Star
Ink: Memento Tuxedo Black
Paper: Gina K White and SU Basic Black and Daffodil Delight
Accessories: SU Labels Aglow Dies, Copic Markers

Hello Stampers!  I have made a clean and simple masculine card for the Clean and Simple challenge over at Splitcoaststampers.  For my card I started by cutting a white panel 4x4.  Then I used the Labels Aglow to die cut the shine around this rock star.  Next I used my Stamp a ma Jig to stamp the rock star and sentiment, and I colored in the focal image with Copic markers.  To emphasize the shine around the rock star I added a piece of Daffodil Delight behind the white focal panel.  And to finish the card I adhered this piece to the card base.

That's all for now!  Thanks for stopping by!!
Terri

Sunday, March 10, 2024

Cruisin' By Carrot Car


 Supplies:
Stamps: Lawn Fawn Carrot 'bout You, Amuse: Carrot Car, Spellbinders: Gnome Drive Sentiments (inside)
Ink: Memento Tuxedo Black and SU Pear Pizzazz
Paper: Gina K white, SU pear pizzazz, Amuse gingham
Accessories: Lawn Fawn Carrot 'about You die, Copic markers, Taylored Expressions: Grass Border Die, Waffle Flower: Scalloped Circles Die and Nesting Circles Die, Lawn Fawn Spring Showers Dies, Simon Says Stamp: 3D Foam Squares

Hello Stampers!  I am back with my card that I made for the Freshly Made Sketches, Sketch of the Week:

For my card I started by making the half gingham circle and adding a grass border to the top.  Then I stamped and die cut the Happy Easter banner.  Next I stamped my carrot car onto the stamp a ma jig plastic in order to get good placement of the carrot car.  I stamped the carrot car onto the card base, and colored it with Copic markers.  Once the carrot car was colored I adhered the half circle to the card base, and I also popped up the Happy Easter banner.  For the top half circle of this sketch I decided to use some clouds.  I die cut them and adhered the large one to the card base, and popped up the small one.  I kept the inside of the card simple.  I stamped the sentiment and die cut it from a circle die, and matted it with a scalloped circle.

That's all for now!  Thanks so much for stopping by!
Terri

Monday, July 31, 2023

Relax It's Your Day


Supplies:
Stamps: Amuse: Relax It's Your Day and Hammock, Papertrey Birthday Basics (inside)
Ink: Memento Tuxedo Black and Distress Ink: Mustard Seed (inside)
Paper: Gina K white
Accessories: Copic Markers, Stamp a ma Jig, Gina K Sunshine Stencil (inside), Poppy: Whittle Sunshine and Whittle Clouds, My Favorite Things: Rectangle Peek a Boo Window

Hello Stampers!  I made this card for the Clean and Simple Card Challenge on Splitcoaststampers.  The theme for this week's challenge is vacation.  I thought of this hammock stamp right away.  To make my card I started with the front card panel.  I trimmed it and die cut the recgtangle peek a boo die cut.  Then I set it on my card front without adhering it and used a pencil to trace the inside of the rectangle so I could see where to stamp my hammock.  Next I lined up my stamp a ma jig and stamped the hammock within the lines I traced.   Then before I went further I wanted to stamp my sentiment.  I again used the stamp a ma jig to line up and stamp the sentiment.  By this time the ink was dry from the hammock stamp and I erased the lines I drew on.  Next I colored in the hammock stamp, and then dotted the sand with my Copic markers.   For the sky I used a Copic marker and colored swirls.  Now it was time to adhered the card panel to the card front.  I used dimensionals to pop this panel up.  For the die cuts I adhered the clouds and for the sun I colored it in with Copic markers and then adhered it to the card.  I was kind of stumped as to what I should do on the inside.  Then I remembered that I had this sunshine stencil and that was what I went with.  
This was a fun card to make.  Thanks so much for stopping by!!

Terri

Monday, September 6, 2021

How Ya Bean?


 Supplies: Stamps: Amuse: To Go Cup and How Ya Bean? Ink: Memento tuxedo black and VersaMark Paper: Gina K heavy base weight white, SU melon mambo, and Pink Paislee patterned paper Accessories: SU stitched circle die cut, Spellbinders scalloped circle nestabilities, Brutus Monroe alabaster white embossing powder, SU word window punch, dimensionals
Hello Stampers!  Well I survived my first three days of school.  I have 22 kindergarteners this year, needless to say I was pretty tired out after three days of school!!  It is great to have a three day weekend after that!!  I didn't get to participate in the featured stamper challenge yesterday, we were celebrating my niece's 18th birthday!  Today I have to clean the house and do laundry so I thought this morning I would have some fun time in my craft room first!  

I made this card for the Clean and Simple challenge on Splitcoaststampers.  The theme this week is coffee.  I love these images from Amuse, and decided to use them in this challenge.  To start I stamped the coffee and die cut it with the stitched circle die cut.  Then I cut the scalloped circle frame.  I stamped the coffee again onto the patterned paper and cut out the cup of the coffee and adhered it to the stamped image.  I love how dainty the hearts are on this patterned paper.  Next I cut the card base, added a strip of the patterned paper, and a sliver of melon mambo to frame the patterned paper.  I adhered the coffee piece to the card base, and then worked on the sentiment.  I stamped and embossed the sentiment and cut it out with the word window punch.  I popped it up with some dimensionals on the card, and this card is complete.

Thanks so much for stopping by!

Terri

Sunday, May 10, 2020

Happy Mother's Day

Supplies:   Stamps:  Amuse  Paper: SU Daffodil Delight and Gina K heavy base weight white  Ink:  Memento tuxedo black  Accessories:  SU Needlepoint Elements Framelits Dies,  SU Pretty Label Punch, pearls, dimensionals, ribbon from my stash

Happy Mother's Day to all of the Moms out there!!!  Here is a card that I made for my Mom.  I love these Needlepoint Elements Framelits Dies, I had to make another card using them.  This card is pretty much the same as my previous card I made with these dies, except I added the Pretty Label punch with a sentiment.  I also added pearls to the sentiment and focal stitched image.  That's all for now!

Thanks so much for stopping by!

Terri

Friday, May 1, 2020

How ya bean?

Supplies:  Stamps:  Amuse and SU Timeless Textures  Paper: Gina K heavy base weight chocolate kiss and white  Ink: Memento tuxedo black and rich cocoa Accessories: copic marker

Hello Stampers!  I made this for this weeks Freshly Made Sketches sketch.  
This sketch was a challenge for me.  I didn't know what to use for the paint splotch of the sketch.  Then I stumbled upon the Timeless Textures set, and remembered I had a coffee and sentiment to match, and things started to come together.  I stamped the coffee stains in rich cocoa ink.  Then I stamped the coffee, cut it out, and added a few shadows with a copic marker.  I popped this image up on the coffee stains.  Lastly, I stamped the sentiment.  That's all for now.

Thanks for stopping by!

Terri

Sunday, February 9, 2020

You Make Life Sweet

Supplies:  Stamps: Amuse  Paper: Gina K Chocolate Kiss and Amuse  Ink: Gina K jet black amalgam Accessories:  Stampin up circle framelits, copic markers, silver pen

The Clean and Simple challenge this week is chocolate!  I broke out the Amuse stamps for this challenge.  I stamped and colored the chocolate image, die cut it, and then matted it onto a scalloped circle.  Then I made the gingham panel, and adhered it to the card panel.  After this I used my stamp-a-ma-jig to stamp the sentiment.  Lastly I adhered the focal image onto the card panel, and adhered the card panel to the card base.  This was a fun challenge!

Thanks for stopping by!

Terri

Sunday, January 26, 2020

Have a holly jolly Christmas

Supplies:  Stamps: Amuse  Paper: GKD heavy base weight white  Ink: GKD jet black amalgam, Distress Ink: faded jeans Accessories:  MFT stitched arch dies, picket fence life changing brushes, mask paper, copic markers

It is Featured Stamper Sunday!  This week the featured stamper is Angela.  This is the card that I found inspiration from: 

To make my card I dry embossed the stitched arch die onto my card base.  Then I stamped my image and sentiment using the stamp-a-ma-jig.  Next I stamped my car image onto masking paper and cut it out, and adhered it to the card.  Then it was time to add the distress ink.  I didn't want the blue to go over the stitched part of the die cut image, so first I set down the die cut on the card base and then added some masking paper around the die cut.  This was the first time I used the life changing picket fence brushes.  They are nice, they make blending very easy.  I didn't get any hard edges like I would with the Tim Holtz blender sponges.  Next I sprayed my blending with some water like Angela did on her card.  I like how it looks like it is snowing.  Lastly, I took off all of the masking paper and colored my image in with copic markers.  And that completed my card.

Thanks so much for stopping by!

Terri

Sunday, January 12, 2020

Relax, it's your day

Supplies: Stamps: Amuse  Paper: GKD heavy base weight white  Ink: GKD black amalgam ink  Accessories:  ribbon, oval Spellbinders, copic markers, and dimensionals

It is Featured Stamper Sunday on SCS.  This week's featured stamper is Kim.  This is the card that I got inspiration for my card.  I went super clean and simple with this card.  I stamped my image, colored it, and cut it out.  Added a scalloped oval frame, some ribbon, and a sentiment.

Thanks so much for stopping by!

Terri

Sunday, January 13, 2019

Retro Christmas

Supplies: Stamps: Amuse and Stampabilities  Ink: Gina K Amalgam black ink  Paper: Gina K heavy base weight white  Accessories: Stamp a ma Jig, MFT die cut, copic markers

Another Christmas card... I am starting early this year I guess! :)  I made this for the featured stamper challenge on SCS.  This week the featured stamper is Lori.  I selected this card to CASE.  When  I saw this card I remembered I had this retro Christmas ornament stamp, and I thought the die cut resembled the score lines on Lori's card.  

Thanks so much for stopping by!

Terri

Sunday, August 12, 2018

Ready, Set, Recline

Supplies: Stamps:  Amuse  Ink: Gina K black amalgam ink  Paper: Gina K heavy base weight  Accessories:  MFT square die cut, copic markers, dimensionals

Happy Sunday everyone!  Today is the featured stamper challenge on SCS.  Today's featured stamper is Beth.  After browsing through her gallery I chose this card as inspiration for my card.  I die cut my window, then traced the inner part of the frame onto my card base so I could stamp my images in the correct area.  After I stamped I colored in the chair with copic markers.  Lastly, I erased my square and added the top layer using dimensionals.

Thanks so much for stopping by!!

Terri

Saturday, August 11, 2018

Life Is Good

Supplies: Stamps: Amuse and Gina K  Ink: Gina K black amalgam ink  Paper: Gina K white, K & Company Citronella  Accessories: Spellbinders Nestabilities, twine, copic markers, thick twine ribbon

Today on SCS is the inspiration challenge.  This week the Life Is Good website is where we are getting inspiration for our cards.  I found this image as my inspiration.  I found some wave patterned paper to go with this card.  Then I stamped and colored my focal image.  I added twine, as ropes, to the focal image.  Then I stamped my sentiment and added scalloped mats to the sentiment and focal image using dimensionals.  Lastly, I added the twine ribbon to the patterned paper and then adhered the focal image and sentiment on top.

Thanks so much for stopping by!!!

Terri

Monday, April 3, 2017

Rain, Rain Go Away

Supplies: Stamps: Amuse  Paper: Lawn Fawn plaid, Gina K white  Ink: Memento tuxedo black  Accessories: copic markers, SU embossing folder, American Crafts ribbon, copic multiliner

The theme for this week's CAS challenge on SCS is April Showers.  We sure have had a lot of rain where I live, and there's more on its way.  I'm looking forward to the rain bringing those May flowers.  I chose this sweet little girl and her umbrella for this challenge.  I stamped her and drew in a sidewalk with a copic multiliner, and then colored it in using copic markers.  I added some cloud ribbon and I was done.  

Thanks for stopping by!!
Terri

Tuesday, June 16, 2015

First Stenciled Card

Supplies: Stamps: Amuse  Paper: Neenah solar white  Ink: Distress ink: tattered rose, Victorian velvet, milled lavender,  Memento rich cocoa,   Accessories: translucent embossing paste, Clearly Besotted happy die cut, Stampin Up edgelit finishing touches, Tim Holtz lace stencil, twine, spatula, multi matte medium, dimensionals
You Tube has soooo many great tutorials, and I have been watching quite a few.  I recently watched this one, by Kristina Werner, and decided to give this technique a try.  First I mixed my distress ink with the translucent embossing paste one color at a time, applying it to the stencil overlapping the paste a bit in between each color in order to blend them.  Then I had to wait for it to dry....  I decided to make the stenciled portion an angle, and cut a couple slivers of white cardstock and one strip that I die cut with the fancy edge.  Instead of trying to find cardstock to match I used the distress ink pads to color the paper so it matched my project.  For the sentiment I die cut the word happy, inked it with the distress ink pad, and heat embossed it with clear embossing powder twice so it was a nice thick gloss look.  Then I stamped the birthday portion of my Amuse stamp and adhered my die cut to coordinate with the stamped word.  I added a twine bow, popped up the panel with dimensionals, and that finished the card.  Thanks for stopping by! 
Terri


Wednesday, August 7, 2013

Gotta Love Dessert

Supplies: Stamps: Amuse Paper: Neenah white, Amuse black gingham Ink: Memento tuxedo black  Accessories: copic markers, paper piercer and template, extra large oval punch, dimensionals

Two posts in one day, I'm on a roll!  I couldn't resist, I had to make another dessert themed card for CASology.  I added some patterned paper this time and changed the shape of the piercing.  This was a fun challenge!
Thanks for stopping by!

Terri

Friday, April 5, 2013

Under the Weather

Supplies: Stamps: Amuse and Whipper Snapper  Paper: white and pink cardstock  Accessories: pink twine, oval punch, dimensionals, SU cloud embossing folder, Darice embossing easy frame, nestabilities, copic markers
I picked up the Darice embossing easy frames and tried them out.  They work great!  I wanted more of a frame around the focal image, so I embossed an oval nestabilities.  It flattened out the clouds...so I ran it through again and some of the clouds were on the oval frame I embossed...  So instead of continuing this endless battle, I got out my stylus and smoothed out the embossed oval frame the best I could.  Next time I think I will use the Darice easy frame and a stylus to emboss a frame. 
 
I added a sidewalk to my focal image, and popped up the main panel for some dimension wih the sentiment.
 
Thanks for stopping by!
 
Terri