Monday, October 30, 2023

Pumpkin Hello!


Supplies:
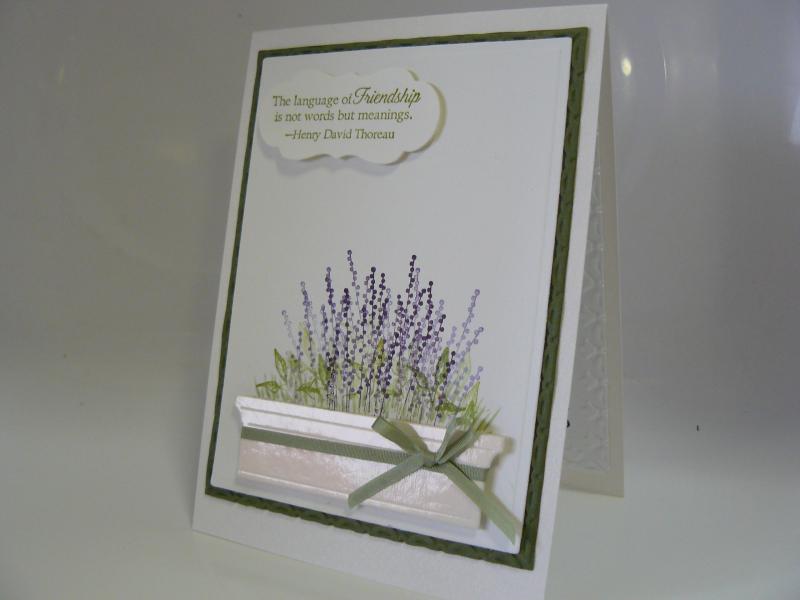
Stamps: SU Rustic Crate, Thinking of You (inside, unknown)
Ink: Memento Tuxedo Black
Paper: Gina K white and SU Crumb Cake
Accessories: Spellbinders Square Nestabilities, SU Rustic Crate Dies, SU Linen Thread, Cuttlebug embossing folder (inside), Copic Markers

Hello Stampers!  I'm back with a card that I made for the Clean and Simple Challenge on Splitcoaststampers.  The theme of the challenge is: Pumpkin Everything!  I've had this Rustic Crate stamp set on my desk for awhile and I was going to put it away, and then I saw this challenge.  I love this fall arrangement, and was happy I could use it again.  To make my card I started with a square card base, and then embossed the square nestabilities die.  Next I used my Misti to stamp the focal image.  I colored in the image with Copic markers, and then die cut the hello three times and stacked them together before adhering it to my card.  To finish off the front I added some linen thread at the top with a bow.  For the inside I kept it simple, so a note could be written.  I embossed the border and stamped the sentiment, and I was done.

That's all for now!!  Thanks for stopping by!!
Terri

Sunday, October 29, 2023

Happy Birthday To You!


Supplies:
Stamps: SU Rustic Crate and Label Love, Honey Bee Birthday Wishes (inside)
Paper: Gina K White and SU Crumb Cake
Ink: Memento Tuxedo Black and SU Crumb Cake
Accessories: SU Rustic Crate Dies, Linen Thread, Punch, Nested Essentials Dies (inside), Designer Tags Dies (inside), Copic Markers

Hello Stampers!  It is Featured Stamper Sunday!!  Today's Featured Stamper is Anita, and this is the card I chose from her gallery to CASE.
For my card I started by stamping and die cutting the crate.  Then I added some linen thread to my crate.  Next I cut my layers.  I stamped the floral image using my Misti, and then colored it in with Copic markers.  I popped up the crate on my focal image.  Then I stamped my sentiment, punched it out, and adhered it to my card.  After I adhered my layers to the card base I stamped and die cut the inside sentiment and adhered it to the inside.  I found the sprig die cut as I was looking for something and thought this complimented the floral image on the front of the card.  And that completes this card!  

Thanks so much for stopping by!!
Terri
 

Thursday, October 26, 2023

Driving By To Say Happy Birthday


Supplies:
Stamps: SU Driving By and Because You Care (inside)
Ink: Memento Tuxedo Black and VersaMark
Paper: SU Real Red, Basic Black, and Zoo Crew 12x12 DSP, Gina K white
Accessories: Gina K Large Rectangle Die Set and Master Layouts 4, Brutus Monroe Alabaster White Embossing Powder, Copic Markers, and SU dimensionals

Hello stampers!  I'm back to share the birthday card that I made for my nephew.  He will be 19 on Halloween!!!  I used the sketch from Freshly Made Sketches.
To make my card I started with picking out the DSP.  I chose the black DSP because I thought it looked like tire marks on the road.  Then I decided I wanted the car to be red so I made a red card base, and matted the DSP with black paper. For the focal image I stamped, die cut, and colored it in with Copics.  Then I heat embossed the sentiment and die cut it with a banner from Gina K's Master Layouts 4. and adhered them to the focal image.  To finish the front I popped up the focal image.  I kept the inside simple.  I stamped, die cut, and matted the sentiment and adhered it inside the card. 

That's all for now!  Thanks so much for stopping by! 

Terri

Sunday, October 22, 2023

Wintery Christmas


Supplies:
Stamps: Gina K Scripty Holiday, SU Brightest Glow (inside)
Paper: Gina K white, SSS Matte Silver Cardstock
Ink: VersaMark
Accessories: SU Simply Elegant Trim, Rubbernecker Deckle Hills, Ranger Silver Embossing Powder, SU Labels Aglow Dies (inside), Poppy Nordic Whimsy Trees, SU Snowflake Sky Embossing Folder

Hello Stampers!  I'm sharing a card I made for the Featured Stamper challenge on Splitcoaststampers.  The featured stamper is Pat and this is the card I chose from her gallery to CASE.

 For my card I die cut the trees and the deckle edge hills, and arranged them as my focal image.  Then I partial embossed the top of the card panel, stamped my sentiment, and added some silver cording to the bottom of the card.  I matted it with some silver cardstock and then adhered it to the card base.  For the inside I heat embossed the sentiment and die cut it with the label die.  And then I had a couple of extra trees so I adhered them to the inside as well.

That's all for now!  Thanks for stopping by!!

Terri

Sunday, October 15, 2023

A Little Birdie Told Me It Is Your Birthday


Supplies:
Stamps: SU Bird's Eye View and Go To Greetings, Stampers Anonymous: Crazy Talk (inside)
Paper: Gina K white and kraft, SU Vellum Basics 12x12
Ink: Memento Tuxedo Black
Accessories: Misti, Copic Markers, SU Linen Thread, SU Dimensionals, Pretty Pink Posh Sentiment Strips Dies

Hello Stampers!!  I am back with a card I made for the Featured Stamper Challenge on Splitcoaststampers.  This is the card that I CASED:

For my card I started with the card base, added a kraft layer, and then strategically glued on the vellum rectangles so the adhesive wouldn't show through.  For the focal image I found a stitched rectangle in my stash and masked off the stitched edge before stamping the branch, bird, and leaves.  Then I colored in the focal image with Copic markers.  I added some twine on the left of the focal image and popped it up with dimensionals.  To finish the front I stamped and die cut the sentiment and adhered it to the card.  For the inside I stamped the sentiment and stamped and colored the bird.

That's all for now, thanks for stopping by!

Terri

Saturday, October 14, 2023

Autumn Birthday Wishes


Supplies:
Stamps: SU Rustic Crate and Go To Greetings, HoneyBee Stamps Birthday Wishes (inside)
Ink: Memento Tuxedo Black and SU Early Espresso
Paper: Gina K white and kraft
Accessories: SU Dimensionals, May Arts Twine, SU Rustic Crate Dies and Nature's Thoughts Dies

Hello Stampers!  I made this card for a couple of challenges on Splitcoaststampers.  The first one is for the Clean and Simple Challenge: Autumn/Fall.  The second one is for the Inspiration Challenge.  
To make my card I started by stamping the focal image and die cutting it.  Then I used my stamp a ma jig to stamp the sentiment.  I did all of that before coloring in my focal image because then if I made a mistake die cutting or stamping the senitment crooked I wouldn't have wasted all of that time coloring.  After I colored in my focal image, I stamped, die cut, and adhered the crate to my focal panel.  And then I added the twine.  Then it was time to adhere it to the card base.  I thought about embossing the card base with a woodgrain folder, but decided against it.  So I adhered the focal panel with some dimensionals and kept it nice and simple.  For the inside I stamped the sentiment and stamped and colored in the image.  That is what is so great about Gina K heavy weight cardstock, you can color an image and it does not go through to the back of the cardstock.  I love it!  

Well that's all for now, I'll be back I have to make a birthday card for my nephew he is going to be 19.  I'm not exactly sure what to make yet, we'll see!!

Thanks for stopping by!!
Terri

Sunday, October 8, 2023

Brightest Daisy Birthday


Supplies: 
Stamps: SU Cheerful Daisies
Ink: SU Balmy Blue and Daffodil Delight
Paper: Gina K white, SU Balmy Blue, Mint Macaron, and Country Gingham 6x6 paper pack
Accessories: SU Linen Thread, SU Cheerful Daisies Dies, Pink Fresh 1/4 inch round blending brush

Hello Stampers!  I'm back to share my card for the Freshly Made Sketches, sketch of the week.
For my card I started by die cutting the daisies.  I used a small blending brush to brush on some Daffodil Delight to the center of the daisies.  Then I die cut the next layer of the daisies and adhered them to the base die cuts.  Next I wanted to add some greenery to the daisies so I die cut some greenery.  For the background I cut a panel of the plaid and matted it with some balmy blue paper, and adhered it to my white card base.  So I laid everything out on the card base and figured out how I wanted the flowers, and I took a picture of it.  Then I stamped and die cut the sentiment. To finish the card I adhered all of the flowers and sentiment to the card base using the picture I took of it.  I kept it simple on the inside, stamped and die cut a sentiment and adhered it to the DSP matted in balmy blue.

That's all for now, thank you for stopping by!!
Terri

Christmas Tree Wishes


 Supplies:
Stamps: Hero Arts Wishing You Tree Bundle
Paper: SU Tidings of Christmas, Evening Evergreen, and GKD white
Ink: VersaMark and SU Evening Evergreen
Accessories: Brutus Monroe Alabaster White embossing powder, Gina K Master Layouts 3, star brad, Silver gel pen, Waffle Flower A2 layering dies

Hello Stampers!  I am sharing my card for the Featured Stamper Challenge on Splitcoaststampers.  The Featured Stamper is Raye Lynn and this is the card I chose to CASE.
The hardest part of making this card was choosing the patterned paper.  My tree image has bold lines and it was hard to find a pattern that coordinated with that.  So I went with lines and I think it compliments the tree.  Also in the picture it looks like my card is black, it is actually a dark evergreen color.  

For my card I started by stamping and die cutting the tree out.  Then I die cut the patterned paper, and adhered these two layers together.  Then I added the star brad and colored in some accents on the tree with a silver gel pen.  And then I adhered this to the card base.  For the sentiment I heat embossed it, die cut it with a die from Gina K's master layouts three, and adhered it to the card.  For the inside I just stamped the ornaments and sentiment using my Misti.

Another quick and easy one.  Thanks for stopping by!
Terri

Sunday, October 1, 2023

Christmas Mouse


Supplies:
Stamps: Gina K Noelle Mouse
Paper: Gina K white and kraft, Stampin' Up Cherry Cobbler
Ink: Memento Tuxedo Black
Accessories: Stampin' Up Layering Circles Framelits Dies, ribbon, and Copic markers

Hello Stampers!  I am sharing a card I made for the Featured Stamper challenge on Splitcoaststampers.  The Featured Stamper is Manetta, and this is the card I chose to CASE. When I saw the mouse holding the candy cane, I immediately thought of the Gina K mouse and candy cane.  

I changed the card size to a 4.25x4.25 square card, and the color scheme.  To start the card I cut out the card base and the two layers.  I stamped my mouse and colored it in with Copic markers.  Then I stamped, colored, and fussy cut out the candy cane, and popped it up with some mini dimensionals on the mouse.  I used the stay put bow ribbon treatment and added a sentiment.  For the inside I stamped the sentiment, die cut it, and die cut a red scalloped circle.  I adhered everything together and that finished this card.  

Now I better get something done around the house... dishes, laundry, making chili where do I start?!  

Thanks for stopping by!!
Terri