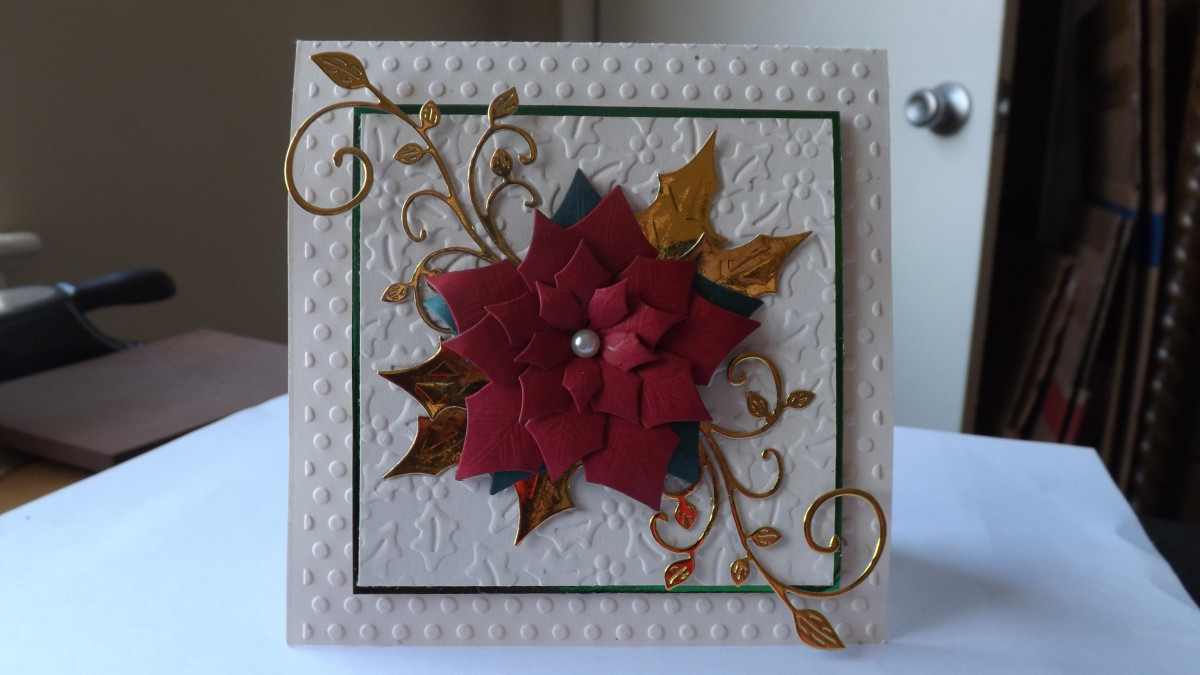
Sunday, December 17, 2023

Poinsetta Christmas


 Supplies:
Stamps: SU Cherish the Season and Rustic Crate
Paper: Gina K White and SU Soft Suede
Ink: SU Early Espresso and Memento Tuxedo Black
Accessories: SU Wavy Trim, Copic Markers, SU Dimensionals, SU Nature's Thoughts Dies and Rustic Crate Dies

Hello Stampers! I am back with a card that I made for the Clean and Simple Challenge over at Splitcoaststampers: Poinsettas.  I love the Rustic Crate set, and I hadn't made a card with the poinsettas yet.  So I was excited to ink it up!  I started by stamping, die cutting, and coloring the poinsettas.  Then I stamped the crate and die cut it.  I die cut the rectangle from the SU Nature's Thoughts Dies, and stamped the sentiment.  Then I added some wavy trim, and adhered the crate to the rectangle.  To finish the front I popped up the poinsettas.  For the inside I simply stamped a sentiment and die cut it with the same rectangle from the front.

Thanks so much for stopping by!
Terri

Rainbow Birthday Wishes


Supplies: 
Stamps: Julie Hickey: Sweet Sentiments Stamp Set (inside)
Paper: Gina K white, Silver glitter cardstock, Bazzill Vellum, SU: real red, pumpkin pie, daffodil delight, gumball green, blueberry bushel
Ink: Memento Tuxedo Black, SU: real red, pumpkin pie, daffodil delight, gumball green, blueberry bushel
Accessories: Gina K: Large circle die and Birthday Trio Dies, Brads, Pickett Fence blending brushes, Newton's Nook: Confetti Stencil

Hello Stampers!  It is Sunday and you know what that means, it is Featured Stamper Challenge Time on Splitcoaststampers.  This week's Features Stamper is Karen is this is the card I chose from her gallery:


I really liked the confetti background and the rainbow colors in the patterned paper.  So I started by stenciling on the confetti background.  Then I blended inks on white card stock and die cut the Birthday Trio dies. I got that all assembled and put it on the background and it was all just too bright.  The birthday dies blended in with the background and it was hard to see what it said.  So I got out some vellum and layered that on top and that softened my background.  I dug out some brads to adhere the vellum to the stenciled background.  Then I adhered the Happy Birthday.  For the inside I wanted to incorporate the rainbow colors from the front so I cut strips of paper and adhered them to the inside of my card.  I stamped and die cut the sentiment and adhered that to the rainbow strips.  And that completed my card!  

Thanks so much for stopping by!
Terri

Sunday, December 10, 2023

Jingle Bells


Supplies:
Stamps: SU Cherish the Season
Paper: Gina K Ivory, Simon Says Stamp: Matte Gold CS, Memory Box: Jolly Christmas 6x6 paper pad
Ink: VersaMark
Accessories: SU Sounds of the Season Dies, Simon Says Stamp Gold Embossing Powder, Gina K Master Layouts 2, SU Dimensionals, The Stamp Market: Pierced Plaid Cover Die, SU Simply Elegant Trim

Hello Stampers!  I made this card for the Freshly Made Sketches, Sketch of the Week:
For my card I started with the focal point.  I die cut the jingle bells out of the Matte Gold cardstock.  Then I had to decide on patterned paper, embossed paper, or a cover plate paper.  I had pieces cut up and put together so many different ways!  I decided on using a cover plate for the background that complimented the pattern of the patterned paper I chose.  I had it all put together, but I felt like it needed something more.  So I decided to heat emboss a sentiment.  For the inside of the card I heat embossed the sentiment and layered it with the patterned paper and gold cardstock.  Then I saw the jingle bell stamps in the Cherish the Season stamp set, and thought that would be nice heat embossed in the bottom corner.  And that completed my card.  

Thanks so much for stopping by!!

Terri

Blue Bird Christmas


Supplies:
Stamps: Whipper Snapper: Snowbird, Gina K: Christmas Greenery (inside)
Ink: Memento Tuxedo Black
Paper: Gina K white and SU real red
Accessories: Cuttlebug embossing folder, Honey Bee Stamps: clear gem stickers, Copic markers, Hero Arts: Square Infinity Dies

Hello Stampers!  I made this card for the Featured Stamper challenge on Splitcoaststampers.  When I saw this card:
I thought of my Whipper Snapper: Snowbird stamp.  I stamped the image and die cut it into a square.  Then I embossed it with my Cuttlebug embossing folder.  I framed it with a real red mat, colored it in with Copic markers, added some clear gems, and adhered it to my 4.25x4.25 card base.  For the inside I die cut a square and embossed it with the same embossing folder as the front.  I used my Misti to stamp a sentiment in the inside.

That's all for now, thank you for stopping by!
Terri

Sunday, December 3, 2023

Gnomie Christmas Card


Supplies:
Stamps: Kraftin' Kimmie Stamps: Holiday Wishes (inside)
Ink: VersaMark
Paper: Gina K white, SU powder pink, rococo rose, real red, old olive, Simon Says Stamp: Matte silver cardstock
Accessories: silver embossing powder, Spellbinders: Gnome Drive Holiday, SU Something Fancy Dies (inside), Concord &9th Snowfall Card Front Die, Honey Bee Clear gem stickers, pom pom, Waffle Flowers A2 Layers Dies

Hey there!  I have a card to share with you that I made for the Paper Players theme challenge: Christmas.  For my card I assembled the gnome scene.  I used pink because this is for my niece.  Once I had the gnome scene assembled I die cut the sentiment.  For the background I die cut the card front, I really like that the silver peeks through the die cut card front.  Then I adhered everything together.  For the inside I heat embossed the sentiment and die cut it from a label.  I created a couple of layers for the sentiment.  And that completes my card!  

Thanks so much for stopping by!!

Terri

Sparkly Snowflakes


Supplies:
Stamps: Gina K: Scripty Holiday (inside)
Ink: SU Real Red
Paper: Gina K White, SU Real Red, Silver glitter paper
Accessories: Penny Black: Merry and Joy, Poppy: Snowflake Flurry Collage, Red gems from stash

Hello Stampers!  I made a card using the Freshly Made Sketches, sketch of the week:
For my card I started by die cutting the Snowflake Flurry Collage twice so it extended from corner to corner.  Then for the sentiment I die cut the merry out of real red paper and adhered it to the card.  To finish the card I added a couple of red gems to the center of the snowflakes.  

That's all for now!  Thanks so much for stopping by!
Terri
 

Sunflower Birthday Wishes


 Supplies:
Stamps: Honey Bee: Birthday Wishes Stamps
Ink: SU Daffodil Delight, Crushed Curry, Soft Suede, Early Espresso, and VersaFine Clair Nocturne
Paper: Gina K White, and SU Basic Black
Accessories: SU Abundant Beauty Decorative Masks, Studio Katia: Majestic Confetti, Pickett Fences: Blending Brushes, and Honey Bee: Birthday Wishes Dies

Hello Stampers!!  I'm here today to show you a card I made for the Featured Stamper challenge on Splitcoaststampers.  This week the Featured Stamper is: Karen.  She does a lot of scrapbook layouts.  I selected this scrapbook layout as inspiration for my card:

I love sunflowers, so this layout caught my eye.  For my card I stenciled on the sunflowers, and then added a die cut sentiment.  To finish the card I added a little bling.

That's all for now!  Thanks for stopping by!!
Terri

Sunday, November 26, 2023

Evergreen Christmas Card


Supplies:
Stamps: Our Daily Bread: Cardinal Ornament and SU Brightest Glow (inside)
Ink: Memento Tuxedo Black
Paper: Gina K white and SU real red
Accessories: Copic Markers, SU Real Red Ribbon, SU embossing folder, and Waffle Flower Additional Circle Die

Hello Stampers!  I made this card for two challenges: Featured Stamper Challenge on Splitcoaststampers and the CAS Challenge on Splitcoaststampers (winter foliage).  Here is my inspiration challenge card:
For my card I had the same focal image, I colored it with Copic markers.  And I die cut it with the Waffle Flower Additional Circle Dies.  For my embossing I used an evergreen embossing folder, and matted it with real red cardstock.  I also included a red ribbon treatment at the bottom of my card.  For the inside of the card I partially embossed the top of my panel and stamped a sentiment.

That's all for now!  Thanks for stopping by!
Terri

Sunday, November 19, 2023

Warm Christmas Blessings


Supplies: 
Stamps: Simon Says Stamp: Christmas Blessings and SU: Brightest Glow(inside)
Ink: VersaMark and SU Evening Evergreen
Paper: SU Evening Evergreen, Very Vanilla, Daffodil Delight and Memory Box Jolly Christmas 6x6 paper pad
Accessories: Simon Says Stamp: Christmas Blessings Dies, Honey Bee Stamps: Winter Bouquets Honey Cuts, Simon Says Stamp: gold embossing powder

Hello Stampers!  I made this card using the Freshly Made Sketches sketch of the week:
For my card I started by picking out some patterned paper for the background of the card.  From there I die cut my candles and flames to match the patterned paper. I adhered these candles to the patterned paper, popping up one of the candles to add some dimension.  For the sentiment I wanted to pick up some of the gold in the patterned paper, so I heat embossed the sentiment and die cut it.  I popped the sentiment up also.  For the inside I die cut a candle from the patterned paper, and stamped a sentiment on the inside to complete the card.

Thank you so much for stopping by!!  
Terri

Merry And Bright


Supplies:
Stamps: Penny Black Ode to Christmas and Gina K Blessed is the Season
Ink: Memento Tuxedo Black and SU Gray Granite
Paper: Gina K white and SU gray granite
Accessories: Penny Black Snowflake Stitch Frames and red gems

Hello Stampers!  I'm here to share the card that I made for the Featured Stamper challenge on Splitcoaststampers.  Here is the card that I selected for inspiration:

I kept the same square layout, but I changed the focal image to a bird.  To make my card I stamped and die cut the focal image.  I added some red gems to the branches, matted the focal image with gray granite cardstock, and adhered it to the card base.  For the inside I stamped, die cut, and adhered the sentiment layer to a piece of gray granite cardstock.  To finish this card I adhered this to the inside of my card. 

That's all for now!  Thanks for stopping by!
Terri 


Sunday, November 12, 2023

Graceful Snowflake


Supplies:
Stamps: Gina K Blesses Is the Season, SU Cherish the Season (inside)
Paper: Gina K white and kraft
Ink: Gina K White Pigment Ink and Memento Tuxedo Black
Accessories: Gina K Graceful Snowflake Stencil, Honey Bee Clear Gems, Simon Says Stamp Sponge Applicators

Hello Stampers!  I'm back to share a card that I made for the Featured Stamper challenge.  This week's Featured Stamper is Laura, and this is my inspiration card:

For my card I kept the same cardstock, but I chose to stencil the snowflake instead of die cutting the snowflake.  After I stenciled the snowflakes for the inside and outside I let them dry for about an hour.  Then I used my stamp a ma jig to stamp the sentiment.  To finish the snowflake I added some gems, I just kept adding them and adding them LOL.  I may have gone a bit overboard.  Then I simply stamped the inside and that completed my card!  

Thanks so much for stopping by!!
Terri


Sunday, November 5, 2023

Flying By


Supplies:
Stamps: Lawn Fawn: Flying By and Happy Everything (inside)
Ink: Memento Tuxedo Black
Paper: Gina K white and Simon Says Stamp Fog
Accessories: Lawn Fawn Flying By Dies, SU Dimensionals

Hello Stampers!!  I'm back to share a card I made for the Freshly Made Sketches, sketch of the week:
This card turned out way different from what I had planned to do.  When I went to make the card I was going to do butterflies for the circles, but the butterflies that I had were too big.  So I started looking through my supplies, and got out my Lawn Fawn basket.  I knew there had to be something in there for this sketch.  That's when I came upon this Flying By set, and I knew that it was the perfect choice.  I cut a piece of fog cardstock and got started.  I stamped and die cut the paper airplanes, and placed them on the fog cardstock.  Then I got out my Misti and stamped the trails and the sentiment.  Next I adhered the paper airplanes onto the fog cardstock, popping up the large paper airplane.  For the inside I stamped the happy birthday and added a couple paper airplanes.  

That's all for now!  Thanks for stopping by!!
Terri

Saturday, November 4, 2023

Snowy


Supplies:
Stamps: Penny Black Snowy, SU Framed and Festive (Inside)
Ink: Memento Tuxedo Black
Paper: SU Evening Evergreen, Gina K white and chocolate kiss, Paper Cut Sno Cone
Accessories: Poppy: Iced Pine Trees, SU Labels Aglow Dies, Penny Black's Frosty's Snow die cut, Copic markers, SU Stitched Snowflakes Dies (Inside)

Hello Stampers!  I'm back to share a card I made for the Featured Stamper challenge on Splitcoaststampers.  This week's Featured Stamper is Korimou and this is the card I CASED.
This card caught my eye because I have the same stamp!  For my card I stamped, colored, and die cut the snowman.  Then I die cut the top of my card base with the SU Labels Aglow die.  From there I tore some snowy hills, and tucked in some die cut pine trees and the snowman.  For the inside I cut a white card panel so the white would show through to the die cut top of the card, and die cut it with another die from the SU Labels Aglow dies.  Then to finish the inside I stamped the sentiment and adhered this panel to the inside of the card.

That's all for now!! Thanks for stopping by!!
Terri

Snow


Supplies: 
Paper: Gina K white and kraft, SU cherry cobbler and mossy meadow, Simon Says Stamp fog
Accessories: Lawn Fawn Stitched Snowflake Backdrop, Tim Holtz Snow Sidekick Side-Order dies, Honey Bee Gems, May Arts Twine

Hello Stampers!  I went to a Stamp and Scrap Rummage this morning, and I just had to make a card with some of the goodies I got.  The Free 4 All challenge on Splitcoaststampers is: Word Dies, and one of the sets I got had a word die!!  So I started by die cutting the mitten, snowflake, and hat.  Then I cut three squares of kraft paper and embossed them.  I adhered the die cuts to the squares, and then I adhered the squares to the cherry cobbler strip of cardstock.  I left some room to the left to add some twine.  Then I die cut the snowflake background, and adhered it to the card base.  Next I adhered the cherry cobbler strip.  Then it was onto the word die.  I die cut snow three times and adhered them together and then to the card.  For the inside I die cut the same snowflake background, added some white cardstock matted on cherry cobbler and adhered this to the inside of the card.  I die cut another mitten and hat to embellish the inside.  And that completes this card.  
Thanks for stopping by!!
Terri


Monday, October 30, 2023

Pumpkin Hello!


Supplies:
Stamps: SU Rustic Crate, Thinking of You (inside, unknown)
Ink: Memento Tuxedo Black
Paper: Gina K white and SU Crumb Cake
Accessories: Spellbinders Square Nestabilities, SU Rustic Crate Dies, SU Linen Thread, Cuttlebug embossing folder (inside), Copic Markers

Hello Stampers!  I'm back with a card that I made for the Clean and Simple Challenge on Splitcoaststampers.  The theme of the challenge is: Pumpkin Everything!  I've had this Rustic Crate stamp set on my desk for awhile and I was going to put it away, and then I saw this challenge.  I love this fall arrangement, and was happy I could use it again.  To make my card I started with a square card base, and then embossed the square nestabilities die.  Next I used my Misti to stamp the focal image.  I colored in the image with Copic markers, and then die cut the hello three times and stacked them together before adhering it to my card.  To finish off the front I added some linen thread at the top with a bow.  For the inside I kept it simple, so a note could be written.  I embossed the border and stamped the sentiment, and I was done.

That's all for now!!  Thanks for stopping by!!
Terri

Sunday, October 29, 2023

Happy Birthday To You!


Supplies:
Stamps: SU Rustic Crate and Label Love, Honey Bee Birthday Wishes (inside)
Paper: Gina K White and SU Crumb Cake
Ink: Memento Tuxedo Black and SU Crumb Cake
Accessories: SU Rustic Crate Dies, Linen Thread, Punch, Nested Essentials Dies (inside), Designer Tags Dies (inside), Copic Markers

Hello Stampers!  It is Featured Stamper Sunday!!  Today's Featured Stamper is Anita, and this is the card I chose from her gallery to CASE.
For my card I started by stamping and die cutting the crate.  Then I added some linen thread to my crate.  Next I cut my layers.  I stamped the floral image using my Misti, and then colored it in with Copic markers.  I popped up the crate on my focal image.  Then I stamped my sentiment, punched it out, and adhered it to my card.  After I adhered my layers to the card base I stamped and die cut the inside sentiment and adhered it to the inside.  I found the sprig die cut as I was looking for something and thought this complimented the floral image on the front of the card.  And that completes this card!  

Thanks so much for stopping by!!
Terri
 

Thursday, October 26, 2023

Driving By To Say Happy Birthday


Supplies:
Stamps: SU Driving By and Because You Care (inside)
Ink: Memento Tuxedo Black and VersaMark
Paper: SU Real Red, Basic Black, and Zoo Crew 12x12 DSP, Gina K white
Accessories: Gina K Large Rectangle Die Set and Master Layouts 4, Brutus Monroe Alabaster White Embossing Powder, Copic Markers, and SU dimensionals

Hello stampers!  I'm back to share the birthday card that I made for my nephew.  He will be 19 on Halloween!!!  I used the sketch from Freshly Made Sketches.
To make my card I started with picking out the DSP.  I chose the black DSP because I thought it looked like tire marks on the road.  Then I decided I wanted the car to be red so I made a red card base, and matted the DSP with black paper. For the focal image I stamped, die cut, and colored it in with Copics.  Then I heat embossed the sentiment and die cut it with a banner from Gina K's Master Layouts 4. and adhered them to the focal image.  To finish the front I popped up the focal image.  I kept the inside simple.  I stamped, die cut, and matted the sentiment and adhered it inside the card. 

That's all for now!  Thanks so much for stopping by! 

Terri

Sunday, October 22, 2023

Wintery Christmas


Supplies:
Stamps: Gina K Scripty Holiday, SU Brightest Glow (inside)
Paper: Gina K white, SSS Matte Silver Cardstock
Ink: VersaMark
Accessories: SU Simply Elegant Trim, Rubbernecker Deckle Hills, Ranger Silver Embossing Powder, SU Labels Aglow Dies (inside), Poppy Nordic Whimsy Trees, SU Snowflake Sky Embossing Folder

Hello Stampers!  I'm sharing a card I made for the Featured Stamper challenge on Splitcoaststampers.  The featured stamper is Pat and this is the card I chose from her gallery to CASE.

 For my card I die cut the trees and the deckle edge hills, and arranged them as my focal image.  Then I partial embossed the top of the card panel, stamped my sentiment, and added some silver cording to the bottom of the card.  I matted it with some silver cardstock and then adhered it to the card base.  For the inside I heat embossed the sentiment and die cut it with the label die.  And then I had a couple of extra trees so I adhered them to the inside as well.

That's all for now!  Thanks for stopping by!!

Terri