Sunday, December 11, 2022

Autumn Silhouette


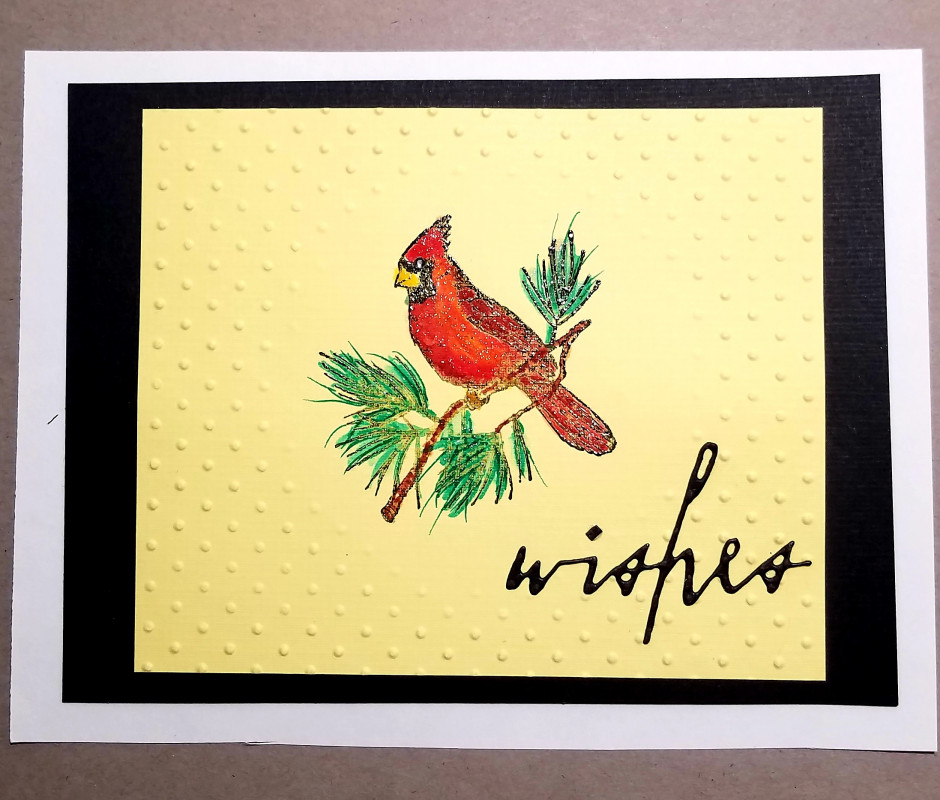
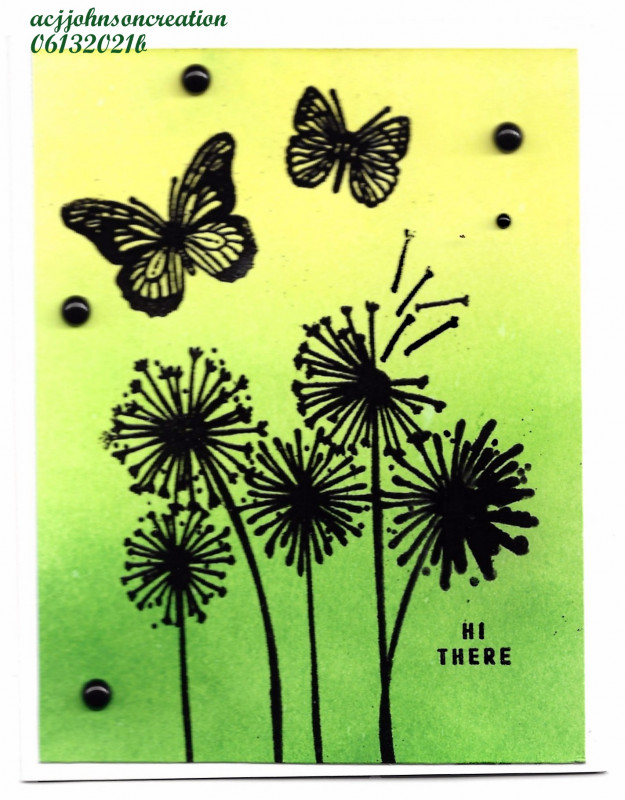
Supplies: Stamps: Gina K Autumn Silhouettes Paper: Gina K: Heavy Base Weight White and Black Ink: Distress Ink: Wild Honey, Seedless Preserves, Mustard Seed, Spiced Marmalade, VersaFine Clair Nocturne Accessories: Stampin' Up: Wonderful Gems, Simply Elegent Trim, Needlepoint Elements Framelits Dies, Pickett Fences Blending Brushes

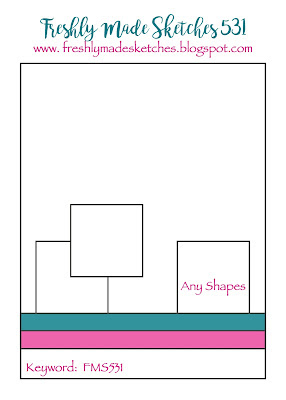
Hello Stampers!  I made this card using Freshly Made Sketches sketch of the week.
I decided to take a break from Christmas cards and go with a fall theme for this card.  I started by blending my background.  Then I used my Misti to stamp the silhouette image.  I matted this blended piece with black cardstock.  For the sentiment I stamped and die cut it, and attached it to the card.  To separate the focal image from the sentiment I added some gold twine.  And then I added some sparkle to my focal image by adding some gold sparkly gems to finish the card.

Thanks so much for stopping by!!

Terri

Christmas Stocking


Supplies: Stamps: Stampin' Up Tidings and Trimmings Ink: VersaMark and Stampin' Up Cherry Cobbler  Paper: Gina K Heavy Base Weight White, Green from my stash, Stampin' Up Sahara Sand, Stampin' Up Tidings of Christmas 6x6 DSP Accessories: Stampin' Up Christmas Trimmings Dies, Stampin' Up Linen Thread, Brutus Monroe Alabaster White Embossing Powder

Hello Stampers!  I made this card for the Featured Stamper challenge on Splitcoaststampers.  This week's Featured Stamper is Gerry and this is the card I chose to CASE.


I kept the layout the same I just flip flopped it because my stocking was going the opposite way.  To make this card I got all of my layers cut out, and glued on the paper strips.  I heat embossed and die cut my stocking, and adhered it to the card.  I added a double linen thread bow to the stocking and stamped the sentiment.   

That's all for now, thank you for stopping by!

Terri

Friday, December 9, 2022

Country Santa


 Supplies: Stamps: Whipper Snapper Designs: Country Santa  Ink: Memento Tuxedo Black  Paper: Stampin' Up Cherry Cobbler, and Gina K Heavy Base Weight White and Kraft  Accessories: Gina K large and small set rectangles, Essentials by Ellen Twirling Flurries, Stampin' Up Stitched Snowflake Dies, Offray gingham ribbon, Stampin' Up Linen Thread, gems, Prismacolor colored pencils, Gamsol, blending tools


Hello Stampers!!  I made this card for the Paper Players Challenge: Ho! Ho! Ho! feature a Santa on your project.  To make this card I started with a Kraft top folding card base.  Then I cut a piece of Cherry Cobbler and die cut it with the Twirling Flurries cover plate.  After I did this I noticed that there were some small circles cut out, so I put a piece of white cardstock behind the Cherry Cobbler.  For the focal image I stamped my Santa and die cut it with the double stitched rectangle.  Then I used a stitched snowflake and partial die cut these in opposite corners.  Next I colored in my Santa with Prisma Colored pencils and blended it with Gamsol, and die cut a rectangle from Kraft paper to frame it.  Adding my ribbon treatment was next.  I added the gingham around the card, and added a linen thread double bow.  To complete the card I adhered the Santa with dimensionals to the Cherry Cobbler panel, and then the Cherry Cobbler panel to the card base.  

Thanks so much for stopping by!
Terri

Sunday, December 4, 2022

Believe


 Supplies: Stamps: unknown  Ink: VersaMark, VersaFine Clair Nocturne, Distress Inks: Salty Ocean, Prize Ribbon, Chipped Sapphire, Wilted Violet Paper: Gina K Heavy Base Weight White, Hero Arts Pitch Black Accessories: 5/8 inch circle punch, masking paper, Stampin' Up twine, Memory Box Country Landscape, blending brushes, Brutus Monroe Alabaster White Embossing Powder

Hello Stampers!  I made this card for the Featured Stamper challenge on Splitcoaststampers.  This week's featured stamper is Pat, and this is the card I chose from her gallery to CASE.

To make my card I started with at 4.25x4.25 card base, because my elements were smaller than the featured stamper's card.  Next I cut a piece of white card stock to 4x4.  After this I die cut the country landscape out of black and laid it down on the 4x4 piece of cardstock.  I lightly traced the country landscape so I knew where to start blending the purple.  Before blending I cut out a circle for the moon and placed it on the 4x4 piece of card stock.  I started blending at the bottom with the purple and then blended a couple of blue shades for the night sky.  I blended lightly around the moon so there would be a glow around the moon.  After I was done blending a splattered some water onto the blended areas.  I let this dry while I stamped and heat embossed the sentiment in white.  I adhered the the landscape to the focal panel and added some black and white twine. Then I used my Stamp a ma Jig to stamp the flying Santa.  To finish the card I adhered the focal panel to the card base.  

That's all for now!  Thanks so much for stopping by!!

Terri

Saturday, December 3, 2022

Happy Holidays


Supplies: Stamps: Stampin' Up Itty Bitty Christmas  Ink: Memento Tuxedo Black  Paper: PaperCut Sno Cone and Gina K Heavy Base Weight White  Accessories: Stampin' Up Linen Thread, My Favorite Things Die-namics Snowdrifts Gina K Master Layouts 3, Essentials by Ellen Alpine Snowfall, Impression Obsession Dies: DIE117-C and DIE079-U, Waffle Flower Additional A2 Layers, Simon Says Stamp Birch Circle


Hello Stampers!  For today's card I participated it two challenges.  The first one is the sketch at Freshly Made Sketches.  For the two elements on the upper left I used cardinals, and for the element on the bottom right I used a deer.  And the second challenge is the Inspiration Challenge on Splitcoaststampers.  I found the color palette below to use on my card.  

As I was making this card I felt like I kept adding more and more die cuts! LOL!  I knew I wanted the cardinals, birch circle, and deer as the elements, but as I started putting it together I realized that the deer needed some snow to be standing on, there should be a sky colored background, and then I thought the sky should have some snowflakes!    

So to make the card I decided to start with the birch circle.  I die cut it and then used the A2 die to cut it out.  Next I die cut the snow drift and adhered to to the back of the birch circle.  Then I die cut the alpine snowfall and adhered it behind the birch circle.  Next I added the cardinals, deer, and sentiment.  Before I adhered the focal panel to the card base I added some linen thread and a bow to finish my card.

Thanks so much for stopping by!

Terri

Sunday, November 27, 2022

Snowflake Aglow


 Supplies: Stamps: Stampin' Up Brightest Glow Ink: VersaMark Paper: Gina K Heavy Base Weight White, Simon Says Stamp Matte Silver Cardstock Accessories: Stampin' Up Labels Aglow Dies, Stampin' Up Stylish Shapes Dies, Simon Says Stamp Rina Snowflake Die, Ranger Silver Embossing Powder, Dimensionals

Hello Stampers!  This holiday weekend I spent a lot of time in my craft room finishing up my Christmas cards!  I have them addressed, stamped, and ready to mail tomorrow!  I think this is the earliest I have ever sent out my Christmas cards.  Today's card uses the sketch over at Freshly Made Sketches.  
To make my card I started with a white card base.  Then I die cut the "glow" onto a white layer measuring 3.75x5.  I matted this with the matte silver cardstock, and it shines through my die cut "glow."  Next I found a snowflake that would fit into the circle and die cut it out of silver matte cardstock, and adhered it to my card.  Now it was time for the sentiment.  I heat embossed the sentiment and die cut it out of a label die.  I used mini dimensionals to adhere the sentiment to the card.  All that was left was to adhere my focal panel to my card base.   

That's all for now, thanks for stopping by!

Terri

Sunday, November 20, 2022

Christmas Tree

Supplies: Stamps: Hero Arts Wishing You Tree  Ink: VersaMark  Paper: Gina K Kraft, and Layering Weight White, and Stampin' Up Riding Hood Red   Accessories: Spellbinders Hemstitch Rectangles, Waffle Flowers Additional A2 Dies, Recollections Pearl Stickers, Ranger Liquid Platinum embossing powder

Hello Stampers!  It is Featured Stamper Sunday!  The Featured Stamper on Splitcoaststampers is Sarah.  Here is the card I chose as inspiration for my card:
To make my card I started with a Kraft card base.  Then I worked on the focal panel.  I did this three times before I got it!  I die cut the hem stitch die, then die cut around it with the plain rectangle die.  Next I heat embossed the tree in liquid platinum embossing powder.  I love the color of this embossing powder, it looks silvery and gold at the same time.  So pretty!  Then I added some teeny tiny pearls to the tree.  To finish the card I matted the focal panel on white so you can see the hem stitching, and then adhered this to my card base.  

Thanks so much for stopping by!!
Terri


Thursday, November 17, 2022

18th Birthday


Supplies: Stamps: PaperTrey Birthday Basics Paper: Gina K black and white, SU real red  Ink: Memento Tuxedo Black Accessories: embossing folder ?, Julie Hickey Sweet Pea Numbers die set

Hello Stampers!  The Ways To Use It challenge is to add dimension to your card.  I added foam tape to the back of my focal image to add dimension to my card.  
To make this card I started with a black card base, added a red layer, and then embossed the focal panel.  Then I worked on the focal image.  I stamped happy birthday on the focal image, and then die cut the 18th and adhered it to the focal image.  To finish the card I popped the focal image up using dimensionals.

Thanks so much for stopping by!
Terri

Sunday, November 13, 2022

Ladybug Wishes


Supplies: Stamps: Stampin' Up Little Ladybug Ink: Memento Tuxedo Black and VersaMark Paper: Stampin' Up Real Red, Gina K layering weight white, and Hero Arts Pitch Black Accessories: Gina K Master Layouts 2&4, Copic markers, Dimensionals, Brutus Monroe Alabaster White embossing powder, Stampin' Up Ladybug Dies

Hello Stampers!  I made this card using the Freshly Made Sketches, sketch of the week.
To make my card I started with a red card base.  Then I die cut the focal panel, stamped the flower, and colored it in with Copic markers.  Next I stamped, die cut, and colored in the ladybug.  I adhered the ladybug with dimensionals.  For the sentiment I heat embossed it and die cut it.  To finish the card I adhered the sentiment, and adhered the focal panel to the card base.

Thanks so much for stopping by!!

Terri

Cardinal Christmas

Supplies: Stamps: Our Daily Bread Designs: Cardinal Ornament  Ink: Memento Tuxedo Black Paper: Gina K heavy base weight white and layering weight white Accessories: Darice embossing folder, Copic markers, dimensionals, Waffle Flower: Additional circles die

Hello Stampers!  It is Featured Stamper Sunday on Splitcoaststampers!  I chose this card from the Featured Stamper's gallery.

To make my card I started with a white card base, cut the focal panel from layering weight white, and embossed it.  Then I stamped and die cut the focal image with a circle die cut.  Next I colored in the focal image with Copic markers.  To finish the card I popped up the focal image with dimensionals and adhered it to the embossed panel.

Thanks so much for stopping by!

Terri

Saturday, November 12, 2022

Merry Christmas

Supplies: Stamps: Honey Bee Joy  Paper: Gina K white, DCWV silver foil paper  Ink: SU real red  Accessories: Sunny Studio: Merry die, Stampin' Up Labels Aglow dies, dimensionals, bakers twine.

Hello Stampers!  Today there is an Inspiration Challenge (Chapters Indigo Christmas) on Splitcoaststampers. I chose the following image as inspiration for my card.  The pierced bubble pattern reminded me of the Label Aglow die.
This was a pretty simple card to make (my favorite kind.). I started with a white card base, then cut the focal panel out of white, and die cut the dotted frame.  To this I added the silver die cut merry, and used my stamp a ma jig to stamp Christmas.  To finish the focal panel I added some red and white twine.  

Thanks so much for stopping by!!

Terri

Sunday, November 6, 2022

Reindeer Cheer


 Supplies: Paper: SU crumb cake, riding hood red, early espresso, garden green Gina K white, PaperCut sno cone, DCWV silver foil Accessories: PoppyStamps: Whittle Forest Reindeer Kit, Lawn Fawn Stitched Snowflake Backdrop, Essentials by Ellen Alpine snowfall, Waffle Flowers-Additional circles dies, Lawn Fawn Stitched Hillside Borders, Bakers' Twine, red gem

Hello Stampers!  I made this card using this weeks Freshly Made Sketches sketch.  
To make this card I started with a crumb cake card base.  For the two panels I die cut the Lawn Fawn stitched snowflake backdrop. For the focal panel there was a lot of die cutting.  I started with the alpine snowfall in sno cone.  Then I die cut a white circle to put behind the alpine snowfall piece.  Then I die cut the reindeer and tree and adhered it to the focal piece. I wrapped the bakers twine around the card base, and then adhered the focal panel with dimensionals.  And to finish the card I adhered a bow to the bakers twine.  This was a fun card to make, I love all of the die cutting!!
Thanks for stopping by!!

Terri

Wreath Christmas


Supplies: Stamps: SU Wondrous Wreath, SU Peaceful Wreath  Ink: Memento tuxedo black Paper: real red and white Accessories: Copic markers, SU real red ribbon

Hello Stampers!  It is time for the Featured Stamper Challenge on Splitcoaststampers.  Here is the card I chose as inspiration for my card.  
For my card I cut a red card base, and a white focal panel.  I stamped and colored the wreath with Copic markers.  To finish the card I added a ribbon treatment and a sentiment.

Thanks so much for stopping by!!
Terri


Sunday, October 30, 2022

Graveyard Greetings


 Supplies: Stamps: Taylored Expressions: Simply Said-Halloween Paper: Gina K white and black cardstock and Pebbles 6x6 Midnight Haunting paper pack, and silver foil cardstock Ink: Memento tuxedo black Accessories: Cottage Cutz-Graveyard Border and Gina K stitched oval dies

Hello Stampers!  I spent the day in my craft room making Halloween cards, and a birthday card for my nephew who is turning 18!  This card was inspired by a card my mom sent me.  I will try to link it.  

I started with a black card base.  Then I worked on the white layer.  First I die cut an oval in the center of the white layer.  I also die cut the stitched oval frame and adhered to the white layer.  I used my stamp a ma jig to stamp the sentiment at the bottom of the white layer.  To finish the card I die cut the oval from the starry night paper.  Then I die cut the graveyard and added silver foil paper behind the windows of the graveyard die cut, and adhered it to the starry night paper.  I lined up the starry night oval to match the oval from the front of the card and adhered it to the inside of the card.  

That's all for now! :)

Terri

Sunday, October 23, 2022

Gnome Halloween


Supplies: Stamps: Stampin' Up Good Greetings Paper: SU daffodil delight and mango melody, and Gina K white  Ink: Memento tuxedo black Accessories: Stampin' Up frosted flurry dies, twine, gnome dies, woodland embossing folder, and dimensionals

Hello Stampers!  I am sharing a Halloween card today.  The Clean and Simple challenge on Splitcoaststampers is to Pop something up.  I popped up my sentiment and that cute gnome onto my card. 

To make this card I started with an orange card base.  Next I embossed the white layer and added twine and a bow.  I adhered this to a yellow layer and adhered it to the card base.  After assembling the gnome I popped it up on the card, and I stamped and die cut the sentiment.  I popped the sentiment up as well. 

Thanks so much for stopping by!!

Terri

Sunday, October 16, 2022

Spooky Wishes

Supplies: Stamps: Pretty Pink Posh Ghost Friends  Paper: Gina K kraft, white, and black, gingham from my stash Ink: Versamark, Memento tuxedo black, white craft ink Accessories: Pretty Pink Posh Ghost Friends dies, Brutus Monroe alabaster white embossing powder, paint brush, dimensionals, copic markers

Hello Stampers...I am alive!  It has been awhile since I have made a card.  So I thought I would check out the Featured Stamper challenge on SCS.  Here is the card that I CASED.

To make my card I started by stamping a background with a couple of ghost stamps, and heat embossed them.  Then I used my white craft ink, a paintbrush, and some water to color in the ghosts, and give them a white wash effect.  Then I stamped, die cut, and colored in the focal image, and added a heat embossed sentiment.  I added a layer of gingham paper for some interest.  

Hopefully by making this card, it will be a starting point to make more cards.   I know I need to make a couple more Halloween cards, and a Halloween Birthday card for my nephew who is turning 18!  Oh my goodness kids grow up what too fast.

Take care, and thank you for stopping by!
Terri

Sunday, May 8, 2022

Heart Trio


Supplies: Paper: SU real red, Gina K white and black Accessories: Martha Stewart punch around the page heart, SU playful pets twine, Gina K Master Layouts 7

Hello Stampers!  Today's Featured Stamper on Splitcoaststampers is Kittie!  I love Kittie's style, her use of die cuts is amazing!  Here is the card I chose to CASE.

For my card I made a mini slimline.  I used the master layouts to die cut a piece of red cardstock.  Then after lots of measuring I punched out the hearts on the focal panel.  I put a piece of white cardstock behind the hearts, and tied on some black twine.  I adhered this to a black layer that I cut out using the master layouts die. Lastly I adhere the focal panel to my card base.

That's all for now, thanks for stopping by!
Terri

Sunday, May 1, 2022

Happy Anniversary


 Supplies: Stamps: Stampabilities Ink: Memento tuxedo black Paper: Gina K heavy base weight white, Stampin Up Rococo Rose, Powder Pink, Highland Heather, So Saffron Accessories: SU Rectangle Stitched Framelits Dies, SU Pierced Blooms Dies, Honey Bee Quilted A2 Cover Plate

Hello Stampers!  The theme of the Clean and Simple challenge on Splitcoaststampers is Blooms.  So I found my Pierced Bloom Dies and started die cutting some blooms.  Then I die cut the cover plate and adhered it to the card base.  Next I stamped the sentiment and die cut it with the stitched rectangle die, and adhered it to the card.  Then it was time to adhere the flowers.  And that completes my card.

Thanks so much for stopping by!  
Terri  

You've Been In My Thoughts


Supplies: Stamps: Gina K Autumn Silhouettes Ink: VersaFine CLAIR nocturne, Distress Inks: Scattered Straw, Spiced Marmalade, and Seedless Preserves Paper: Gina K heavy base weight white and black onyx  Accessories: Gina K Master Layouts 1, gems, Martha Stewart butterfly punch, Pickett Fence blending brushes

Hello Stampers!  Happy May 1st!  So excited to be that much closer to summer break.  I made this card for the Featured Stamper Challenge on Splitcoaststampers.  Here is the card I CASED.


To make my card I cut my card base, and I used the Master Layouts 1 to cut the layers of my card.  Next I chose some Distress Inks to blend the background.  Then I stamped the silhouette and sentiment using the Misti.  Lastly, I added some butterflies with gems to give the card a little sparkle.


That's all for now, thanks for stopping by!

Terri

Saturday, April 30, 2022

Birthday Wishes


Supplies: Stamps: CZ Design Love Garden Greetings Ink: Memento Tuxedo Black Paper: Melon Mambo, Daffodil Delight, and Coastal Cabana, GKD heavy base weight white Accessories: EK Success border punch

Hello Stampers!  I made this card using the sketch from Freshly Made Sketches.  
I have to admit this was a tricky challenge for me, but as I was looking through my supplies I came across my border punches.  And then everything came together.  I started by punching out the strips of cardstock.  After I had them cut into strips, which was not as easy as it looks, I picked out a sentiment.  I stamped the sentiment and then trimmed the cardstock strips to frame it.  

That's all for now! Thanks for stopping by!

Terri

Sunday, April 24, 2022

Bunny Trio

Supplies: Stampendous Happy Easter and Great Impressions (bunnies) Paper: Gina K heavy base weight white, and yellow from scraps Ink: Memento Tuxedo Black  Accessories: Copic markers and DCWV yellow twine
Hello Stampers!  I made this card for the Featured Stamper Challenge on Splitcoaststampers.  Congratulations to Vicky.  Here is the card I chose from her gallery to CASE.

To make my card I started with a 4.25x4.25 card base.  Then I stamped the bunnies and colored them in.  I used my stamp a ma jig to stamp the sentiment.  Next I wrapped some yellow and white twine around the focal panel, and added a bow.  Then I matted the focal panel with a yellow layer to coordinate with the twine, and adhered this to the card base.

Thanks for stopping by!!
Terri

Saturday, April 23, 2022

Birthday Wishes


Supplies: Stamps: Simon Says Stamp: Tiny Words, CZ Design Love Garden Greetings  Paper: Gina K heavy base weight white and black onyx Ink: VersaMark, Memento tuxedo black, Distress Ink: twisted citron Accessories: Copic markers, Waffle Flowers Additional A2 Layers Dies, Stampin Up Brushed Brass Butterflies, Brutus Monroe alabaster white embossing powder, Simon Says Stamp: sentiment labels dies, masking paper, Pickett Fence blending brush, and dimensionals

Hello Stampers!!  I am sharing a card today that I made for the Freshly Made Sketches Challenge.  Here is the current sketch:

To make my card I started with a white card base.  Then I worked on the focal panel.  I stamped the flowers, and die cut them.  I made a mask so I could ink blend the green below the flowers.  Then I colored in the flowers with Copic markers.  I added some butterflies, a sentiment, and popped up the focal panel onto the card base.  

Thanks so much for stopping by!!
Terri

Monday, April 18, 2022

Confetti Birthday


 Supplies: Paper: Gina K heavy base weight white and silver glitter cardstock Ink: Distress Inks: saltwater taffy, scattered straw, and salvaged patina Accessories: Pickett Fence blending brushes and Gina K birthday trio die cut, Waffle Flower A2 rectangle dies, Hero Arts confetti stencil pair

Hello Stampers!  I survived my first day back to school after Spring Break.  Yay!!!  I saw the theme for the CAS challenge, birthday theme, on Splitcoaststampers last night.  I immediately thought of this birthday die cut and wanted to make a card with it for the challenge.  When I got home I looked through my stencils and found this fun confetti stencil and thought that would be a perfect background with the die cut!  So I started by blending on the distress inks.  I thought it was nice that an orange and green color were created when I did my blending.  After that I die cut the focal panel with the Waffle Flowers A2 dies.  Next it was time for the greeting.  I started by die cutting the background with silver glitter paper.  Then I needed to figure out what colors I should do for the Happy and Birthday.  I swiped my saltwater taffy ink cube on top of my card stock instead of trying to find a card stock that matched, and die cut the Happy.  For the Birthday I blended scattered straw with salvage patina on my card stock, and then I die cut the birthday.  To finish the card I adhered my sentiment to the silver glitter card stock, and adhered the layers together.

That's all for now!  Thanks so much for stopping by!!
Terri

Sunday, April 17, 2022

Happy Easter!!


Supplies: Stamps: Your Next Stamp: Easter Goodie Sentiments Ink: Memento tuxedo black Paper: Gina K white and SU scraps Accessories: SU linen thread, Taylored Expressions Block Party-Bunnies and Marshmallow Bunny, Cuttlebug Swiss Dots, pom poms, dimensionals

Hello Stampers, and Happy Easter!!  Today is my last day of Spring Break....I guess now it is time for the countdown to summer.  We have about 7 weeks to go.  

For today's card I participated in the Featured Stamper challenge on Splitcoaststampers.  The Featured Stamper is Wendy and here is the card I chose to CASE. 

To make my card I started with a white card base and embossed it with the swiss dots embossing folder.  Then I cut a panel and die cut the peeps.  To finish the peeps part of the panel, I die cut each peep and added it to the card.  And of course I had to give these bunnies some cottontails.  Next I added to the card panel was the linen thread treatment, and to finish the card panel I stamped the sentiment.  Now that the card panel is done, I adhered dimensionals to the back and popped it up on the card base.  

Thanks so much for stopping by!
Terri

Saturday, April 16, 2022

Bunny Trio


 Supplies: Paper: Stampin Up daffodil delight, mango melody, white, and gray granite, Lawn Fawn: beachside 6x6 paper pad, Doodlebug 12x12 limeade swiss dot Accessories: Impression Obsession bunny dies, Lawn Fawn stitched hillside borders, Poppy Stamps: whittle sunshine and whittle clouds, DCWV black pearls, pom poms, mini dimensionals

Hello Stampers!  I'm back to share a card that I made for the Freshly Made Sketches, sketch of the week.  Here is the sketch: 
I changed the orientation of the sketch to spread out my bunnies a bit.  I used the stitched hillside dies to make the two borders of the sketch.  And then the bunnies are the three squares on the sketch.  Then I added a few die cuts to make the sky.  This was a fun card to make, I love die cuts and it seems as though I don't use them very often.  

Thanks so much for stopping by!
Terri

Tuesday, April 12, 2022

Hello!

Supplies: Paper: GKD black onyx and heavy base weight white Ink: Distress Inks: crackling campfire, carved pumpkin, and mustard seed Accessories: SU rectangle stitched framelits, SU scalloped contours dies, Impression Obsession butterflies, Create a Smile hello twice cool cuts die, Taylored Expressions gold drip drops, Picket Fences blender brushes

Hello Stampers!  I was stuck on the heating pad on Sunday, and wasn't able to participate in the Featured Stamper challenge on Splitcoaststampers.  So I thought I would make one today.  Congratulations to Gayle on being the Featured Stamper this week.  Here is the card that I got inspiration from:

To make my card I started with a white card base, and then die cut the scalloped rectangle out of black onyx cardstock.  Then I die cut a stitched rectangle and ink blended the background with Distress Inks.  I die cut the butterflies and adhered them to the background, and added some gold drip drops to the body of the butterflies.  For the sentiment I die cut it out of black cardstock and adhered it to the ink blended background.  

That's all for now, thanks for stopping by!!
Terri

Monday, April 11, 2022

Sailboat Bay


 Supplies: Stamps: Stampendous Sailboat Bay, Papertrey sentiment Paper: GKD black onyx and heavy base weight white Ink: memento tuxedo black Accessories: Copic markers, SU linen thread, dimensionals

Hello Stampers!  It is Spring Break!!!!  I'm so happy to have some time off this week.  Unfortunately I threw out my back on Friday and have been hobbling around.  I do O.K. if I stand in one spot so I decided to head back to the craft room and make a card.  Today's card is for the Clean and Simple Challenge on Splitcoaststampers.  The theme is: Nautical.  I dug out this stamp from my collection and colored it with copic markers.  I left a little extra space on the left of my focal image to add a nautical knot.  To finish the card I stamped the sentiment. 

That's all for now, thanks for stopping by!!


Terri

Sunday, April 3, 2022

Gingham Bunny Wishes

Supplies:  Stamps: Stampin' Up Circle of Spring  Paper: GKD white, SU Highland Heather, and SU Gingham Gala 6x6 DSP  Ink: SU Highland Heather Accessories:  GKD Rectangle small die set, 1 inch circle punch, 1 1/4 inch scallop circle punch, Highland Heather ribbon, Cuttlebug swiss dots embossing folder, Stampin Up bunny punch, pom pom

Hello Stampers!  It is Featured Stamper Sunday on Splitcoaststampers.  This week the Featured Stamper is Kristine.  I chose this card to CASE.
To make my card I started with a Highland Heather card base, and added a Swiss Dot layer.  Next I made the next layer with another Swiss Dots panel matted with Highland Heather.  I adhered this to the card base and added the ribbon treatment.  For the focal image I punched out the bunny, and adhered it to die cut rectangle.  I added a pom pom to the bunny.  To finish the card I added the sentiment.  It was stamped and punched out of a 1 inch circle punch, and matted onto a 1 1/4 inch scalloped circle punch.  

That's all for now!  Thanks for stopping by!

Terri